Table of Contents >> Show >> Hide
- Why This Recipe Works (A.K.A. Cookie Science Without the Boring Part)
- Ingredients for Easy Gluten-Free Peanut Butter Cookies
- Step-by-Step Recipe
- Pro Tips for Perfect Texture
- Flavor Variations (Because You Deserve Options)
- Gluten-Free Kitchen Safety (Avoiding Cross-Contact Without Becoming a Paranoid Detective)
- How to Store and Freeze
- FAQ
- Conclusion: The Cookie That Never Asks Too Much of You
- Kitchen Stories & Cookie Wisdom ( of Real-Life Experience)
Some desserts require a standing mixer, a prayer, and a tiny whisk you can’t find until you’ve already started cleaning.
These are not those desserts. These easy gluten-free peanut butter cookies are the “blink twice and they’re baked” kind
the kind you make when you want something warm, sweet, and peanut-buttery right now, with minimal dishes and maximum smugness.
Even better: the classic flourless version is naturally gluten-free (no wheat flour to begin with), which makes it a
go-to cookie for potlucks, school events, and those moments when your pantry is basically a jar of peanut butter and vibes.
Let’s bake.
Why This Recipe Works (A.K.A. Cookie Science Without the Boring Part)
Traditional peanut butter cookies usually rely on flour for structure. Flourless, gluten-free peanut butter cookies
pull off the same magic trick with a different cast:
- Peanut butter provides fat, flavor, and enough protein to give the dough body.
- Egg acts like the bouncer at a clubkeeps everything together and prevents chaos.
- Sugar sweetens, encourages spreading, and helps create those crisp edges.
- Baking soda (optional but recommended) adds lift and a lighter bite.
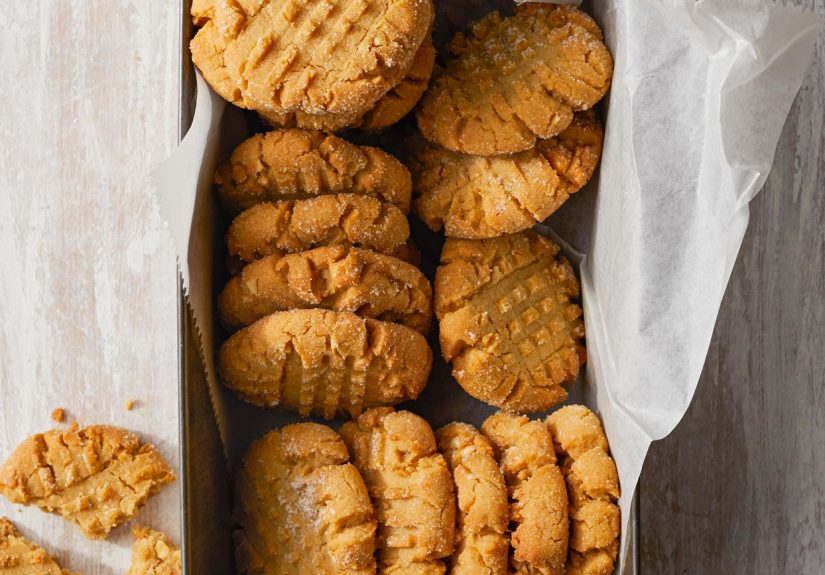
And yes, we’re doing the iconic fork crisscross. It’s not just decorationit flattens thicker peanut butter dough so it
bakes evenly and doesn’t stay a little too “raw-in-the-middle, crunchy-on-the-outside” unless that’s your love language.
Ingredients for Easy Gluten-Free Peanut Butter Cookies
This recipe aims for “easy” and “reliable,” not “I ate one and immediately planned my next one.” (Okay, it’s also that.)
The base is 3 ingredients, but two small add-ons make a big difference in flavor and texture.
The Core (3 Ingredients)
- 1 cup peanut butter (creamy or crunchy; see notes below)
- 1 cup granulated sugar (or 3/4 cup if you prefer less-sweet cookies)
- 1 large egg
The “Make It Taste Like a Bakery” Extras (Optional, but You’ll Thank Yourself)
- 1/2 teaspoon baking soda (helps the cookies rise and improves texture)
- 1 teaspoon vanilla extract (adds warmth and depth)
- 1/4 teaspoon fine salt (especially helpful if your peanut butter is unsalted)
Peanut Butter Notes (Because Not All Jars Behave the Same)
- Conventional peanut butter (like the smooth, no-stir kind) is the most consistent for cookie texture.
-
Natural peanut butter can work beautifully, but it must be stirred extremely well.
If the oil is separated, your dough can turn greasy or crumbly. (We’ll fix that in the tips section.)
Step-by-Step Recipe
Quick Recipe Card
Time: 10 minutes prep + 9–11 minutes bake
Oven: 350°F
Yield: About 18–24 cookies (depending on scoop size)
1) Preheat and Prep
Preheat your oven to 350°F. Line a baking sheet with parchment paper (or a silicone baking mat).
Parchment is optional, but it makes cleanup so easy you’ll feel like you cheated.
2) Mix the Dough
In a medium bowl, mix the peanut butter, sugar, and egg until smooth. Add baking soda, vanilla, and salt if using.
Stir until the mixture looks like thick, glossy cookie dough and not like “sweet peanut paste with trust issues.”
3) Scoop and Shape
Scoop into 1-tablespoon portions (a cookie scoop is great, but two spoons and determination also work). Roll into balls and
place about 2 inches apart.
Use a fork to press each ball down in one direction, then press again the opposite way to form a crisscross pattern.
If the fork sticks, lightly dip it in sugar or water.
4) Bake
Bake for 9–11 minutes, until the edges look set and the tops appear slightly crackled.
Do not wait for them to look “done” in the centerpeanut butter cookies finish setting as they cool.
5) Cool (Yes, This Step Matters)
Let the cookies cool on the baking sheet for 10 minutes before moving them to a rack.
Flourless cookies are tender when hot; if you move them too soon, they can break (and you’ll be forced to eat the evidence).
Pro Tips for Perfect Texture
Want Chewy Centers?
- Pull them at 9–10 minutes. They should look set at the edges but still soft.
- Let them cool completely before judging. Warm cookies lie for a living.
Want Crispier Cookies?
- Bake 1–2 minutes longer, watching closely so the bottoms don’t over-brown.
- Use a slightly smaller scoop and flatten a bit more.
If Your Dough Is Too Sticky
- Chill the bowl for 15–30 minutes.
- Or mix in 1–2 tablespoons of peanut butter (yes, more peanut butter; you’re welcome).
If Your Dough Is Too Dry or Crumbly
- Add 1–2 teaspoons of warm water and mix again.
- Make sure your egg is a full large egg, not “whatever came out of that carton.”
- If using natural peanut butter, stir it thoroughly before measuring.
Why the Fork Pattern Helps
Peanut butter dough is thicker and doesn’t spread like a buttery sugar cookie.
Flattening helps the cookie bake evenly so you don’t get an underbaked center and a crunchy exterior.
Plus, it creates ridges that brown beautifully and make the cookie instantly recognizable. (Nostalgia, but make it functional.)
Flavor Variations (Because You Deserve Options)
1) Chocolate Chip Peanut Butter Cookies
Fold in 1/2 cup chocolate chips (regular, dairy-free, or allergy-friendlyyour call).
Tip: chill the dough 20 minutes so the cookies stay thick and loaded.
2) Peanut Butter Oatmeal Version (Still Gluten-FreeWith One Important شرط)
Add 1 cup certified gluten-free rolled oats for a chewy, hearty cookie.
Oats are naturally gluten-free, but they’re often processed alongside wheatso choose certified gluten-free oats if you’re avoiding gluten.
3) Sea Salt Finish
Sprinkle a pinch of flaky sea salt on top right before baking. The sweet-salty combo tastes like you bought them at a fancy café,
and nobody needs to know you were wearing sweatpants the whole time.
4) Peanut Butter Blossoms (Gluten-Free Edition)
Roll dough balls in sugar, bake as usual, then press a chocolate kiss into the center right after baking.
The cookie will crack a littledon’t panic, that’s part of the charm.
5) Nut-Free Swap
If peanuts are a no-go, try sunflower seed butter 1:1. Note: it can sometimes turn the cookies green-ish due to a natural reaction with baking soda.
It’s harmless, just… unexpected. (Like running into your teacher at the grocery store.)
Gluten-Free Kitchen Safety (Avoiding Cross-Contact Without Becoming a Paranoid Detective)
If you’re baking for someone with celiac disease or serious gluten sensitivity, the recipe is only half the job.
Cross-contact can happen in shared kitchensespecially with “double-dipped” jars.
Quick Checklist
- Use a peanut butter jar that hasn’t been touched by gluten crumbs. (Toast crumbs are sneaky.)
- Clean counters and tools thoroughly before starting.
- Consider dedicated utensils if your kitchen regularly handles wheat flour.
- Label gluten-free condiments or keep squeeze bottles to avoid cross-contact.
- Use fresh parchment and a clean baking sheet (not the one that just hosted frozen pizza night).
This sounds intense, but it becomes second nature fastand it’s a loving detail if you’re baking for someone who needs it.
Think of it as “hosting, but with fewer crumbs.”
How to Store and Freeze
Storing Baked Cookies
Store cooled cookies in an airtight container at room temperature.
They stay their best for about 5 days. Want them softer longer? Toss in a slice of breadthe cookies steal moisture from it
like tiny delicious vampires.
Freezing Dough (My Favorite “Future Me” Gift)
Roll dough into balls, freeze on a tray until solid, then store in a freezer bag.
Bake from frozen at 350°F, adding 1–2 minutes. This is how you get fresh cookies on a random Tuesday without mixing a thing.
FAQ
Are peanut butter cookies always gluten-free?
Not always. Many classic recipes use wheat flour. Flourless peanut butter cookies are naturally gluten-free by design,
but you still need to watch cross-contact and any add-ins (like oats or chocolate) if you’re baking for someone sensitive.
Do I need gluten-free flour?
Not for this flourless version. If you prefer a more traditional, thick “bakery-style” cookie that uses a gluten-free flour blend,
you can absolutely do thatbut it’s a different recipe and usually involves butter and more steps.
Can I make these dairy-free?
Yesthis flourless recipe is naturally dairy-free as written (just check your chocolate chips or add-ins).
Can I make these egg-free?
Sometimes. Egg substitutes can work, but results vary. Applesauce or aquafaba may help bind, though texture can be softer and more fragile.
If you try it, chill the dough and let cookies cool fully before moving.
Conclusion: The Cookie That Never Asks Too Much of You
Easy gluten-free peanut butter cookies are the kind of recipe you keep in your back pocket for emergencies
like “I need dessert,” “I forgot the bake sale,” or “today was a lot.”
They’re fast, deeply peanut-buttery, naturally gluten-free in the flourless version, and endlessly customizable.
Make them classic with the fork marks, dress them up with chocolate and sea salt, or stash dough balls in the freezer like a responsible adult.
Either way, you end up with cookies that taste like comfort and smell like you’ve got your life together. (Even if you don’t. Same.)
Kitchen Stories & Cookie Wisdom ( of Real-Life Experience)
The first time I made flourless peanut butter cookies, I expected something… compromised. Like a cookie that tries really hard but
still tastes like it’s wearing a “gluten-free” name tag at a party. Instead, what came out of the oven was a legit cookie: crackly top,
toasty edges, and a center that felt like a warm peanut butter hug.
Here’s the funny part: the “easy” recipe teaches you more about baking than a fussy one. You learn quickly that peanut butter isn’t a single
ingredientit’s a whole personality. The no-stir jar is predictable and stable. Natural peanut butter is brilliant and chaotic. If you don’t stir it
like your cookie happiness depends on it, it will absolutely punish you with oily dough or crumbly cookies. But when it behaves? Incredible flavor.
The lesson: measure peanut butter after it’s fully mixed, not after you’ve scooped mostly oil and hope.
Another real-life moment: the cooling step. Every time, somebody (often me) tries to move the cookies too soon. They’re warm, they smell amazing,
and your brain says, “I have hands. I can do things.” But flourless cookies are tender when hotso they bend, crack, and sometimes collapse.
Once you accept the 10-minute cooling rule, the cookies suddenly become neat little rounds instead of delicious rubble. (Delicious rubble still counts,
but presentation matters when you’re sharing.)
I’ve also learned that these cookies are social chameleons. For a kid’s party, toss in mini chocolate chips and you’re a hero. For grown-ups,
add flaky salt and suddenly everyone’s talking about “balance” and “depth of flavor” like you opened a bakery. For holiday trays, make half plain and
half blossoms with chocolate kissesinstant nostalgia, no extra chaos. The base dough is forgiving that way; it’s basically a cookie platform.
The most meaningful experiences, though, come when you bake them for someone who really needs gluten-free. If you’ve never had to read labels or worry
about cross-contact, it can feel like a lot at first. But small choicesclean tools, safe ingredients, a dedicated peanut butter jartell someone,
“I thought about you.” I’ve watched the tension leave a friend’s shoulders when they realize dessert is actually safe for them. That moment tastes
better than any cookie.
So yes, these are easy gluten-free peanut butter cookies. But they’re also a tiny, warm reminder that good food doesn’t have to be complicated to be
generous. And if a cookie can be both low-effort and high-love, honestly, what more are we asking from life?


