Table of Contents >> Show >> Hide
- Why an Organized Chalkboard Works When “Just Put It Away” Doesn’t
- Choose Your “Junk” Base (Yes, This Is an Official Step)
- What You’ll Need (No Fancy Workshop Required)
- Step-by-Step: From Random Object to Chalkboard Command Center
- Build the Storage Side: Hooks, Ledges, and Paper Wrangling
- Layout Ideas That Actually Work
- Chalkboard Etiquette: Write, Erase, Repeat Without Ghosting
- Styling Without Sacrificing Function
- Common Mistakes (So You Don’t Invent New Cuss Words)
- Quick FAQ
- Bonus: of Real-World “This Will Happen” Experiences
- Conclusion
You know that one “special” pile in your house? The one that’s not a pile, it’s a systema system that just happens to look like a paper avalanche,
a key graveyard, and a rogue sock convention happening on the same square foot of countertop.
If you’ve ever said, “I just put my keys down,” while staring into the void like a detective in a noir film… welcome.
The good news: you don’t need more bins. You need a smarter landing zoneone that talks back (politely) and tells you where life belongs.
Enter the organized chalkboard: part message center, part wall-mounted storage, part “future me will be so grateful” magic trick.
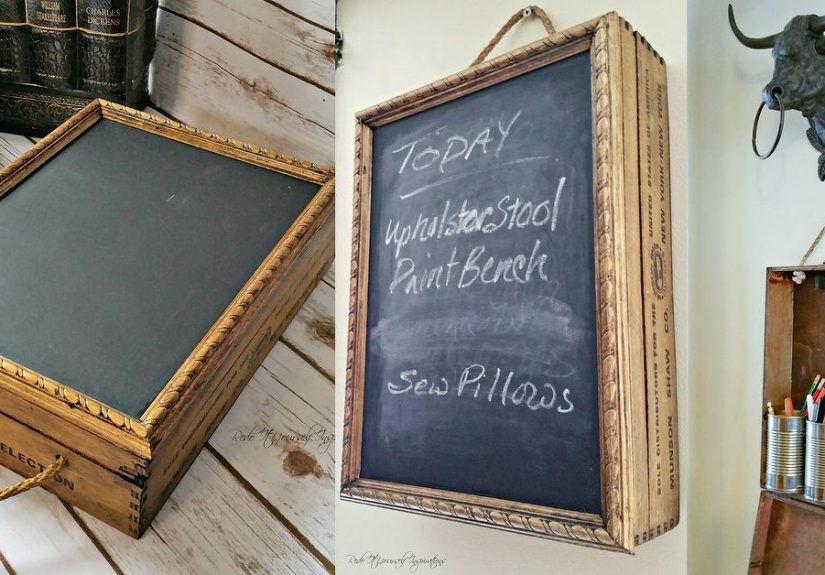
Best of all? The base material can be the kind of “junk” you already have: an old frame, a cabinet door, a scrap board, a thrift-store find that was
definitely going to become something “someday.”
Why an Organized Chalkboard Works When “Just Put It Away” Doesn’t
A chalkboard organizer isn’t just cute wall decor with handwriting aspirations. It’s a visual command center:
schedules, reminders, grocery lists, and the stuff you must grab on the way outin one place.
You stop playing hide-and-seek with your life because your life has a zip code now.
- It’s visible: notes don’t disappear into drawers where they quietly become historical documents.
- It’s flexible: today it’s a grocery list; tomorrow it’s a chore chart; next week it’s “DON’T FORGET THE COSTUME.”
- It reduces surface clutter: when mail, keys, and pens have assigned seating, your counters can stop hosting them.
Choose Your “Junk” Base (Yes, This Is an Official Step)
The base is the hero of this project. Pick something sturdy, flat-ish, and emotionally ready for a second act.
Here are the best candidates for an upcycled wall organizer:
Great Base Options
- Old picture frame: add a backing board, paint it chalkboard, and suddenly it’s “gallery wall, but useful.”
- Cabinet door: already has characterand sometimes helpful routing for shelves or hooks.
- Scrap plywood or MDF: boring in the best way. Smooth canvas, easy to customize.
- Thrifted serving tray or wall plaque: if it’s flat and hangable, it’s negotiable.
A quick reality check: if the piece is super warped, crumbly, or smells like a mystery basement, it might be better as a “nice try” story.
Otherwise, you’re good.
What You’ll Need (No Fancy Workshop Required)
This is a “minimal drama, maximum payoff” build. Gather what you have, then fill the gaps.
Core Supplies
- Base board (frame/door/wood panel)
- Cleaner/degreaser and a rag
- Sandpaper (medium + fine grit) or sanding sponge
- Primer (optional, but helpful for glossy or stained surfaces)
- Chalkboard paint (or chalkboard panel/vinyl if you prefer)
- Dense foam roller (great for smoother finishes) and a brush for edges
- Painter’s tape
- Wall hooks (keys, lanyards, dog leashchoose your chaos)
- Small shelf/ledge (for chalk, markers, sunglasses)
- Mail sorter or wall file pockets
- Mounting hardware (D-rings/French cleat/anchors rated for weight)
Optional “Level Up” Add-Ons
- Magnetic primer/paint (for turning the chalkboard into a magnetic chalkboard)
- Mini baskets or wire bins
- Label tags (chalk labels are chef’s kiss)
- Chalk markers (less dust; more crisp lines)
- Command hooks (for renters or commitment-phobes)
Step-by-Step: From Random Object to Chalkboard Command Center
1) Clean It Like You’re Mad at It
Oils, dust, and “kitchen air” are paint’s worst enemies. Wipe everything down thoroughly.
If your base lived near cooking, clean twiceonce for grease, once for your dignity.
2) Sand for Adhesion (Not for Emotional Healing, Sadly)
You don’t need to sand to bare wood in most cases. The goal is to scuff glossy finishes so primer/paint can grab.
Wipe away dust after sanding. If the item is very old and has older paint, use safe sanding practices and avoid creating dust you don’t want to breathe.
3) Prime If Needed
Primer helps if you’re painting over glossy surfaces, stains, or anything that seems determined to sabotage you.
Let it dry fully, then lightly sand the primer for a smoother chalkboard finish. (Yes, it’s an extra step. No, you won’t regret it.)
4) Paint the Chalkboard Surface (Thin Coats = Thick Confidence)
Stir your chalkboard paint well. Use a dense foam roller for light, even coats.
Don’t press hard and don’t over-rolllet the paint level out. Apply 2–3 thin coats, letting each coat dry per the label directions.
If you see roller texture, lightly sand between coats once dry, then wipe clean.
5) Optional: Make It Magnetic
If you want a magnetic chalkboard, apply magnetic primer/paint first, then chalkboard paint on top once it dries.
A practical tip: stronger magnets (like rare-earth magnets) tend to hold better through paint layers.
The result is perfect for pinning permission slips, takeout menus, and that one coupon you swear you’ll use.
6) Let It Cure, Then “Season” the Board
This is the step people skipand then they wonder why their first message haunts the board forever like a polite ghost.
Once fully dry and cured (follow your product guidance), rub the side of a piece of chalk over the entire surface,
then wipe it off. This conditions the board and helps prevent “shadow writing.”
Build the Storage Side: Hooks, Ledges, and Paper Wrangling
The chalkboard is the brain. The storage is the muscle. This is where your organizer becomes a real home command center.
Hooks: The Key to Not Losing Your Keys
- Keys: 1 hook per regular key set, plus 1 “spare” hook for guests or the key you’re “temporarily” holding.
- Leash: keep it low enough to grab quickly, high enough that it doesn’t become a tripping hazard.
- Bag straps/lanyards: use sturdier hooks if you hang anything heavy.
Mail Sorting That Doesn’t Turn Into a Paper Museum
Use wall file pockets or a slim mail sorter. Keep it simple:
IN (unopened), OUT (to mail/return), and FILE (to handle once a week).
Add a pen cup or clip-on holder so you’re not hunting for something to sign with five minutes before leaving.
Add a Mini Ledge
A narrow shelf is the secret MVP. It holds chalk, a small eraser, chalk markers, or even sunglasses.
If you have kids, consider a tiny bin for “homework tools” so the organizer doesn’t become “the place where pencils go to vanish.”
Charging Without the Cord Spaghetti
If this is a family command center, it probably needs a charging plan.
Add a small shelf for a charging block and use adhesive cord clips to route cables neatly.
(A charging station that looks like a sea creature is still a sea creature.)
Layout Ideas That Actually Work
Design matters because this thing has to live with younot just look good for the “after” photo.
Pick one of these proven setups and adjust for your space.
1) Entryway Drop Zone Organizer
- Chalkboard: “Today” reminders + quick notes
- Hooks: keys, leash, hats
- Mail pockets: IN/OUT
- Ledge: chalk + sunglasses
2) Kitchen Menu + Grocery Board
- Chalkboard: weekly menu on the left, grocery list on the right
- Magnetic area: recipes, coupons, school flyers
- Small bin: takeout menus (limit this bin or it will become a novel series)
3) Homework + After-School Hub
- Chalkboard: assignments + due dates
- Hooks: backpacks, sports bags
- Basket: permission slips + forms that need signatures
4) Craft Room / Garage Mini Tool Board
- Chalkboard: project steps, measurements, supply list
- Hooks: scissors, tape, small tools
- Label system: chalk labels on bins for fast resets
Chalkboard Etiquette: Write, Erase, Repeat Without Ghosting
A chalkboard organizer should be easy to update. A few habits keep it looking fresh:
- Condition first: season the board before the first real use to reduce staining and “shadow” text.
- Use the right eraser: microfiber cloths or a felt eraser work well; a slightly damp cloth helps for deep cleans.
- Go easy on liquids: don’t soak the board; moisture is helpful, but puddles are not.
- Chalk vs. chalk markers: chalk is classic; markers are crisp. If you use markers, confirm your paint surface handles them well and test in a corner.
Styling Without Sacrificing Function
Yes, your organized chalkboard can be pretty. But pretty is a bonus; functional is the job.
Here are low-effort style upgrades that don’t break the system:
- Frame it: thrifted frames turn a plain board into a statement piece.
- Use one accent color: paint the frame or shelf in a color that matches your entryway or kitchen.
- Keep the handwriting readable: if it looks like a ransom note, your family will ignore it out of fear.
- Limit “decor clutter”: one small plant or photo is cute; six is just more to dust.
Common Mistakes (So You Don’t Invent New Cuss Words)
Mistake: Painting Thick Coats
Thick coats dry unevenly and show roller marks. Thin coats are smoother and tougher.
Mistake: Skipping Cure Time
“Dry to the touch” is not “ready for chalk warfare.” Let it cure properly or you’ll scratch, smear, and regret.
Mistake: Overbuilding the Organizer
If you add hooks, bins, a calendar, a shelf, a charging station, and a spot for your hopes and dreams,
it becomes heavy, visually busy, and hard to maintain. Start with essentials; expand only if needed.
Mistake: Weak Mounting Hardware
Storage + chalkboard + mail = weight. Use anchors rated for the load (or mount into studs).
Your wall should not have to “learn a lesson” the hard way.
Quick FAQ
Where should I hang an organized chalkboard?
Put it where your life naturally lands: near the entryway, mudroom, kitchen traffic path, or the spot where you always drop mail.
Convenience beats “perfect aesthetic corner” every time.
How big should it be?
Big enough for real notes, small enough to maintain. For many homes, a board roughly the width of a torso works well:
you can see it, use it, and not feel like you installed a chalkboard billboard.
What if I rent?
Use a lighter base, minimal add-ons, and renter-friendly mounting strips or hooks rated for weight.
Keep storage lightweight (keys, mail, small notes) instead of heavy bags.
Is magnetic primer worth it?
If you love pinning paper reminders where you can’t ignore them, yes.
If you mostly write lists and don’t care about magnets, skip it and keep the build simple.
How do I keep it from becoming clutter again?
Give it a reset routine: 2 minutes a day (erase outdated notes) and a 10-minute weekly “paper purge.”
The board is a tool, not a museum exhibit.
Bonus: of Real-World “This Will Happen” Experiences
Let’s talk about what usually happens after the paint driesbecause that’s when the organizer starts living a real life.
First, there’s the honeymoon phase. You write your grocery list in crisp chalk letters. You hang the keys on the hooks like a responsible adult in a commercial.
You step back and think, “Wow. I have my life together.” Enjoy that moment. It’s wholesome.
Then reality wanders in holding a handful of mail and an energy drink. The first challenge is always paper volume.
Even the best mail sorter can’t save you if you treat it like a paper hotel where guests check in and never leave.
The trick is to make “IN” a temporary holding zone, not a permanent address. Most households do better with fewer categories:
one slot for “needs action,” one for “file/keep,” and a ruthless plan for recycling.
Next comes the marker vs. chalk debate. Chalk is classic, but it can dust up the ledge and drift onto anything below like a tiny snowstorm.
Chalk markers look amazinguntil you realize not every surface loves them equally. The safest play is to test whatever you plan to use in a discreet corner first.
You’ll save yourself from the dramatic scrubbing session that makes you question every decision that led you here.
Another common moment: you’ll discover the organizer is only as good as its placement.
If you hang it where you wish you dropped your stuff instead of where you actually do, it becomes wall art with responsibilities.
Put it where your keys already attempt to live. Let your habits lead; don’t try to out-stubborn your own routine.
Finally, there’s the “more features!” temptation. A basket! A second shelf! A third hook row! A tiny chalkboard for the chalkboard!
It’s understandablethis project is fun. But every add-on increases weight and maintenance.
The most successful organized chalkboards stay slightly boring: they do the same few jobs every day, reliably.
If you want to expand later, do it only after a week or two of real use. That way, you’ll add what you actually need,
not what looked adorable at midnight while scrolling DIY photos.
Conclusion
Turning “junk” into an organized chalkboard isn’t just a craft projectit’s a small home upgrade that pays you back daily.
You get a cleaner entryway, fewer lost keys, less paper chaos, and a simple place for reminders that won’t vanish into the void.
Keep it practical, let it match your routines, and give it a quick weekly reset. Your future self will be smugin the best way.


