Table of Contents >> Show >> Hide
- What Does It Mean to Blanch Almonds?
- Why Blanch Almonds in the First Place?
- How to Blanch Almonds: 8 Steps
- Common Mistakes to Avoid When Blanching Almonds
- What Can You Make With Blanched Almonds?
- How to Store Blanched Almonds
- Do You Need to Blanch Almonds Every Time?
- Kitchen Experiences: What Blanching Almonds Is Really Like
- Conclusion
- SEO Tags
If you have ever looked at a recipe and noticed the words blanched almonds, you may have reacted the way many home cooks do: with confidence at first, followed by a quiet, suspicious whisper of, “Cool… but what does that actually mean?” The good news is that blanching almonds is not fancy culinary wizardry. It is simply the process of loosening and removing the brown skins from whole almonds using hot water.
That is it. No culinary degree required. No tiny chef hat required either, though I will not stop you.
Learning how to blanch almonds is useful for more than checking off a recipe step. Skinless almonds are smoother in texture, lighter in color, and often better for delicate desserts, almond paste, marzipan-style fillings, sauces, and homemade almond flour. They also look cleaner and more polished in recipes where the darker skin would stand out like a plot twist no one asked for.
In this guide, you will learn exactly how to blanch almonds in 8 easy steps, plus when to do it, what mistakes to avoid, how to dry and store the almonds afterward, and what to make once you have a bowl of freshly blanched almonds staring at you like eager little overachievers.
What Does It Mean to Blanch Almonds?
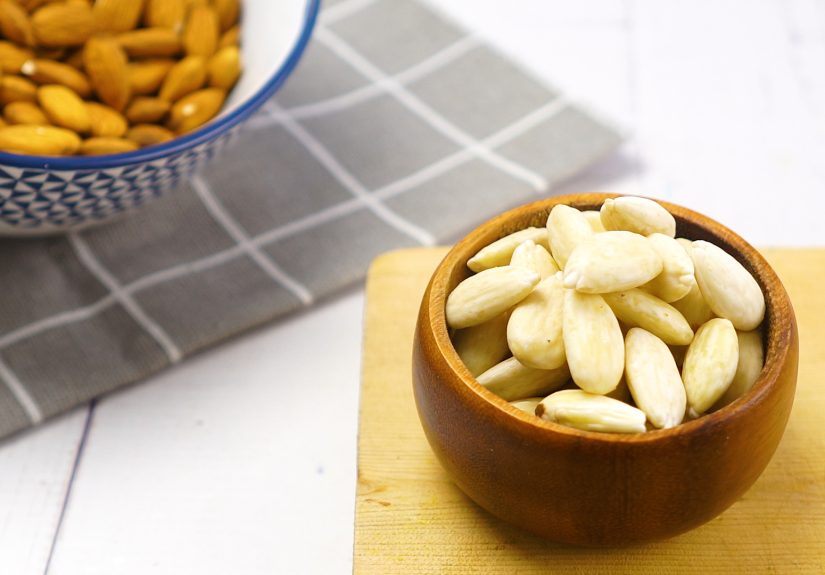
Blanching is a quick cooking technique that briefly exposes food to boiling water and then cools it down. In the case of almonds, the goal is not to cook them all the way through. The goal is to loosen the thin brown skin so it slips off easily.
Once peeled, the almonds are called blanched almonds. They are often used in baking because they produce a finer texture and a paler color than unblanched almonds. That matters in recipes like almond cake, macarons, almond paste, marzipan, frangipane, and certain cookies where appearance and mouthfeel are part of the magic.
Why Blanch Almonds in the First Place?
There are several good reasons to remove almond skins. First, blanched almonds look cleaner and more uniform in finished dishes. Second, they create a smoother texture when ground into almond flour or almond paste. Third, some cooks prefer them in delicate baked goods because the skins can add specks, slight bitterness, or a more rustic texture.
In other words, blanching almonds is the difference between “cozy homemade” and “bakery-case polished.” Both are lovely. One just wears nicer shoes.
How to Blanch Almonds: 8 Steps
This method works best with whole raw almonds. If your almonds are already roasted or salted, put them back in the pantry and save yourself the heartbreak. Those are snack almonds, not blanching almonds.
Step 1: Gather your almonds and tools
You only need a few basics: whole raw almonds, water, a saucepan or kettle, a heat-safe bowl or pot, a colander, and a clean kitchen towel or paper towels. A bowl of cold water can also help cool the almonds faster, especially if you are making a large batch.
Keep your setup simple. This is not the time to turn the kitchen into a television cooking competition. You are removing almond skins, not auditioning for a dramatic soundtrack.
Step 2: Bring water to a boil
Fill a small pot with enough water to cover the almonds and bring it to a boil. You do not need a giant stockpot unless you are planning to blanch enough almonds to supply a pastry shop.
A steady boil is important because the heat is what loosens the skins. The water should be properly hot, not lukewarm, not “getting there,” and definitely not “vaguely optimistic.”
Step 3: Add the almonds for a very short time
Once the water is boiling, add the almonds and let them sit in the hot water for about 1 minute. Some cooks prefer pouring boiling water over almonds in a bowl and letting them stand for a minute; others briefly boil them in a saucepan. Either way, the key detail is the same: do not leave them in too long.
If almonds stay in hot water too long, they begin to soften instead of simply loosening their skins. That means less crunch, more frustration, and a higher chance of ending up with almonds that feel like they attended a spa retreat instead of a prep session.
Step 4: Drain immediately
Pour the almonds into a colander as soon as the minute is up. Do not wander off to answer a text, reorganize your spice drawer, or admire your own efficiency. The timing matters.
Draining promptly stops the hot-water phase before the almonds soften too much. If you are wondering whether thirty extra seconds matters, the answer is yes. Almonds are not dramatic, but they are sensitive.
Step 5: Rinse or cool the almonds
Run the drained almonds under cold water or transfer them to a bowl of cool water for a moment. This makes them comfortable to handle and helps halt the blanching process.
You do not need a long ice bath here unless you are doing a big batch. A quick cool-down is usually enough. The goal is simple: stop the heat and avoid turning a nice firm almond into a slightly squishy one.
Step 6: Slip off the skins
Now for the satisfying part. Take one almond between your thumb and forefinger and gently squeeze. In most cases, the almond will shoot right out of its loosened skin.
Yes, sometimes it really does launch across the kitchen like a tiny beige torpedo. This is normal. This is also why it helps to aim the almond into your other hand or over a bowl. Blanching almonds is a calm kitchen skill right up until the almonds decide they would like to achieve flight.
Step 7: Dry the blanched almonds well
Once the skins are removed, spread the almonds on a clean kitchen towel or paper towels and pat them dry. If you plan to use them in baking, let them air-dry a bit longer so excess moisture does not affect your recipe.
If you want the almonds crisp again, you can dry them more thoroughly in a low oven. A brief oven dry is especially helpful if you need them for grinding, chopping, or storing. Damp almonds are not ideal for any of those jobs.
Step 8: Use them right away or store them properly
Your almonds are now blanched and ready for action. Use them whole, chop them, slice them, grind them into flour, or turn them into almond paste. They are especially useful in recipes where a smooth texture and pale color matter.
If you are not using them immediately, make sure they are fully dry before storing. That helps preserve texture and keeps them from going stale faster than necessary.
Common Mistakes to Avoid When Blanching Almonds
Leaving the almonds in hot water too long
This is the most common mistake. If you boil or soak them too long, the almonds soften and lose their pleasant bite. The sweet spot is brief. Think “quick dip,” not “extended vacation.”
Trying to blanch roasted almonds
Roasted almonds do not behave the same way as raw almonds. Their skins may cling, their texture may change oddly, and the result is rarely worth the effort.
Skipping the drying step
Even perfectly peeled almonds can cause trouble if they are still wet. Extra moisture can affect texture in cakes, cookies, candies, and homemade almond flour. Drying is not the glamorous part, but it is the part that keeps your recipe from becoming a cautionary tale.
Using too much force when peeling
You do not need to wrestle the skins off one by one. If the almonds were blanched properly, the skins should loosen easily. If they are fighting back, they may need a few more seconds in hot water, not an aggressive thumb workout.
What Can You Make With Blanched Almonds?
Once you know how to blanch almonds, you open the door to a surprising number of recipes. Blanched almonds are useful in both sweet and savory cooking, especially when you want a cleaner look or smoother blend.
- Homemade almond flour: Great for gluten-free baking, cakes, and cookies.
- Almond paste: Ideal for pastries, tarts, and holiday baking.
- Marzipan-style sweets: Better with peeled almonds for a smoother finish.
- Frangipane: That dreamy almond filling for tarts and pastries.
- Delicate cakes: Especially recipes where dark almond skin would affect the look.
- Sauces and dips: Blanched almonds blend more smoothly into creamy mixtures.
- Salads and toppings: Slivered or chopped blanched almonds look elegant and crisp.
If you want an even nuttier flavor, you can lightly toast the blanched almonds after they dry. That gives you the best of both worlds: smooth appearance and deeper flavor.
How to Store Blanched Almonds
Freshly blanched almonds should be completely dry before storage. Once dry, place them in an airtight container and keep them in a cool, dark place if you will use them soon. For longer storage, the refrigerator or freezer is a better option.
Like other nuts, almonds contain natural oils. Those oils are wonderful for flavor and texture, but they also mean nuts can go rancid if stored carelessly. Translation: do not leave your beautiful blanched almonds lounging around uncovered like they pay rent.
Do You Need to Blanch Almonds Every Time?
No. Plenty of recipes work beautifully with unblanched almonds, especially rustic bakes, granola, salads, snack mixes, and savory dishes where color and texture are welcome. Almond skins are not the enemy. They are just not always the aesthetic you want.
Blanch almonds when a recipe calls for them, when you want a finer grind, or when you prefer a smoother, lighter final result. Skip the step when you want a more robust texture, a nuttier appearance, or less prep work. The kitchen should serve you, not boss you around.
Kitchen Experiences: What Blanching Almonds Is Really Like
The first time many people blanch almonds, they expect it to be either annoyingly technical or wildly unnecessary. Then they try it and realize it is actually one of those oddly satisfying kitchen jobs, like peeling a perfectly loosened hard-boiled egg or cutting parchment to fit a cake pan on the first try. It feels small, but it makes you irrationally proud.
One common experience is surprise at how fast the method works. Before trying it, people often imagine that removing almond skins must involve a paring knife, saint-level patience, and perhaps a dramatic violin soundtrack. In reality, once the almonds have had that quick minute in hot water, the skins usually slide off with a gentle pinch. Some pop out neatly. Some shoot across the counter. Either way, it becomes a memorable little kitchen moment.
Another experience people mention is how much the almonds change visually. Unblanched almonds look earthy and familiar with their light brown skins, but once peeled, they become creamy, pale, and almost elegant. If you are making almond cake, almond paste, marzipan-inspired desserts, or a smooth sauce, that visual difference matters more than you might expect. The whole recipe suddenly looks more polished, like it put on a blazer.
Texture is where the experience really becomes valuable. Ground blanched almonds usually feel softer and finer, especially in baking. If you have ever made a dessert that turned out a little coarse, speckled, or darker than expected, switching to blanched almonds can be one of those tiny improvements that pays off immediately. It is not culinary magic, but it can feel suspiciously close.
There is also a practical lesson that comes with repetition: timing matters. People who blanch almonds regularly tend to learn quickly that longer is not better. Leaving almonds in boiling water too long does not make the skins easier to remove forever; it just makes the nuts softer. After one slightly mushy batch, most home cooks become extremely loyal to the one-minute rule. Experience is a great teacher, even when it arrives wearing wet almond skins.
Many home bakers also find that blanching almonds becomes less of a chore and more of a habit. Once you have done it a couple of times, it fits naturally into prep work. Water goes on to boil, almonds go in, colander comes out, towel gets unfolded, and suddenly you are moving with the calm efficiency of someone who definitely has their life together. Even if your sink says otherwise.
And perhaps the best part of the experience is that blanching almonds gives you options. You can leave them whole for snacking and salads, chop them for toppings, grind them for baking, or toast them after blanching for deeper flavor. It is one small kitchen skill that quietly unlocks a lot of versatility. Not bad for a bowl of nuts and a pot of hot water.
Conclusion
Knowing how to blanch almonds is one of those simple kitchen skills that sounds more complicated than it really is. In practice, it comes down to a quick minute in hot water, a cold rinse, a gentle squeeze, and a little drying time. That short process can improve the look, texture, and versatility of almonds in everything from pastries to sauces to homemade almond flour.
So the next time a recipe calls for blanched almonds, there is no need to stare dramatically into the pantry and reconsider your life choices. You have this. A pot of boiling water, a colander, and a few slippery little almonds are all that stand between you and kitchen competence.


