Table of Contents >> Show >> Hide
- Why Boiled Eggs Turn Out Differently
- Pick Your Ideal Egg Texture First
- Egg Boiling Times by Texture (Large Eggs)
- Three Reliable Ways to Boil Eggs
- The Ice Bath Step (Don’t Skip It)
- How to Peel Boiled Eggs Without Losing Half the Egg White
- Food Safety Notes for Boiled Eggs
- Troubleshooting: Why Your Boiled Eggs Went Wrong
- Best Texture for Different Dishes
- Final Takeaway: Your Perfect Egg Is a System, Not a Secret
- Experience-Based Tips: What People Learn After Boiling a Lot of Eggs (About )
- Conclusion
If you’ve ever boiled eggs and ended up with one perfect, one rubbery, and one that looked like it had a stressful day at work, you’re not alone. Boiling eggs seems simple (it’s literally eggs + water), but tiny changes in timing, heat, egg size, and cooling can completely change the texture.
The good news: once you understand a few basic rules, you can make eggs exactly how you like themrunny, jammy, creamy, firm, or fully hard-cooked for salads and deviled eggs. This guide breaks down the timing, methods, and troubleshooting tips so you can stop guessing and start nailing your ideal boiled egg every time.
Why Boiled Eggs Turn Out Differently
Before we talk timing, let’s solve the biggest mystery in egg world: why one person’s “8-minute egg” is jammy perfection while another person’s is basically a bouncy ball.
1) Egg size matters
Large eggs are the standard for most timing guides. Medium eggs cook a little faster, while extra-large or jumbo eggs need more time. If your eggs don’t match the recipe, your results won’t either.
2) Starting temperature matters
Eggs straight from the fridge cook a little differently than room-temperature eggs. Many reliable methods assume cold eggs from the refrigerator, so if you’re following a guide, stick to its starting conditions.
3) Your method changes the clock
A hot-start method (eggs lowered into already boiling water), a cold-start method (eggs heated in water from cold), and steaming all produce different results at different times. They’re all validyou just need to time the right method consistently.
4) Stove, pot, and altitude all affect results
Yes, your saucepan has opinions. Pot size, lid fit, burner strength, and altitude can change how fast eggs cook. Think of egg timing as a starting point, then fine-tune by 30 to 60 seconds until you hit your favorite texture.
Pick Your Ideal Egg Texture First
The easiest way to boil eggs well is to decide what texture you actually want. “Perfect” is not universal. Some people want a silky, runny center for toast soldiers; others want a jammy yolk for ramen; others want a fully set yolk for egg salad.
Use this texture-based mindset and you’ll stop overcooking eggs just because a recipe said “hard-boiled.”
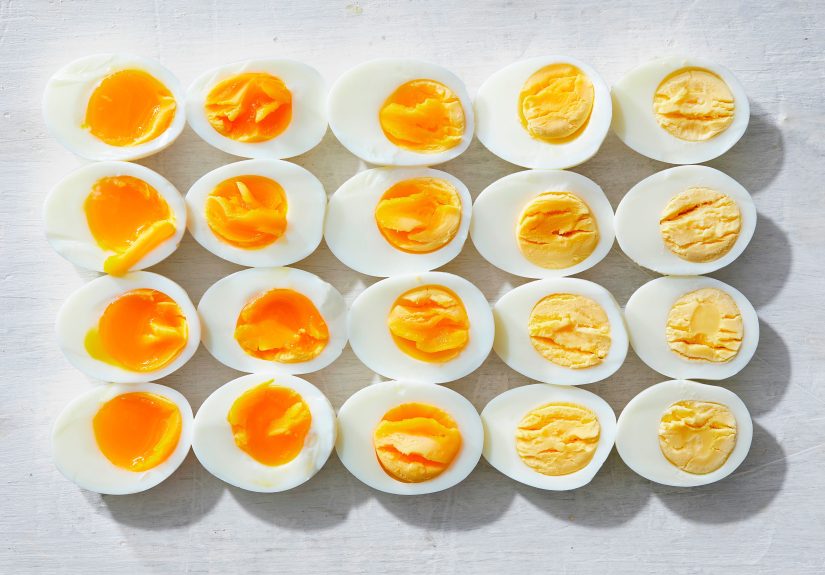
Common boiled egg textures
- Soft/runny: whites barely set, yolk very fluid
- Jammy: whites set, yolk thick and glossy
- Medium: yolk mostly set but still creamy in the center
- Hard-cooked (tender): fully set yolk, not chalky
- Fully firm: great for slicing, deviled eggs, and meal prep
Egg Boiling Times by Texture (Large Eggs)
These times are practical ranges for large eggs and work best when you use a timer (seriously, this is not the moment to “eyeball it”). The ranges below combine common, real-world guidance across popular cooking methods and test kitchens.
Hot-start method (lower eggs into boiling water)
- 4–5 minutes: soft-boiled, runny yolk
- 6–7 minutes: jammy yolk
- 8–9 minutes: medium, creamy center
- 10–12 minutes: hard-cooked, fully set but still tender
- 13–14 minutes: extra-firm (good for deviled eggs, but don’t overdo it)
Pro tip: If your yolks turn dry or gray-green around the edges, cut back the time and cool the eggs faster.
Three Reliable Ways to Boil Eggs
There are many methods online, but these three are the most reliable and easiest to repeat. Pick one, practice it once or twice, and you’ll have a house egg style.
Method 1: Hot-Start Boiled Eggs (Best for precise textures)
This method is popular for soft-boiled and jammy eggs because it gives you tighter control over timing.
- Bring a pot of water to a gentle boil (enough water to fully cover the eggs).
- Use a slotted spoon to lower eggs in carefully.
- Reduce heat slightly to maintain a gentle boil/simmer.
- Set a timer immediately based on your target texture.
- Transfer eggs to an ice bath when done.
This is a great method if you love ramen eggs, avocado toast eggs, or anything “jammy.”
Method 2: Cold-Start, Cover-and-Rest Eggs (Classic and forgiving)
This method is a kitchen classic and excellent for hard-cooked eggs.
- Place eggs in a saucepan in a single layer.
- Cover with cold water by about 1 inch.
- Bring to a boil.
- Turn off the heat, cover the pot, and let eggs stand in the hot water.
- For large eggs, a common target is about 10–12 minutes for fully set yolks.
- Cool immediately under cold running water or in an ice bath.
This method is ideal for meal prep, salads, lunch boxes, and egg salad because it’s easy and low-drama. (Well, low-drama unless someone forgets to set the timer.)
Method 3: Steamed Eggs (Fast, efficient, and often easy to peel)
Steaming is a favorite for many home cooks because you only boil a small amount of water, and the results can be very consistent.
- Add about 1 inch of water to a pot and bring it to a boil.
- Place eggs in a steamer basket (single layer if possible).
- Cover and steam.
- For hard-cooked eggs, many cooks aim around 10–16 minutes depending on setup and egg size.
- Move eggs to an ice bath right away.
If you’ve had a rough history with hard-to-peel eggs, steaming is worth trying.
The Ice Bath Step (Don’t Skip It)
If there is one step that separates “pretty good” eggs from “why are these perfect,” it’s rapid cooling.
Why an ice bath helps
- Stops carryover cooking so your yolks don’t keep firming up
- Helps preserve the texture you timed for
- Can improve peeling by firming the egg structure
- Makes eggs easier to handle without playing hot-potato in your kitchen
A quick dunk in cold water is helpful, but a real ice bath is even better when texture matters.
How to Peel Boiled Eggs Without Losing Half the Egg White
Peeling boiled eggs can feel like a tiny test of character. Here’s how to make it easier.
Peeling tips that actually help
- Cool the eggs fully first. Warm eggs can tear more easily.
- Use slightly older eggs when possible. They often peel more easily than super-fresh eggs.
- Crack the shell all over. Small cracks help the shell release more evenly.
- Start at the wider end. There’s usually an air pocket there, which can help you get under the membrane.
- Peel under running water or in a bowl of water. Water helps separate the shell and membrane from the egg white.
And no, you do not need a mystical combination of baking soda, vinegar, moonlight, and positive thinking. A timer + cooling + good peeling technique usually does the job.
Food Safety Notes for Boiled Eggs
Texture is fun. Food safety is non-negotiable.
Cooking safety basics
For general food safety, eggs should be cooked until the yolk and white are firm. Soft-boiled eggs may not reach the same level of doneness, which matters more for young children, older adults, pregnant people, and anyone with a weakened immune system.
Storage safety basics
- Refrigerate eggs and hard-cooked eggs promptly.
- Don’t leave cooked eggs at room temperature for more than 2 hours.
- Hard-cooked eggs generally keep for up to 7 days in the refrigerator.
- Raw shell eggs can typically be refrigerated for several weeks (often 3–5 weeks) if properly stored.
If a boiled egg smells off, feels slimy, or looks suspicious, let it go. It had a good run.
Troubleshooting: Why Your Boiled Eggs Went Wrong
Problem: Green-gray ring around the yolk
Cause: Usually overcooking or slow cooling.
Fix: Shorten cook time and cool immediately in ice water.
Problem: Rubbery whites
Cause: Too much heat or too long in hot water.
Fix: Use a gentler boil/simmer and tighten your timer.
Problem: Eggs crack during cooking
Cause: Rough handling, overcrowding, or sudden temperature shock.
Fix: Lower eggs in with a spoon, don’t crowd the pan, and use a consistent method.
Problem: Eggs are impossible to peel
Cause: Often very fresh eggs, incomplete cooling, or peeling too soon.
Fix: Cool longer, peel under water, and try a hot-start or steaming method next time.
Best Texture for Different Dishes
Want to choose the right egg for the right meal? Here’s a cheat sheet:
- Runny/soft-boiled: toast, breakfast bowls, grain bowls
- Jammy: ramen, noodle bowls, salads, rice bowls
- Medium: snack eggs, elevated avocado toast
- Hard-cooked: Cobb salad, potato salad, tuna salad, lunch prep
- Extra-firm: deviled eggs, chopped egg salad, travel snacks
Final Takeaway: Your Perfect Egg Is a System, Not a Secret
The best way to boil an egg to your ideal texture is not finding one magic number online and hoping for the best. It’s choosing a method, using large eggs (or adjusting for size), setting a timer, cooling quickly, and making tiny tweaks until your eggs come out exactly how you like them.
In other words: your perfect boiled egg is less about luck and more about repeatable kitchen habits. Once you dial in your timewhether that’s 6 minutes for jammy or 11 minutes for firmyou’ll be able to make your ideal texture on purpose, every single time.
Experience-Based Tips: What People Learn After Boiling a Lot of Eggs (About )
One of the most common experiences home cooks share is this: they assume they’re “bad at boiling eggs,” when the real problem is that they keep changing variables without realizing it. One day it’s jumbo eggs, the next day it’s large eggs. One day the eggs go into cold water, the next they’re lowered into boiling water. Then the timer gets interrupted by a phone call, a dog, a delivery, or a dramatic realization that you forgot to buy bread. Suddenly the same “recipe” gives totally different results.
Another common experience is discovering that the egg you thought you wanted isn’t actually your favorite. Many people start out aiming for fully hard-boiled eggs because that’s what they grew up with, then realize they love a jammy center once they try a 7- or 8-minute egg in ramen or on toast. On the flip side, plenty of people try the soft-boiled trend and decide, “Nope, I want a fully set yolk for lunch prep.” That’s the beauty of boiled eggs: you can customize the texture to your taste, not the internet’s opinion.
Meal preppers often report another practical lesson: consistency matters more than perfection. If you’re making a dozen eggs for the week, it’s better to have all of them come out “pretty close” to your target than to chase a mythical flawless egg every time. Using the same pot, the same burner, and the same timing method usually gets better results than hopping between random tricks. A simple notebook note like “Large eggs, hot-start, 9 minutes, full ice bath = perfect for salads” can save a lot of trial and error later.
Peeling is where most people experience peak frustration. It’s also where technique helps the fastest. Many home cooks say the biggest improvement came from two changes: cooling eggs completely and peeling under running water. That one small shift can turn a messy peeling session into a clean one. Another frequently mentioned experience is that “slightly older eggs” really do behave better for peeling than ultra-fresh eggs, especially when making deviled eggs for guests and trying to avoid ragged whites.
There’s also the very relatable experience of overcooking eggs while multitasking. The green ring appears, the yolk turns chalky, and suddenly your “protein snack” feels like edible drywall. The fix is usually not complicatedit’s just timing and cooling. Once people start using a timer every single time and moving eggs straight to cold water, results improve dramatically.
Finally, many cooks discover that boiled eggs become a staple once the process feels easy. They stop being a “sometimes food” and become an everyday tool: breakfast on busy mornings, salad topping for lunch, snack with salt and pepper, quick addition to rice bowls, or backup protein when dinner plans fall apart. When you know how to boil an egg to your ideal texture, it sounds smallbut it makes your kitchen life a whole lot smoother.
Conclusion
Boiling eggs to your ideal texture is all about control: choose your method, time it carefully, cool the eggs quickly, and adjust for your kitchen. Whether you like them soft, jammy, medium, or fully hard-cooked, a repeatable process will beat random guesswork every time. Start with the timing ranges in this guide, tweak by a minute based on your egg size and stove, and you’ll quickly build a foolproof routine.


