Table of Contents >> Show >> Hide
- What Spider Mites Are (and Why They’re So Annoying)
- How to Tell If You Have Spider Mites
- Before You Treat: Do These 3 Things Immediately
- The Best Way to Get Rid of Spider Mites: A Practical 7–14 Day Plan
- What Makes Spider Mites Come Back (and How to Stop the Cycle)
- Indoor Houseplants: Spider Mite Control That Won’t Trash Your Living Room
- Outdoor Gardens: Spider Mites on Vegetables, Herbs, and Shrubs
- Common Mistakes That Make Spider Mites Harder to Kill
- When to Use Stronger Controls
- How to Prevent Spider Mites Long-Term
- Conclusion: Your Spider Mite Exit Strategy
- Experiences and Real-World Scenarios (What Usually Happens in the Wild)
Spider mites are the tiny, eight-legged chaos gremlins of the plant world: too small to notice until your
once-thriving leaf looks like it auditioned for a “before” photo. The good news? You don’t need to set your
garden on fire (please don’t) or buy a chemistry set the size of a refrigerator. Most infestations can be
knocked back with a smart, repeatable routine: confirm, isolate, rinse, treat, repeatthen fix the conditions
that let mites throw a house party in the first place.
This guide walks you through identification, the fastest ways to stop damage, what actually works (and what
wastes time), and how to keep spider mites from coming back like that one relative who “just happened to be in
the neighborhood.”
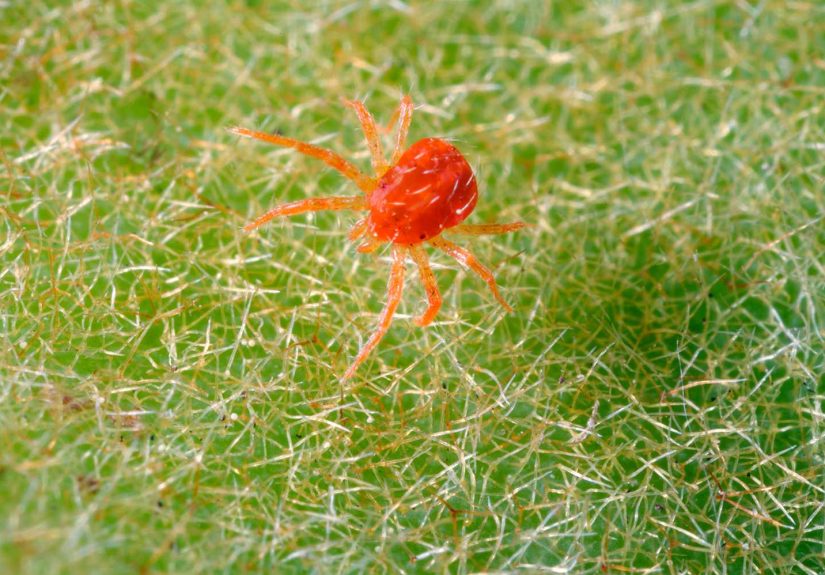
What Spider Mites Are (and Why They’re So Annoying)
Spider mites are not insectsthey’re arachnids. That matters because some common “bug sprays” don’t touch them,
and others can make the problem worse by wiping out the beneficial predators that normally keep mite numbers
under control.
They feed by piercing plant cells and sucking out the contents, which creates a telltale speckled, dusty, or
“stippled” look. In warm, dry conditions, spider mites can multiply fastespecially indoors near heating vents
or outdoors during hot, dry spells when plants are stressed.
How to Tell If You Have Spider Mites
Classic symptoms
- Stippling: tiny pale dots across leaves, as if someone flicked paint with a toothbrush.
- Leaf dullness or bronzing: foliage looks tired, dusty, or slightly rusty.
- Fine webbing: especially on leaf undersides, stems, and between leaf joints in heavier infestations.
- Leaf drop or weak growth: the plant declines even though you’re watering “like a responsible adult.”
The “white paper test” (fast and oddly satisfying)
- Hold a sheet of white paper under a suspect leaf.
- Tap or shake the leaf firmly.
- Look for tiny moving dots on the paper. If they crawl, congratulations/condolences: that’s likely mites.
Where to look first
Spider mites often hang out on the undersides of leaves, especially older leaves or leaves already showing
damage. Use a bright light and, if you have one, a hand lens. (If you don’t, no worrieswebbing and stippling are
already pretty strong clues.)
Before You Treat: Do These 3 Things Immediately
1) Isolate the plant (indoors especially)
Spider mites spread easilyby air movement, leaf-to-leaf contact, hands, tools, and your general habit of
admiring plants up close. If this is a houseplant problem, move the plant away from others right away.
2) Confirm it’s mites, not dust, thrips, or “mystery sadness”
Dust can mimic stippling. Thrips can create silvery streaks and black specks. Nutrient issues cause more uniform
yellowing. Do the paper test and check leaf undersides before you commit to a treatment plan.
3) Decide whether the plant is worth “intensive care”
If a plant is severely infested, already declining, and not sentimental, sometimes the kindest choice is to
discard it (sealed in a bag) to protect nearby plants. Harsh? Yes. Effective? Also yes.
The Best Way to Get Rid of Spider Mites: A Practical 7–14 Day Plan
Here’s the secret: with spider mites, one-and-done rarely works. You’re not just killing live mitesyou’re
interrupting a fast life cycle by repeating treatments on a schedule.
Day 1: Rinse like you mean it
Start with the lowest-tech, highest-impact move: a strong spray of water. This physically removes mites,
disrupts webbing, and can reduce the population dramatically.
- Houseplants: take the plant to a shower or sink and rinse tops and undersides of leaves thoroughly.
- Outdoor plants: hose foliage, focusing on undersides. Early morning is best so leaves dry quickly.
If your plant is prone to foliar disease, avoid creating a consistently wet canopy. You’re aiming for targeted
rinses (especially leaf undersides), not turning the garden into a rainforest every evening.
Day 1 (after rinsing): Prune and clean
- Remove the worst-damaged leaves (especially those loaded with webbing).
- Wipe smooth, sturdy leaves with a damp cloth (think pothos, rubber plant, philodendron).
- Clean the area: fallen leaves + dust = spider mite spa vibes.
Day 1: Choose a treatment that works on mites
The most reliable home-garden options are insecticidal soap and horticultural oil (including some neem-based oils).
These work primarily by contact, so coverage matters more than heroic concentration.
Option A: Insecticidal soap (great starter choice)
Insecticidal soaps work on contact and have little to no residual activity once dry. That’s why repeat
applications matter. They can be gentler than many other pesticides, but they still can cause leaf injury
on sensitive plantsalways spot test first.
- Spray thoroughly, especially leaf undersides.
- Apply when the plant is not drought-stressed.
- Keep the plant out of harsh sun until the spray dries.
Option B: Horticultural oil (often the heavy-hitter)
Horticultural oils can be very effective against mites when applied correctly. Like soaps, oils require
good coverage and smart timing to avoid plant damage.
- Apply during cooler parts of the day (morning/evening) so it doesn’t dry too fast.
- Do not apply to moisture-stressed plants.
- Avoid spraying during extreme heat or when plants are already struggling.
Option C: Neem-based products (read labels carefully)
“Neem” can mean different things in different products (oil vs. extracts with additional active ingredients).
Some neem oils function similarly to other horticultural oils by coating pests. The key is still contact and
coverageundersides, stems, crevices.
Option D: Biological control (best for greenhouses and serious plant people)
Beneficial predatorsespecially predatory mitescan suppress spider mites very effectively in controlled
environments like greenhouses, hoophouses, or indoor plant cabinets. They’re less predictable outdoors
because weather and pesticide drift can reduce success.
If you go this route, you’ll get the best results when you release predators early (before webbing blankets
the plant) and avoid broad-spectrum insecticides that harm beneficials.
Days 4–7: Repeat the rinse + treatment
Repeat your water rinse and reapply your chosen treatment on a schedulecommonly every 5–7 days for a few
rounds. The goal is to catch newly hatched mites before they rebuild the population.
Days 10–14: Final follow-up and prevention switch
Once the outbreak is under control, shift from “battle mode” to “keep the peace”:
monitor weekly, rinse occasionally, and fix the underlying conditions that favor mites.
What Makes Spider Mites Come Back (and How to Stop the Cycle)
Dry air and heat
Spider mites thrive in warm, dry conditions. Indoors, that can mean winter heating or a sunny window with low
humidity. Outdoors, it’s often drought stress plus heat.
Fix: Increase humidity for houseplants (humidifier, pebble tray, grouping plants) and keep outdoor plants
appropriately watered so they aren’t chronically stressed.
Dusty leaves
Dust can interfere with natural enemies and gives mites a comfortable environment. Outdoor shrubs along roads
or driveways are classic “dust + mites” hotspots.
Fix: Periodically rinse foliage (especially the undersides) and keep nearby areas less dusty when possible.
Using the wrong pesticide (or the right one at the wrong time)
Some broad-spectrum insecticides can reduce beneficial predators and accidentally turn a minor mite issue into
a full-blown infestation. Also, applying soaps/oils during heat or on stressed plants raises the chance of
leaf burn.
Fix: Choose mite-appropriate options (soaps/oils/miticides labeled for mites), apply at cooler times, and
prioritize plant health first.
Indoor Houseplants: Spider Mite Control That Won’t Trash Your Living Room
A simple indoor routine
- Quarantine the plant immediately.
- Shower rinse (tops and undersides).
- Wipe sturdy leaves; prune heavily webbed leaves.
- Spray insecticidal soap or horticultural oil with full coverage.
- Repeat every 5–7 days for 2–3 rounds.
Example: A crispy calathea in winter
Calatheas and other humidity-loving plants are spider-mite magnets when indoor air gets dry.
After you treat the mites, the bigger win is stabilizing humidity so the plant isn’t constantly stressed.
Many plant owners find that adding a humidifier (or clustering plants together) reduces repeat infestations.
Outdoor Gardens: Spider Mites on Vegetables, Herbs, and Shrubs
Vegetables and herbs
Spider mites love tender, fast-growing plants like beans and cucumbers, and they can be brutal on tomatoes
during hot, dry periods. If you’re growing food, your choices should be guided by what’s labeled for edibles
and how close you are to harvest.
- Start with water sprays and pruning.
- Use labeled products only, and follow directions exactly.
- Spray coverage is everythingundersides matter most.
Shrubs and ornamentals
Spider mites can flare on evergreens, roses, and landscape shrubsespecially in dusty or droughty sites.
If you’re seeing repeated outbreaks on the same plant each season, look at irrigation, dust, and nearby
pesticide use (including “just in case” sprays).
Common Mistakes That Make Spider Mites Harder to Kill
- Only treating once: mites rebound quickly without repeat applications.
- Spraying tops of leaves only: mites are usually partying underneath.
- Overconcentrating DIY mixes: more isn’t bettermore is leaf burn.
- Treating stressed plants: drought-stressed plants are more likely to get damaged by sprays.
- Ignoring the environment: dry air + dusty leaves + heat = spider mite paradise.
When to Use Stronger Controls
If you’ve done water sprays plus 2–3 properly timed rounds of soap/oil and mites are still thriving, consider:
- Whether the infestation is being reintroduced (new plants, nearby untreated plants, outdoor hot spots).
- Whether you’re missing coverage (undersides and tight crevices).
- Using a product specifically labeled for mites (a miticide) that matches your plant type and setting.
For any pesticide product, follow label directionsespecially for indoor use, edible crops, and safety steps.
How to Prevent Spider Mites Long-Term
- Inspect new plants before bringing them home and quarantine them for 1–2 weeks.
- Rinse foliage periodically (especially leaf undersides) to remove dust and early mites.
- Maintain humidity indoors for sensitive houseplants.
- Water consistently outdoors to reduce drought stress during heat waves.
- Avoid broad-spectrum insecticides unless truly needed; protect beneficial predators.
- Monitor regularly in warm, dry weathercatching mites early is the whole game.
Conclusion: Your Spider Mite Exit Strategy
Getting rid of spider mites is less about finding a magic spray and more about running a tight routine:
confirm, isolate, rinse, treat with a contact product that works on mites, repeat on a schedule, and then
change the conditions that invited them in. If you do those steps, spider mites go from “plant apocalypse”
to “minor inconvenience you handle while your coffee brews.”
Experiences and Real-World Scenarios (What Usually Happens in the Wild)
If you’ve ever felt personally targeted by spider mites, you’re not alone. A lot of plant owners describe the
same pattern: everything looks fine… until a certain leaf starts to look a little dusty. Then another leaf.
Then suddenly your plant has the vibe of an old attic lamp, and you realize the “dust” is actually stippling,
webbing, and regret.
One of the most common experiencesespecially with houseplantsis discovering mites right after a seasonal
shift. Winter heat clicks on, humidity drops, and that lush corner turns into a desert microclimate. People
often notice the problem first on the plants closest to windows, vents, or radiators. The fix that tends to
work best in real homes is combining treatment with an environmental change. In other words: spray alone helps,
but spray plus humidity and rinsing helps fast. Many plant owners report that the outbreak finally stops
cycling when they add a humidifier or move sensitive plants away from hot, dry airflow.
Outdoors, the “classic” spider mite story shows up during a stretch of hot, dry weather. Tomatoes and beans
start looking speckled, lower leaves yellow, and you might even see webbing if populations explode. Gardeners
who get ahead of it earlyby hosing leaf undersides and keeping soil moisture steadyoften avoid a full takeover.
The gardeners who struggle most are usually the ones who don’t see mites until the plant is already stressed.
At that point, it can feel like every option is a tradeoff: spray too hard and you damage foliage; do nothing
and you lose the plant’s momentum. That’s why the “rinse + repeat” schedule matters. The first rinse knocks the
population down. The follow-ups prevent the bounce-back.
Another real-world scenario: a gardener reaches for a general insect killer “just to be safe,” especially if
they’re also fighting aphids or whiteflies. Then, a couple weeks later, spider mites get worse. This is
frustrating but common, because broad-spectrum insecticides can reduce the beneficial predators that naturally
keep mites in check. Gardeners who switch to targeted controls (like soaps/oils for mites) and avoid unnecessary
broad sprays often see the situation stabilize over the next couple of treatment cycles.
People also learnsometimes the hard waythat coverage is everything. The most frequent “why didn’t this work?”
moment is spraying the tops of leaves like you’re misting a fancy salad. Spider mites are usually on the
underside, tucked along veins and leaf joints. Once gardeners adjust their approachspraying undersides
intentionally, slowing down, and treating stems and crevicesthe same product suddenly “starts working.”
Finally, there’s the emotional arc: initial panic, intense cleaning, and then… forgetting to repeat. Spider
mites love that part. The gardeners who win long-term usually build a tiny habit: a weekly leaf check, a quick
rinse now and then, and a short quarantine for new plants. It’s not dramatic, but it’s effectiveand it keeps
spider mites from treating your home like an all-you-can-eat buffet.


