Table of Contents >> Show >> Hide
- What Is a Mushroom Spore Print?
- Why Make a Mushroom Spore Print?
- Supplies You Need for a Mushroom Spore Print
- How to Make a Mushroom Spore Print: 5 Steps
- How to Read Mushroom Spore Print Colors
- Common Spore Print Problems and How to Fix Them
- Safety Tips for Making Spore Prints
- Creative Uses for Mushroom Spore Prints
- Beginner-Friendly Example: Making a Portobello Spore Print
- Personal Experience: What Making Spore Prints Teaches You
- Conclusion
Note: This guide is for educational observation, mushroom study, and nature journaling. A spore print can help with identification, but it should never be used by itself to decide whether a wild mushroom is safe to eat. When in doubt, do not taste, cook, or consume wild mushrooms.
Mushrooms are tiny mystery novels wearing little umbrellas. One minute they look like plain brown buttons in the grass, and the next they reveal a hidden fingerprint made of dust-fine spores. That fingerprint is called a mushroom spore print, and it is one of the easiest, cheapest, and most fascinating ways to study fungi at home.
If you have ever wondered how mycologists, foragers, artists, and curious backyard explorers learn more about mushrooms, spore printing is a perfect place to start. It requires no microscope, no laboratory coat, and no dramatic lightning in the background. All you need is a mature mushroom cap, paper or foil, a bowl, a little patience, and the ability not to poke the setup every five minutes. The last part is harder than it sounds.
In this guide, you will learn how to make a mushroom spore print in 5 steps, why spore color matters, what materials work best, how long to wait, how to avoid common mistakes, and how to use your print for safe observation. Whether you are teaching kids about fungi, documenting backyard mushrooms, making natural art, or building beginner mycology skills, this process is simple, beautiful, and surprisingly satisfying.
What Is a Mushroom Spore Print?
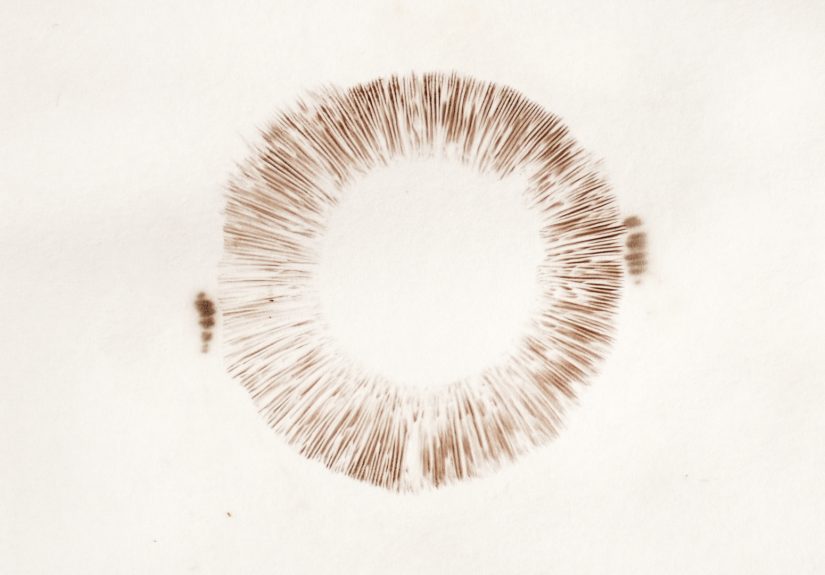
A mushroom spore print is the visible powdery pattern left behind when a mushroom releases thousands or even millions of microscopic spores onto a surface. Spores are part of how fungi reproduce. They are not seeds in the botanical sense, but they play a similar role: they help fungi spread and create new growth when conditions are right.
Most mushrooms release spores from the underside of the cap. In gilled mushrooms, the spores fall from the gills. In boletes, they drop from pores. In tooth fungi, they come from spines. When you place the cap spore-side down on paper, foil, glass, or another clean surface, those spores fall in a pattern that often mirrors the structure underneath the cap. The result can look like a delicate starburst, a smoky circle, a lace fan, or something a tiny forest wizard would leave as a signature.
Why Make a Mushroom Spore Print?
Spore prints are useful for three main reasons: identification, education, and art. In mushroom identification, spore color is one helpful feature among many. A print may be white, cream, pink, yellowish, brown, rusty, purple-brown, black, or even greenish in some species. Since gill color does not always match spore color, making a print can reveal information you cannot reliably see by glancing at the mushroom.
However, spore color is only one clue. Proper mushroom identification also considers cap shape, stem structure, gills or pores, bruising reactions, odor, habitat, season, region, and look-alike species. Some edible mushrooms have toxic twins, and some poisonous mushrooms look annoyingly charming, like they dressed up for a farmer’s market. So, yes, make the print. Admire the print. Photograph the print. But do not treat it as a dinner invitation.
Supplies You Need for a Mushroom Spore Print
Before starting, gather everything in one place. A calm setup gives you a cleaner print and saves you from wandering around the kitchen holding a mushroom cap like it owes you money.
Basic Materials
- A mature mushroom cap with visible gills, pores, or spines
- White paper and black paper, or a half-white/half-black sheet
- Aluminum foil, index cards, or a glass slide as an alternative surface
- A clean knife or scissors for removing the stem
- A bowl, cup, jar, or container to cover the mushroom
- Disposable gloves, especially when handling wild mushrooms
- A notebook or phone camera for recording details
- Tape, paper sleeves, or a small bag for storing the finished print
Best Mushrooms for Beginners
For your first mushroom spore print, it is safest and easiest to use a store-bought edible mushroom such as a portobello, cremini, white button mushroom, or oyster mushroom. Grocery-store mushrooms are not always perfect spore producers because some are harvested young, but mature portobello caps often work well. If using a wild mushroom for study, wear gloves, keep it away from food-preparation surfaces, and do not eat it unless it has been positively identified by a qualified expert.
How to Make a Mushroom Spore Print: 5 Steps
Now for the fun part. The following five-step method works for most cap-and-stem mushrooms, especially gilled mushrooms. If your specimen has pores or teeth instead of gills, the same general idea applies: place the spore-producing surface facing down and let gravity do its quiet little magic trick.
Step 1: Choose a Mature Mushroom
The quality of your mushroom spore print starts with the mushroom itself. Choose a cap that is fresh, mature, and open enough that the underside is exposed. If the mushroom is too young, the cap may still be closed and the spores may not be ready to release. If it is too old, dried out, soggy, or decaying, it may create a messy print or no print at all.
A good candidate usually has a cap that has opened outward, visible gills or pores, and a firm but not shriveled texture. For wild specimens, make notes before you remove the mushroom from its habitat. Record where it was growing: on soil, wood, mulch, grass, moss, or near a particular tree. Take clear photos of the cap, underside, stem, base, and surrounding area. Those details are often more useful than memory, which has a bad habit of turning “under an oak tree” into “near some green stuff” by the time you get home.
Step 2: Prepare Your Printing Surface
Next, choose the surface where the spores will fall. White paper is great for dark spores, while black paper helps pale spores stand out. Many beginners use a sheet that is half white and half black so they can see almost any spore color clearly. Aluminum foil is another excellent option because it does not absorb moisture as quickly as paper, and it makes prints easier to fold and store.
Place the paper, foil, card, or glass on a flat surface where it can remain undisturbed for several hours. Avoid breezy windows, ceiling fans, curious pets, and that one family member who cleans by moving everything into a mysterious new location. A stable table, shelf, or counter works well.
If you plan to use the spore print for study, label the surface or a nearby note with the date, location, habitat, and mushroom description. Good documentation turns a pretty print into useful information.
Step 3: Remove the Stem and Place the Cap Down
Using a clean knife or scissors, cut the stem close to the cap. The goal is to let the underside of the cap sit flat against the printing surface. Place the cap with the gills, pores, or spines facing down. The top of the cap should face up, like a tiny umbrella that has decided to take a nap.
Try not to slide the mushroom once it touches the surface. Sliding can smear the spores and blur the final pattern. If you want to compare spore visibility on different backgrounds, place the cap so half rests over white paper and half over black paper. This simple trick can make subtle colors much easier to read.
Some people add one small drop of water to the top of the cap to help maintain moisture and encourage spore release. This can be helpful if the mushroom is fresh but beginning to dry. Do not soak it. A soggy mushroom can bleed moisture into the print, creating blotches that look less like science and more like a mushroom sneezed.
Step 4: Cover the Cap and Wait
Cover the mushroom cap with a bowl, cup, jar, or container. Covering serves two purposes: it keeps air currents from blowing spores around, and it helps maintain humidity so the cap does not dry out too quickly. A clear glass or jar is handy because you can see the setup without lifting the cover, but any clean cover works.
Leave the mushroom undisturbed for at least 2 to 6 hours. For a stronger print, leave it overnight or up to 24 hours. The exact timing depends on the species, freshness, humidity, and maturity of the mushroom. Some mushrooms drop spores quickly, while others take their sweet fungal time. Patience is part of the process. Think of it as nature’s slow printer, except it never runs out of ink at the worst possible moment.
Do not keep lifting the cover to check progress. Every peek can disturb humidity, shift the cap, or move spores before they settle. If you must check, lift the cover carefully and replace it gently. But honestly, your mushroom is not going anywhere. Probably.
Step 5: Reveal, Record, and Store the Print
When enough time has passed, remove the cover slowly. Then lift the mushroom cap straight up without dragging it. If the print worked, you should see a powdery pattern where spores collected beneath the cap. The design may be bold and dark, pale and ghostly, or somewhere in between.
Look at the print in natural light if possible. Artificial lighting can make cream, pale yellow, white, and light pink harder to distinguish. If the print is faint, place the paper against a contrasting background or take a close-up photo. Record the spore color in your notes using descriptive terms such as white, cream, tan, cinnamon brown, rusty brown, chocolate brown, purple-brown, black, pinkish, or olive.
To preserve a paper spore print for art or journaling, let it dry completely and then cover it with clear tape, a fixative spray made for paper art, or a protective sleeve. If using foil, fold it carefully over the print and store it in a labeled envelope or small bag. Keep stored prints dry and away from heat, sunlight, and moisture.
How to Read Mushroom Spore Print Colors
Spore print color can narrow down possibilities during mushroom identification. For example, many Agaricus species have brown to chocolate-brown spore prints, while many Amanita species have white spore prints. Some mushrooms in the genus Chlorophyllum may produce greenish spores, an important clue because some species in that group are known for causing poisoning. Other mushrooms may show pink, rusty, black, or purple-brown deposits.
Still, spore print color should be treated like one piece of a larger puzzle. It is helpful, but it is not the whole picture. Two mushrooms can have similar spore colors and very different levels of edibility or toxicity. A safe mushroom study habit is to observe, document, compare multiple features, and consult reliable field guides or local mycological clubs before making any identification claims.
Common Spore Print Problems and How to Fix Them
No Spores Appeared
If your mushroom leaves no print, it may be too young, too old, too dry, or already past its spore-releasing stage. Try again with a fresher, more mature cap. Keeping the cap covered and adding a tiny drop of water to the top may help.
The Print Looks Watery or Blotchy
Too much moisture can cause blotches. Use only a tiny drop of water, avoid wet mushrooms, and consider printing on foil instead of paper. Paper absorbs moisture quickly, which can blur delicate patterns.
The Color Is Hard to See
Use both white and black backgrounds. Pale spores disappear on white paper, while dark spores may be difficult to read on black paper. Foil or clear glass can also help because you can move the print over different backgrounds.
The Pattern Smeared
The cap probably moved. Place it carefully, cover it gently, and lift it straight up at the end. Spore prints reward people who move like calm librarians, not raccoons in a snack drawer.
Safety Tips for Making Spore Prints
Spore printing is usually a low-risk educational activity, but mushroom safety matters. Wash your hands after handling mushrooms, especially wild ones. Keep wild mushrooms away from children, pets, and food-preparation areas. Do not taste unknown mushrooms. Do not rely on folklore, smell, silver spoons, insect bites, peeling caps, or any other “old trick” to determine edibility. Many dangerous mushroom myths are persistent because they sound simple, not because they are true.
If a person or pet eats an unknown wild mushroom, contact Poison Control or a medical professional immediately. Save a sample of the mushroom if it is safe to do so, and take photos of the cap, underside, stem, and growing location. Identification is easier when details are preserved.
Creative Uses for Mushroom Spore Prints
Once you learn how to make a mushroom spore print, you may discover that the results are beautiful enough to frame. Spore prints can be used in nature journals, homeschool science projects, mushroom identification logs, seasonal art, classroom demonstrations, and photography. A clean portobello print on white paper can look like a smoky botanical mandala. Oyster mushroom prints often create soft, flowing patterns. Even a humble grocery mushroom can turn into a tiny science poster.
For an attractive display, print several mushrooms on separate cards and label each one with the date, mushroom type, spore color, and surface used. You can compare how prints differ between species, maturity levels, and waiting times. This turns a simple activity into a mini mycology experiment.
Beginner-Friendly Example: Making a Portobello Spore Print
A mature portobello mushroom is one of the easiest examples for beginners. Remove the stem, place the cap gill-side down on white paper or foil, cover it with a bowl, and leave it overnight. In the morning, lift the cap carefully. You will often find a rich brown spore print with clear gill lines radiating outward from the center.
This example is excellent for kids and adults because the spores are usually dark enough to see clearly. It also reinforces the basic science: the gills are not just decorative mushroom curtains. They are spore-producing surfaces designed to release reproductive cells into the environment.
Personal Experience: What Making Spore Prints Teaches You
The first time you make a mushroom spore print, the hardest part is believing something is actually happening. You set a mushroom on paper, cover it with a bowl, and then stare at it like it might perform a magic trick on command. Nothing moves. Nothing sparkles. The mushroom does not explain itself. It just sits there, quietly being a mushroom, which is apparently a full-time job.
Then you come back later, lift the cap, and there it is: a pattern so delicate it feels almost impossible. The print may look like smoke, velvet dust, a flower, a fingerprint, or the shadow of the mushroom’s hidden architecture. That little reveal is what makes spore printing memorable. It turns an ordinary object into evidence of a living process you normally cannot see.
One practical lesson is that maturity matters more than enthusiasm. A young button mushroom may look fresh and cute, but it may not drop much of anything. A mature cap with open gills usually gives a better result. The difference can be dramatic. Beginners often blame themselves when a print fails, but many failures come down to timing, dryness, or choosing a mushroom that was not ready. Fungi are not vending machines. You cannot always insert patience and receive spores immediately.
Another experience worth noting is how much the background changes your perception. A pale spore print on white paper can look invisible until you shift it onto black paper. A dark print on foil may appear richer and sharper than the same print on absorbent paper. This is why using both white and black surfaces is such a smart beginner move. It removes guesswork and makes subtle colors easier to notice.
Spore printing also teaches observation. After doing it a few times, you start paying attention to details you once ignored: whether the gills are attached to the stem, whether the cap is dry or sticky, whether the mushroom grew alone or in clusters, whether it appeared after rain, and whether the stem has a ring or swollen base. You begin to see mushrooms not as random lawn decorations but as structured organisms with clues written into their shape.
There is also a small humility lesson tucked into the process. A beautiful spore print can make you feel like a mushroom detective, but it does not make you an expert. The print is valuable, but it is only one clue. That realization is healthy. It encourages careful research, expert consultation, and respect for the complexity of fungi. Mushrooms are generous teachers, but they are not casual snacks unless you know exactly what you are doing.
For families, spore printing is especially rewarding because it blends science and art without requiring expensive supplies. Children can predict the print color, compare surfaces, draw the mushroom before and after printing, and learn why wild mushrooms should not be eaten casually. Adults get the pleasure of a quiet nature activity that feels both relaxing and mildly magical. Everybody wins, except perhaps the mushroom, which has been turned into homework.
The best experience comes from treating each print like a small field record. Photograph the mushroom before printing, note the location or store-bought variety, write down the time, and describe the final color. Over time, your collection becomes more than pretty patterns. It becomes a personal archive of observation, patience, and curiosity. That is the real charm of making mushroom spore prints: they remind you that nature is constantly leaving clues, even when the clues are too small to see one at a time.
Conclusion
Learning how to make a mushroom spore print is simple, affordable, and genuinely fascinating. In just five steps, you can choose a mature mushroom, prepare a contrasting surface, place the cap spore-side down, cover it, wait, and reveal a hidden pattern created by thousands of falling spores. The process helps beginners understand mushroom anatomy, supports careful observation, and creates beautiful natural artwork.
Just remember the golden rule: a spore print is a clue, not a complete identification. Use it alongside photos, habitat notes, field guides, and expert advice. Never eat a wild mushroom based on a spore print alone. With that safety-first mindset, spore printing becomes one of the most enjoyable ways to explore the fungal worldno lab, no fancy gear, and no wizard hat required.