Table of Contents >> Show >> Hide
- Why Mounting an Outdoor TV Is Different
- Before You Drill: Five Smart Decisions That Make the Whole Job Easier
- Tools and Materials You’ll Likely Need
- How to Mount an Outdoor TV: Step by Step
- Step 1: Choose the Exact Location and Viewing Height
- Step 2: Locate the Structural Support
- Step 3: Hold the Wall Plate in Position and Mark the Holes
- Step 4: Drill Pilot Holes and Fasten the Mount
- Step 5: Attach the Mounting Rails to the TV
- Step 6: Plan the Power Cord and Signal Cables
- Step 7: Hang the TV on the Wall Bracket
- Step 8: Seal, Test, and Fine-Tune
- Common Outdoor TV Mounting Mistakes to Avoid
- How to Keep Your Outdoor TV Setup Looking Good
- Real-World Experiences: What People Learn After Mounting an Outdoor TV
- Final Thoughts
- SEO Tags
Mounting an outdoor TV sounds simple enough until you remember one tiny detail: weather exists. So do glare, humidity, wind, dust, pollen, rogue sprinklers, and that one family member who thinks “eyeballing it” counts as measurement. The good news is that learning how to mount an outdoor TV is absolutely doable with the right plan. The better news is that once it’s done right, your patio, deck, pergola, pool house, or outdoor kitchen instantly becomes the most popular seat in the neighborhood.
A proper outdoor TV installation is not just an indoor wall-mount job that wandered outside for fresh air. It takes the right TV, the right mount, the right wall, and a little common sense about power, cable management, and sun exposure. Get those pieces right, and your setup can look clean, stay safe, and survive more than one football season.
Why Mounting an Outdoor TV Is Different
Indoors, a TV mostly fights dust and fingerprints. Outdoors, it is battling sunlight, moisture, temperature swings, insects, and airborne mystery grit that appears every time the wind changes direction. That is why the first rule of patio TV installation is this: treat the outdoors like the outdoors. Revolutionary, I know.
The biggest difference is exposure. Even on a covered patio, your screen still deals with humidity, drifting rain, heat buildup, and brighter ambient light than a living room ever sees. An outdoor TV mount also needs to resist corrosion, support the set securely through changing weather, and allow you to adjust the screen enough to reduce glare. This is where a weatherproof TV mount earns its paycheck.
Before You Drill: Five Smart Decisions That Make the Whole Job Easier
1. Start with a Real Outdoor TV
If you are serious about longevity, skip the idea of putting an old indoor TV outside “just for now.” In home improvement language, “just for now” usually means “until the first storm ruins it.” Outdoor TVs are built for weather resistance, temperature changes, brighter viewing environments, and sealed compartments. They are made for permanent outdoor installation, not temporary optimism.
That does not mean every outdoor TV belongs in direct sun. Some are designed for full shade, like a covered porch or screened gazebo. Others are meant for partial sun, and premium models can handle full sun. Matching your TV to the location matters just as much as mounting it correctly.
2. Match the TV to the Sun Exposure
This is where many people make the first expensive mistake. A shady back porch and an uncovered poolside wall are not the same environment. If the screen lives under a roof with little direct sunlight, a full-shade outdoor TV may work beautifully. If your setup gets strong afternoon light, you may need a brighter partial-sun or full-sun model with stronger anti-glare performance.
Think of it this way: sunlight is the unpaid villain in every backyard theater project. If you ignore it, your movie night turns into a dark rectangle surrounded by confused guests asking whether the TV is on.
3. Choose the Right Outdoor TV Mount
Not every mount belongs outdoors. For this job, you want an outdoor-rated TV mount with rust-resistant materials such as stainless steel hardware, protective coatings, and a load rating that comfortably exceeds your TV’s weight. The mount also needs to match the TV’s VESA pattern, which is the bolt-hole layout on the back of the set.
There are three main mount styles to consider:
- Fixed mount: Slim, simple, and clean. Best when glare is minimal and your seating is directly in front of the screen.
- Tilt mount: A great choice for reducing glare and making small viewing-angle adjustments.
- Full-motion mount: The most flexible option. It swivels and tilts, which is especially helpful for patios, outdoor kitchens, and seating areas that are not perfectly centered.
For most outdoor spaces, a full-motion TV mount or tilt mount is the sweet spot. The ability to fine-tune the screen angle can save you from glare headaches later.
4. Pick the Best Wall Surface
The strongest mount in the world is useless if it is attached to the wrong surface. Solid structure matters. Brick, block, concrete, and properly framed wood walls are all workable. Siding alone is not. Stucco can work, but the fasteners still need to bite into framing or proper masonry behind it.
If you are mounting on an exterior wall with siding, plan on fastening through to wall studs. If you are mounting on brick or concrete, use the correct masonry anchors and drill bits. In short, the TV should be supported by structure, not by wishful thinking and decorative cladding.
5. Plan Power, Streaming, and Sound Before Mounting
Do not mount first and ask cable questions later. That is how you end up with a gorgeous TV placement and nowhere sensible to put the power cord. Before installation, figure out where electricity comes from, where your streaming device or cable box will live, and whether you want an outdoor soundbar or speakers.
A GFCI-protected outlet is the smart move for outdoor electronics. If you need a new outdoor receptacle, hiring a licensed electrician is money well spent. It is far better than turning your patio into an obstacle course of cords and regret.
Tools and Materials You’ll Likely Need
- Outdoor-rated TV mount
- Outdoor-rated television
- Stud finder
- Level
- Tape measure
- Pencil or painter’s tape for marking
- Drill and proper drill bits
- Lag bolts or masonry anchors, depending on wall type
- Socket wrench or driver
- Outdoor-rated cable protection or conduit
- Weatherproof outlet cover if needed
- Silicone or exterior sealant for wall penetrations
- A second person to help lift the TV
How to Mount an Outdoor TV: Step by Step
Step 1: Choose the Exact Location and Viewing Height
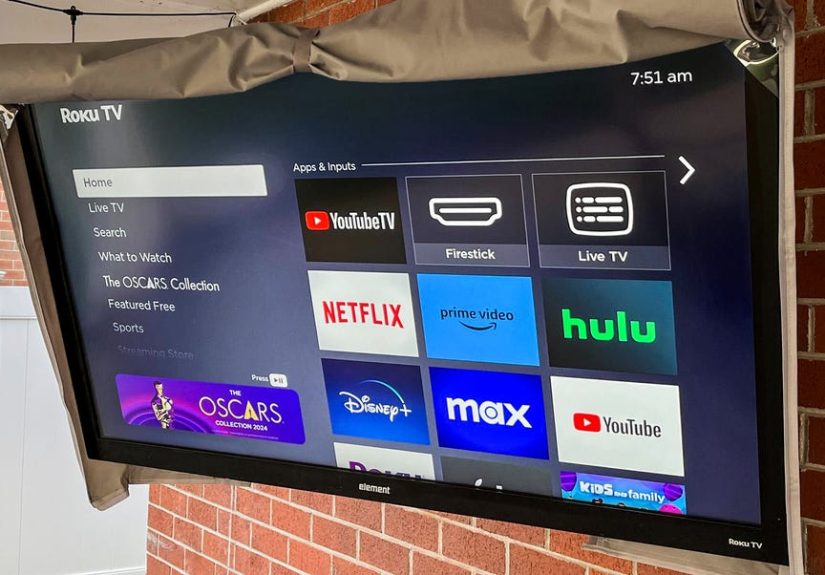
Pick a spot that is protected from direct rain and as much direct sun as possible. A covered patio wall is usually the easiest, cleanest place to mount an outdoor television. You also want the screen visible from the main seating area without forcing everyone to watch with their chin in the air.
A good starting point is to keep the center of the TV near seated eye level. In many setups, that lands around 42 inches from the floor to the center of the screen, though patio seating height and sightlines can shift that number. In outdoor spaces, the screen sometimes ends up a little higher than an indoor TV because of furniture layouts, outdoor kitchen counters, or railing interference. Slightly higher is fine. “Neck-craning sports bar over a fireplace” is less fine.
Another smart move is orientation. If possible, place the TV so the sun stays behind the screen rather than blasting straight into it. That one choice can do more for glare reduction than a heroic amount of menu fiddling later.
Step 2: Locate the Structural Support
Use a stud finder on framed walls and confirm stud locations carefully. Exterior walls can be a little trickier than interior ones, so measure twice and mark clearly. If you are working with brick or concrete, identify sound masonry rather than crumbly joints or weak surfaces.
This part matters because the mount must carry the combined forces of weight, motion, and outdoor wear. A full-motion mount puts extra leverage on the wall when extended, so the fasteners need to land exactly where they are supposed to.
Step 3: Hold the Wall Plate in Position and Mark the Holes
Have a helper hold the wall plate while you check it with a level. Mark the pilot holes precisely. This is not the moment for freestyle design. A small error here can turn into a crooked screen, a sloppy seal around the fasteners, or a bracket that never quite feels right.
Before drilling, step back and confirm clearances. Make sure the TV has room to tilt or swivel without hitting trim, columns, lights, fan blades, shutters, or that decorative outdoor sconce you forgot existed five minutes ago.
Step 4: Drill Pilot Holes and Fasten the Mount
For wood framing, drill pilot holes into the studs and secure the wall plate with the included lag bolts or manufacturer-approved hardware. Tighten firmly, but do not go full gorilla. Over-tightening can damage bolts or reduce holding strength.
For brick or concrete, use the correct masonry bit and anchors rated for the load. Keep the holes clean, seat the anchors properly, and tighten the bracket evenly. If the wall surface is uneven, use the manufacturer’s guidance for spacers or leveling adjustments rather than improvising with random hardware from the garage coffee can.
Step 5: Attach the Mounting Rails to the TV
Lay the TV face-down on a clean, padded surface. Attach the TV-side brackets or rails using the screw size that matches the set’s mounting holes. Always use the shortest screw that fully threads without bottoming out. Many mounting kits include multiple screw sizes and spacers because TV backs are not all shaped the same.
Double-check that the rails are installed squarely and facing the correct direction. This is the stage where a five-minute pause can save a twenty-minute redo.
Step 6: Plan the Power Cord and Signal Cables
Outdoor cable management is a big part of a professional-looking install. Route power and signal cables cleanly, protect them from water and sun exposure, and avoid pinching them behind the TV. Outdoor-rated conduit, cable housings, or protected channels help keep the setup safer and neater.
Use GFCI-protected power outdoors. If your cords rise before entering a compartment or cover, create a drip loop so water does not run straight toward the connection point. Also leave enough slack for a full-motion mount to move freely. A stretched HDMI cable is basically a future problem in disguise.
Step 7: Hang the TV on the Wall Bracket
With a helper, lift the TV carefully and hook or lock it onto the wall-mounted bracket according to the mount instructions. Most systems have a top-hook-and-bottom-lock process or a rail-and-latch design. Secure every locking screw, safety tab, or retaining mechanism before taking your hands off the set.
Then test the tilt or swivel movement. The TV should move smoothly and feel secure. No wobble, no scraping, no suspicious noises that sound like a future insurance claim.
Step 8: Seal, Test, and Fine-Tune
Seal any wall penetrations with exterior-grade sealant to help keep water out. Then connect your streaming device, cable source, or antenna, power everything on, and test the screen during the time of day you will actually use it most. Afternoon glare can reveal problems that a cloudy morning politely hides.
Adjust the tilt, swivel, brightness, and sound. In many outdoor spaces, a soundbar or external speakers make a huge difference because open air does not trap audio the way indoor walls do.
Common Outdoor TV Mounting Mistakes to Avoid
- Using an indoor TV outside and hoping for the best
- Mounting in direct sun when the TV is only rated for shade
- Buying a mount based only on screen size instead of weight and VESA pattern
- Fastening into siding alone instead of studs or masonry
- Ignoring glare until game day
- Blocking ventilation or cramming the TV into a too-tight enclosure
- Leaving cords exposed to weather, foot traffic, or curious pets
- Skipping a protective cover or enclosure in harsher conditions
How to Keep Your Outdoor TV Setup Looking Good
Once the TV is mounted, maintenance is not complicated. Wipe the screen with a soft cloth, inspect brackets and hardware once or twice a year, and keep the cable paths clean and secure. After major storms, check for loosened fasteners, water intrusion, or corrosion on exposed hardware.
If your setup is in a particularly exposed area, use a cover when the TV is not in use. Even weatherproof equipment appreciates not being pelted by every season at full strength. Think of it less as babying the TV and more as refusing to age it in dog years.
Real-World Experiences: What People Learn After Mounting an Outdoor TV
One of the most common experiences with an outdoor TV is realizing that placement matters even more than the TV itself. People often spend hours comparing brands, brightness ratings, and screen sizes, then hang the set wherever there is an empty wall. The first sunny Saturday usually corrects that thinking. A screen that looked perfect at dusk can become a glare magnet at 3 p.m. if the wall faces the wrong direction. That is why the best outdoor TV installations are planned around how the space is actually used, not just where the studs happen to be.
Another frequent lesson is that sound behaves differently outside. Indoors, even average TV speakers bounce audio around the room. Outside, the sound just wanders off like it has somewhere better to be. Many homeowners discover that a perfectly mounted TV still needs an outdoor soundbar, weather-resistant speakers, or at least a smarter seating layout. The TV was never the problem. The backyard simply refused to act like a living room.
People also tend to underestimate cable planning. In theory, it sounds easy: mount the TV, plug in the streaming stick, and enjoy. In practice, the power outlet may be too far away, the Wi-Fi may get flaky on the patio, and the cable box may be sitting indoors on the other side of the wall like an unhelpful roommate. The best installs usually solve this upfront by deciding where components will live, how the remote will work, and whether the system needs conduit, a media bay, or an enclosure. That planning is not glamorous, but it is what separates a clean backyard entertainment wall from a spaghetti festival of cords.
There is also the weather reality check. Even when a TV is rated for outdoor use, people quickly learn that “weatherproof” does not mean “invincible.” Wind can shake loose exposed cables. Pollen can coat everything in yellow fuzz. Moisture finds weak seals with detective-level skill. Families who stay happiest with their setup are usually the ones who inspect it occasionally, keep the screen clean, and use a cover or enclosure when conditions are rough. In other words, the outdoor TV does not need constant babysitting, but it does appreciate basic respect.
And then there is the fun part: once the setup is right, it changes how people use their backyard. Movie nights happen more often. Sunday sports migrate outside. Weeknight dinners stretch longer because no one wants to go back indoors. An outdoor kitchen becomes a gathering spot instead of just a grill with a confidence problem. That is the real payoff of learning how to mount an outdoor TV the right way. It is not only about hardware and fasteners. It is about making a patio feel finished, functional, and a little more like the best seat in the house, except with fresh air and fewer arguments over who gets the couch corner.
Final Thoughts
Mounting an outdoor TV is one of those projects that feels luxurious and practical at the same time. Done right, it adds style, saves space, protects your equipment, and turns an ordinary patio wall into a full entertainment zone. The key is resisting shortcuts. Use an outdoor-rated TV, choose a weatherproof TV mount, anchor into real structure, manage cables properly, and think about sun, power, and sound before the first hole is drilled.
Do that, and your outdoor television will not just survive the seasons. It will become the reason everyone suddenly wants to hang out at your place.