Table of Contents >> Show >> Hide
- Introduction: Your Car Deserves a Fresh Start
- Before You Start: Gather the Right Supplies
- How to Remove Bumper Stickers: 12 Steps
- Step 1: Park in the Right Place
- Step 2: Wash the Sticker and Surrounding Area
- Step 3: Inspect the Sticker Type and Surface
- Step 4: Warm the Sticker with a Hair Dryer
- Step 5: Lift One Corner Gently
- Step 6: Peel Slowly at a Low Angle
- Step 7: Keep the Adhesive Warm as You Work
- Step 8: Apply an Automotive Adhesive Remover
- Step 9: Wipe with a Microfiber Towel
- Step 10: Wash the Area Again
- Step 11: Check for Ghosting or Paint Difference
- Step 12: Protect the Finish with Wax or Sealant
- How to Remove Bumper Stickers from Different Surfaces
- Common Mistakes to Avoid
- Best Products for Removing Sticker Residue
- What If the Sticker Has Been There for Years?
- Real-World Experiences: What Usually Happens When You Remove Bumper Stickers
- Final Thoughts: Remove the Sticker, Not the Paint
Note: This guide is based on practical automotive detailing methods, paint-safe adhesive-removal recommendations, and common car-care best practices. Always test any product on a small hidden area first, especially if your vehicle has older paint, a repaint, vinyl wrap, or aftermarket tint.
Introduction: Your Car Deserves a Fresh Start
Bumper stickers are funny little time capsules. One day, you proudly slap one on your car because it captures your mood, your politics, your favorite band, your kid’s honor-roll glory, or your questionable sense of humor. A few years later, that same sticker has faded into a crusty rectangle of regret. The good news? You do not have to live forever with a sunbaked slogan from another chapter of your life.
Learning how to remove bumper stickers properly is not just about making your car look cleaner. It is also about protecting the paint, avoiding scratches, and removing sticky residue without turning one small sticker into a full Saturday drama. The wrong approachmetal razor blade, aggressive scraping, harsh chemicals, impatient yankingcan damage clear coat, leave ghost marks, or create scratches that cost far more to fix than the sticker ever cost to buy.
The right approach is simple: clean the area, soften the adhesive, peel slowly, remove leftover glue, wash again, and protect the finish. Below is a detailed 12-step method for removing bumper stickers from painted surfaces, plastic bumpers, glass, and chrome-style trim. Think of it as sticker removal therapy for your car. No judgment. We have all made decorative decisions we later needed to reverse.
Before You Start: Gather the Right Supplies
Before attacking the sticker like it owes you money, gather a few basic tools. You may not need everything, but having the right supplies nearby makes the job cleaner and safer.
Recommended Tools and Materials
- Car wash soap and clean water
- Microfiber towels
- Hair dryer or adjustable heat gun
- Plastic scraper, plastic razor blade, or old credit card
- Automotive adhesive remover, bug and tar remover, or citrus-based sticker remover
- Rubbing alcohol for final cleaning, used carefully and sparingly
- Car wax, spray sealant, or ceramic detail spray
- Glass cleaner if the sticker is on a window
- Gloves, especially when using chemical removers
The key word here is plastic. A metal blade may be fine on untreated glass when used carefully, but it should never touch painted car surfaces. Car paint may look tough, but the clear coat is easier to scratch than most people realize.
How to Remove Bumper Stickers: 12 Steps
Step 1: Park in the Right Place
Start by parking your vehicle in a shaded, well-ventilated area. Direct sunlight can make the surface too hot, causing adhesive remover to evaporate quickly and making it harder to control heat. A garage, carport, or shaded driveway is ideal.
If the weather is freezing, sticker adhesive may become brittle and stubborn. If the day is extremely hot, the paint surface may already be warm enough that you need less artificial heat. Sticker removal is a little like making pancakes: temperature matters, and rushing usually makes a mess.
Step 2: Wash the Sticker and Surrounding Area
Before you peel anything, wash the bumper sticker and the area around it with car wash soap and water. This removes dust, grit, road grime, and tiny abrasive particles that can scratch the paint while you work.
Do not skip this step. Scraping a dirty bumper is like rubbing sandpaper over your clear coat and hoping for the best. After washing, dry the area with a clean microfiber towel. The cleaner the surface, the safer the removal process.
Step 3: Inspect the Sticker Type and Surface
Look closely at what you are removing. Is the sticker paper, vinyl, reflective, cracked, glossy, or brittle? Is it stuck to painted metal, a plastic bumper, chrome trim, or glass? A newer vinyl sticker may peel off in one satisfying sheet. An old paper bumper sticker may come off in confetti-sized flakes, because apparently it has chosen chaos.
If the sticker is on paint, use the gentlest method possible. If it is on glass, you have more options, but be careful with rear windows that have defroster lines or aftermarket tint. Sharp blades can damage tint film and defroster elements.
Step 4: Warm the Sticker with a Hair Dryer
A hair dryer is usually the safest heat source for removing bumper stickers. Turn it to a hot setting and hold it several inches away from the sticker. Move it slowly across the surface, warming the center first and then the edges. Heat softens the adhesive, making the sticker easier to lift without tearing.
If you use a heat gun, keep it on a low setting and keep it moving. Do not hold a heat gun in one spot. Too much heat can soften paint, deform plastic, or damage clear coat. The goal is warm and flexible, not “freshly baked bumper casserole.”
Step 5: Lift One Corner Gently
Once the sticker feels warm, try lifting one corner with your fingernail, a plastic scraper, or the edge of an old credit card. Work slowly. Slide the tool under the edge at a shallow angle instead of digging straight down into the paint.
If the corner refuses to lift, apply more heat for 20 to 30 seconds. You can also apply a small amount of adhesive remover around the edge and let it sit for a few minutes. Patience is cheaper than paint repair.
Step 6: Peel Slowly at a Low Angle
Once you have a loose corner, peel the sticker back slowly. Pull it at a low angle, almost folding it back over itself rather than pulling straight out. This reduces stress on the paint and gives the adhesive more time to release.
If the sticker starts tearing, stop and reapply heat. Do not try to win the battle by force. Old stickers often come off in sections, especially if they have been baked by years of sun, rain, road salt, and car washes. Work section by section until most of the sticker is gone.
Step 7: Keep the Adhesive Warm as You Work
For larger decals, keep the hair dryer nearby and warm the next section as you peel. The adhesive cools quickly, especially in cold weather. Warm adhesive behaves like soft chewing gum; cold adhesive behaves like stubborn concrete with trust issues.
Use one hand to apply gentle heat and the other to peel, or heat a section, turn off the dryer, peel, and repeat. Never overheat the area. Short, controlled passes are better than one long blast.
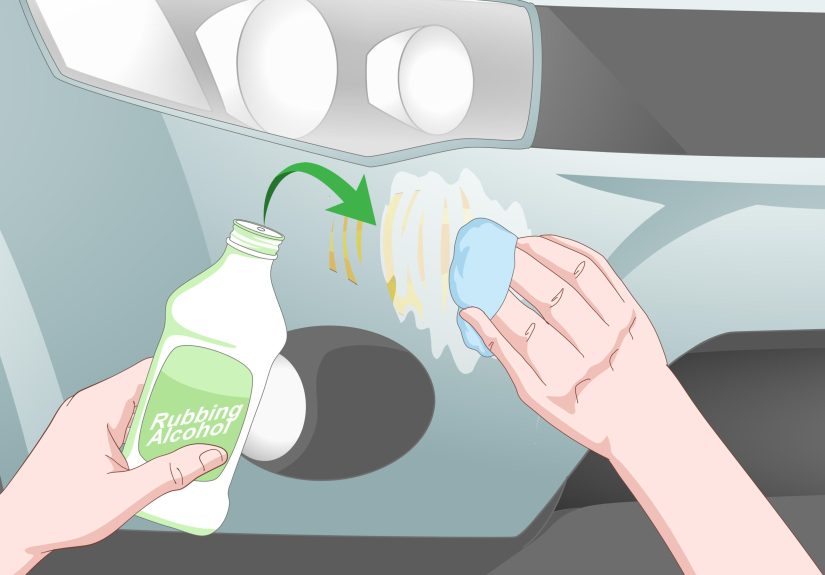
Step 8: Apply an Automotive Adhesive Remover
After the sticker is removed, you will probably see sticky residue. This is normal. Apply an automotive-safe adhesive remover, bug and tar remover, or citrus-based sticker remover to the leftover glue. Follow the product directions carefully. Most removers need a few minutes to soften the residue before wiping.
Choose products labeled safe for automotive paint, clear coat, plastic, glass, or vinyl, depending on your surface. Avoid random household solvents unless you know they are safe for car paint. Acetone, lacquer thinner, and harsh paint solvents can damage finishes quickly.
Step 9: Wipe with a Microfiber Towel
Use a clean microfiber towel to wipe away softened adhesive. Work gently in small circles or short straight strokes. If residue remains, apply more remover and let it dwell again. Do not scrub aggressively. Adhesive removal is less about muscle and more about chemistry doing its job.
For stubborn spots, use a plastic scraper with light pressure. Keep the surface lubricated with adhesive remover so the scraper glides instead of drags. If your towel becomes gummy, switch to a clean section or a new towel.
Step 10: Wash the Area Again
Once the glue is gone, wash the area again with car wash soap and water. This removes chemical residue, oils, and loosened adhesive particles. Dry the surface with a fresh microfiber towel.
This second wash matters because many adhesive removers leave behind a slick film. That film can attract dust or interfere with wax and sealant. A clean finish also helps you inspect the paint clearly.
Step 11: Check for Ghosting or Paint Difference
After removing a bumper sticker, you may notice a faint outline where it used to be. This is called ghosting. It happens because the paint around the sticker has been exposed to sunlight, weather, and oxidation, while the covered area has been protected. The sticker did not stain the paint; it shielded one area while the rest of the bumper aged.
Light ghosting may fade after washing, polishing, and waxing. More noticeable ghosting may require a gentle automotive polish. If your vehicle has older or delicate paint, consider asking a professional detailer before polishing aggressively.
Step 12: Protect the Finish with Wax or Sealant
The final step is protection. Apply car wax, spray wax, sealant, or ceramic detail spray to the cleaned area. This restores some protection that may have been removed by heat, adhesive remover, or washing.
Waxing also helps even out the appearance of the paint and makes future sticker residue easier to clean. If you plan to add another bumper sticker, consider placing it on a magnetic backing or on glass instead of directly on paint. Your future self may send you a thank-you card.
How to Remove Bumper Stickers from Different Surfaces
Painted Bumpers
Painted bumpers require the most care. Use a hair dryer, plastic scraper, automotive adhesive remover, and microfiber towel. Avoid metal blades, acetone, abrasive pads, and rough scrubbing. If the bumper has been repainted, be extra cautious because aftermarket paint can respond differently to heat and solvents.
Plastic Bumpers
Many modern bumpers are plastic with paint or textured trim. Heat can help, but too much heat can warp plastic. Use low heat and check the surface often. If the bumper is textured black plastic, adhesive can settle into the grain. A soft detailing brush and plastic-safe cleaner may help lift residue from the texture.
Car Windows
Glass is tougher than paint, so sticker removal is usually easier. Use glass cleaner, heat, and a plastic scraper. A razor blade can work on plain exterior glass, but avoid blades on aftermarket tint, rear defroster lines, and delicate coatings. If you are not sure, choose plastic tools instead.
Chrome or Metal Trim
Chrome-style trim can scratch or discolor if treated harshly. Use mild heat, a soft cloth, and a compatible adhesive remover. Avoid abrasive pads. After cleaning, wipe the area dry to prevent streaks or water spots.
Common Mistakes to Avoid
Using a Metal Razor Blade on Paint
This is the classic bumper sticker disaster. A metal blade may remove the sticker, but it can also slice into clear coat. Use plastic tools only on painted areas.
Pulling Too Fast
Fast peeling often leaves more glue behind and increases the chance of tearing the sticker into tiny pieces. Slow peeling at a low angle gives better results.
Skipping the Wash
Dirt around the sticker can scratch the paint while you scrape or wipe. Always wash before and after.
Using Harsh Chemicals Without Testing
Some solvents can dull paint, stain plastic, or damage trim. Test first in a hidden area and follow product directions.
Overheating the Paint
Heat is helpful, but too much can cause damage. Use a hair dryer when possible and keep any heat source moving.
Best Products for Removing Sticker Residue
The best product depends on the surface and the age of the sticker. For painted surfaces, choose an automotive adhesive remover, bug and tar remover, or citrus-based automotive sticker remover. These are designed to soften glue without unnecessary abrasion.
WD-40-style products and degreasers are often used for sticky residue, but they can leave an oily film, so the area must be washed thoroughly afterward. White vinegar can help with some paper stickers and mild adhesive, but it is usually slower than dedicated automotive products. Rubbing alcohol may help with final cleanup, but it should be used sparingly and followed by washing and protection.
For heavy decals, pinstripes, and commercial vinyl, professional detailers sometimes use adhesive eraser wheels. These can be effective, but they require care, correct speed, and experience. If used incorrectly, they can create heat or marring. For a small bumper sticker, hand removal is usually safer.
What If the Sticker Has Been There for Years?
Old bumper stickers are a different beast. Sun exposure can make vinyl brittle, paper stickers flaky, and adhesive hard as old candy. If the sticker has been on the vehicle for many years, expect the process to take longer.
Start with a longer warm-up using a hair dryer. Work in small sections. Apply adhesive remover around the edges and give it time to penetrate. If the sticker comes off in flakes, do not panic. That is annoying but normal. Keep alternating heat, gentle scraping, and adhesive remover until the surface is clean.
Afterward, check for ghosting. A protected rectangle may remain visible because the surrounding paint has faded. A mild polish may reduce the contrast, but deep fading may not disappear completely without professional paint correction.
Real-World Experiences: What Usually Happens When You Remove Bumper Stickers
In real life, removing a bumper sticker rarely feels as neat as the instructions make it sound. The first surprise is usually emotional. You look at the sticker and think, “This will take five minutes.” Then the first corner tears, the glue stretches like melted cheese, and suddenly you are negotiating with a three-inch vinyl rectangle as if it is a tiny landlord refusing to move out.
One common experience is the “half-perfect peel.” The sticker lifts beautifully for the first few inches, and confidence rises. You start imagining yourself as a professional detailer with a YouTube channel and a calm voice. Then the sticker hits a cold patch, splits down the middle, and leaves behind a papery layer that looks like it has merged with the bumper on a molecular level. This is where patience matters. More heat, more dwell time, and less force usually solve the problem.
Another common situation involves dealership decals. These are often smaller than bumper stickers but surprisingly stubborn. The raised letters may come off one at a time, leaving adhesive shadows behind. A plastic card works well here, especially when paired with a hair dryer. Once the letters are off, adhesive remover and a microfiber towel usually finish the job. The trick is not to dig under each letter like you are excavating dinosaur bones. Gentle pressure wins.
Families often discover old school, sports, vacation, or honor-roll stickers years later when preparing to sell a car. The sticker may have outlasted the hobby, the team season, and possibly the family minivan era itself. In these cases, ghosting is common. The bumper under the sticker may look newer than the surrounding paint. This is not necessarily damage; it is a reminder that sunlight has been working on the rest of the bumper for years. A wash, mild polish, and wax can reduce the contrast.
People also learn quickly that weather changes everything. On a warm day, adhesive loosens faster. On a cold morning, the same sticker may behave like a frozen tortilla chip. If removal is not urgent, choose a mild day. If you must work in cold weather, spend more time warming the sticker and smaller sections at a time.
The most satisfying moment comes at the end, after the residue is gone and the clean paint finally appears. It feels oddly refreshing, like deleting an old email account or cleaning a junk drawer. A bumper sticker may be small, but removing it can make the whole vehicle look newer, cleaner, and less stuck in the past.
Final Thoughts: Remove the Sticker, Not the Paint
The safest way to remove bumper stickers is to work slowly, use gentle heat, rely on plastic tools, choose paint-safe adhesive remover, and protect the area afterward. The process is not complicated, but it does reward patience. If you rush, scrape, or use harsh chemicals, a simple sticker removal job can turn into a paint repair problem.
For most cars, the best method is simple: wash, heat, peel, dissolve residue, wash again, and wax. That sequence works because it respects the paint while weakening the adhesive. Whether you are removing an old political sticker, a faded vacation decal, a dealership badge, or a joke that stopped being funny in 2014, your car can absolutely make a clean comeback.
And next time? Consider bumper magnets. They let you express yourself without creating a long-term adhesive relationship. That is called growth.


