Table of Contents >> Show >> Hide
- Before You Touch a Pipe: Plan Like a Calm, Responsible Adult
- Tools and Materials You’ll Actually Use
- Step-by-Step: Remove the Old Sink
- Prep the New Sink (Do This Before You Set It in Place)
- Install the Sink
- Reconnect the Plumbing Without Creating a Leak Fountain
- Seal, Finish, and Make It Look Like You Meant to Do This
- Test for Leaks: The 5-Minute Ritual That Saves Cabinets
- Time and Cost Expectations (Because Your Weekend Has Plans)
- When You Should Call a Pro (No Shame, Just Strategy)
- Wrap-Up: Your New Sink, Installed the Right Way
- Real-World Experiences: What Actually Happens Under the Sink (And How to Win Anyway)
Replacing a bathroom sink is one of those DIY projects that feels intimidating until you realize it’s mostly
unscrewing things, cleaning gunk, and not dropping a wrench on your toe. If your sink is cracked,
stained beyond redemption, or you’re upgrading to something that looks less “starter apartment 2009,” this guide walks
you through the whole jobplanning, removal, installation, plumbing reconnection, leak testing, and the little details
that separate “nice work!” from “why is the cabinet mysteriously damp?”
This article focuses on the most common setup: a sink mounted to a vanity top (drop-in, integrated, or undermount).
You’ll also get notes for pedestal and wall-mounted sinks, because bathrooms love variety.
Before You Touch a Pipe: Plan Like a Calm, Responsible Adult
A smooth sink replacement starts with three questions:
What type of sink is it? Will the new sink fit? Will the plumbing line up?
Skip this step and you may end up holding a gorgeous sink… that doesn’t fit your countertop hole. That’s a special kind
of heartbreak.
1) Identify your sink style
- Drop-in (top-mount): The rim sits on top of the countertop cutout. Usually sealed with silicone.
- Undermount: Mounted under the counter with clips/adhesive. Common with stone tops.
- Integrated vanity top: Sink is molded into the countertop. Replacement often means replacing the entire top.
- Vessel sink: Bowl sits on top of the counter; drain and faucet setup can be different.
- Pedestal/wall-mounted: Sink support and mounting hardware matter a lot more than vanity sinks.
2) Measure twice, buy once
- Countertop opening (drop-in): Measure the cutout and confirm the new sink’s template matches.
- Overall sink size: Confirm it won’t hit the backsplash, wall, mirror, or faucet.
- Faucet holes: One-hole, centerset (4″), widespread (8″), or wall-mount. Match what you haveor be ready to change things.
- Drain location: Most bathroom sinks use a standard drain opening, but alignment under the sink can vary.
3) Decide what you’re replacing
Swapping just the sink is simpler if the vanity top and faucet setup stay the same. If you’re replacing the vanity top,
faucet, and sink together, the job gets biggerbut often looks dramatically better.
4) Quick safety + sanity checklist
- Turn off water at the shutoff valves (or the main if the shutoffs don’t fully close).
- Protect your cabinet floor with a towel or panP-traps love surprise water.
- Wear eye protection when cutting caulk or scraping old sealant.
- Follow local plumbing/building rules if you’re changing drain/vent configuration.
Tools and Materials You’ll Actually Use
Your goal is to avoid the classic DIY moment: being 90% done, then realizing you need one $4 part and the store is closed.
Here’s a practical list.
Tools
- Adjustable wrench (and/or two: one to hold, one to turn)
- Basin wrench (optional, but helpful for faucet nuts in tight spaces)
- Channel-lock pliers
- Bucket + towels
- Putty knife or scraper
- Utility knife (for cutting caulk)
- Caulk gun (if sealing around sink rim or backsplash)
- Flashlight or headlamp (under-sink caves are dark)
- Measuring tape
Materials
- New sink (and possibly a matching vanity top)
- New faucet (optional but often smart while everything is apart)
- Pop-up drain assembly (match with overflow or without overflow)
- Plumber’s putty or 100% silicone (use what your sink/faucet manufacturer recommends)
- Silicone caulk (kitchen/bath mildew-resistant)
- New flexible supply lines (recommended if yours are older)
- P-trap parts (only if needed for alignment or replacement)
- PTFE (Teflon) tape (for certain threaded connectionsnot slip-joint or compression fittings)
Step-by-Step: Remove the Old Sink
Step 1: Shut off water and relieve pressure
Close the hot and cold shutoff valves under the sink. Open the faucet to relieve pressure and drain any remaining water
in the lines. If the shutoff valves won’t close completely (they happen to be dramatic sometimes), shut off the main water
supply before proceeding.
Step 2: Disconnect supply lines
Place a towel and a small bucket under the valves. Use an adjustable wrench to loosen the supply line nuts where the lines
connect to the shutoff valves. Expect some waterjust not a swimming pool.
Pro tip: If the supply lines look corroded, kinked, or ancient, replace them now. It’s cheap insurance
against future leaks.
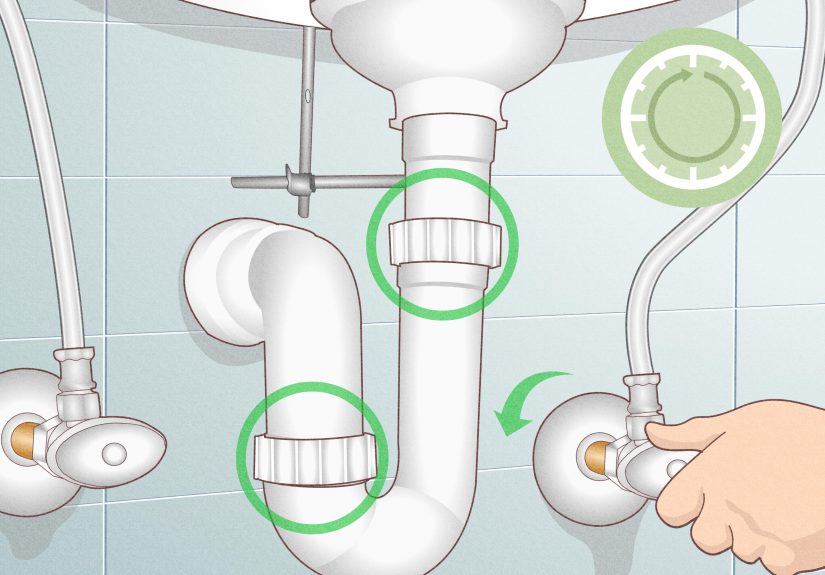
Step 3: Remove the P-trap and drain connections
The curved pipe under your sink is the P-trap. It holds a small amount of water that blocks sewer gases
from entering your bathroom. Place your bucket under it, then loosen the slip nuts (usually hand-loosenable; pliers help if stuck).
Lower the trap and let it drain into the bucket.
- Remove the trap bend (the “U” part).
- Disconnect the trap arm where it meets the wall pipe (if needed for removal).
- Keep track of washers and which direction they face.
Step 4: Free the sink from the countertop
What you do next depends on your sink type:
-
Drop-in sink: Use a utility knife to cut the caulk/silicone around the rim. Some sinks also have mounting clips underneathloosen them.
Then lift the sink straight up. -
Undermount sink: You’ll likely need to remove mounting clips and cut the silicone seal between sink rim and countertop underside.
Undermount sinks can be stubborn; support the sink as you remove the last fasteners so it doesn’t drop. - Integrated vanity top: Disconnect plumbing, cut any caulk at the backsplash, then remove the entire top (often held by adhesive and a few screws).
Step 5: Clean the battlefield
Scrape away old silicone/putty and wipe down the counter surface. A clean surface helps the new sealant actually seal,
which is kind of the whole point of sealant.
Prep the New Sink (Do This Before You Set It in Place)
Installing the faucet and drain assembly is usually easier when the sink is not yet mountedbecause your hands can reach
things without bending like a pretzel.
1) Dry-fit the sink
Set the new sink in the opening (or position it under the counter for undermount) without sealant first. Confirm:
- The sink sits flat and centered.
- Faucet holes match your faucet.
- The drain lines up reasonably with the wall outlet (minor misalignment is fixable; major misalignment may require plumbing adjustment).
2) Install the faucet
Follow the faucet manufacturer’s instructions. In general:
- Set the faucet and any gasket/escutcheon plate in place.
- Tighten mounting nuts from below (a basin wrench helps).
- Connect any included quick-connect hoses if your faucet uses them.
Note: Some faucets use a foam/rubber gasket and don’t require putty; others may suggest a thin bead of silicone.
Do what the instructions say, not what an internet stranger yelled in all caps.
3) Install the pop-up drain assembly (and choose the right type)
Bathroom sinks come in two main drain styles: with overflow (a small opening near the top of the bowl) and
without overflow. Your drain assembly needs to match.
Typical process:
- Clean the drain opening.
- Apply plumber’s putty or silicone under the drain flange (per manufacturer guidance).
- Insert the drain body, install the gasket/nut underneath, and tighten.
- Orient the pivot rod opening toward the back (for pop-up drains).
- Connect the lift rod and pivot rod mechanism (if applicable).
Putty vs. silicone: Plumber’s putty is common for metal drain flanges, but some materials (certain plastics, composites,
or porous natural stone) may require silicone instead. When in doubt, follow the fixture instructions.
Install the Sink
Option A: Drop-in (top-mount) sink installation
- Run a steady bead of bathroom-grade silicone under the sink rim (or on the counter where the rim will sit).
- Lower the sink into the opening, align it, and press down evenly.
- Install and tighten mounting clips (if included) in a crisscross pattern.
- Wipe away excess silicone that squeezes out.
Example: If you’re installing a drop-in sink into a laminate vanity top, the silicone bead is your waterproof shield.
Be generous enough to seal, but not so generous that it becomes a silicone art installation.
Option B: Undermount sink installation
Undermount sinks rely on a combination of clips/anchors and a high-quality silicone seal. Many stone countertops are designed
with specific mounting systems, so follow the countertop or sink manufacturer’s requirements.
- Clean the underside of the countertop around the cutout thoroughly.
- Apply a continuous bead of 100% silicone around the sink rim (the part that contacts the countertop).
- Lift the sink into position and install clips/fasteners.
- Support the sink while silicone cures if required (some installers use temporary bracing/support methods).
- Tool the silicone bead (smooth it) for a continuous seal, then remove excess.
Example: On a quartz or granite top, undermount installation is less forgivingalignment matters because you’ll see the reveal
around the opening. If your countertop wasn’t designed for DIY undermount replacement, this is a reasonable point to call a pro.
Pedestal or wall-mounted sink notes
These sinks often require solid wall blocking, proper anchors, and careful leveling. If you’re replacing one with another,
you may need to patch tile, adjust mounting height, or reconfigure supply lines and drain placement. If any of that sounds like
“a lot,” that’s because it can be.
Reconnect the Plumbing Without Creating a Leak Fountain
Step 1: Reinstall the P-trap
Reconnect the tailpiece (vertical pipe from the sink drain) to the trap bend, then connect the trap arm to the wall pipe.
Make sure slip-joint washers are oriented correctly (they’re shaped to seal when compressed).
- Tighten slip nuts by hand, then give a small additional snug with pliers if neededdon’t Hulk-smash them.
- Align parts so the trap isn’t under stress. A trap that’s forced into place often leaks later.
- Avoid creating an “S-trap” configuration; proper venting matters for drainage and code compliance.
Step 2: Connect faucet supply lines
Attach the flexible supply lines to the faucet shanks and to the shutoff valves. Most braided supply lines seal with a rubber
gasketso you usually don’t need PTFE tape on those connections. Tighten until snug and leak-free.
Step 3: If you replaced or moved the vanity, check alignment
Minor drain misalignment can often be solved with an adjustable or offset tailpiece extension, or by replacing trap parts.
If the wall drain is significantly off, you may be looking at opening the wallaka “plumbing adventure mode.”
Seal, Finish, and Make It Look Like You Meant to Do This
Once the sink is set and plumbing is connected:
- Apply a neat bead of silicone where the sink meets the countertop (for drop-in) if recommended.
- Caulk the backsplash seam against the wall if you removed or replaced the top.
- Remove smudges and stray sealant before it cures (future-you will be grateful).
Test for Leaks: The 5-Minute Ritual That Saves Cabinets
- Turn the shutoff valves back on slowly.
- Run cold water for 30–60 seconds while watching supply connections.
- Run hot water and repeat.
- Fill the basin, then drain it quickly while watching the drain flange and P-trap joints.
- Wipe each connection with a dry paper toweltiny leaks show up immediately.
Common leak clues (and fixes)
- Drip at supply line nut: tighten gently; if it persists, the gasket may be damagedreplace the line.
- Seep at slip-joint: washer may be backward or mis-seated; loosen, realign, retighten.
- Leak under drain flange: flange needs more putty/silicone or the nut isn’t evenly tightened.
- Slow drain or gurgle: pop-up assembly misaligned, or venting/drain configuration issue.
Time and Cost Expectations (Because Your Weekend Has Plans)
A straightforward vanity sink swap (same size, same plumbing location) can often be done in a few hours.
If you’re replacing the vanity top, changing faucet hole configurations, or dealing with stuck shutoff valves, it can turn into a
day-long project.
Costs vary widely by sink type and whether you hire help. Basic sinks can be affordable, while higher-end materials, specialty shapes,
or plumbing modifications increase the budget. Professional installation costs depend on your area and complexityespecially if drain lines,
shutoffs, or wall-mounted fixtures are involved.
When You Should Call a Pro (No Shame, Just Strategy)
DIY is greatuntil it isn’t. Consider professional help if:
- Shutoff valves don’t work or the pipes are heavily corroded.
- You need to move the drain outlet in the wall.
- You’re installing an undermount sink on stone and the mounting system is unfamiliar.
- You see water damage, mold, or a soft/rotting vanity base.
- You suspect venting issues or the existing drain setup is incorrect.
Wrap-Up: Your New Sink, Installed the Right Way
Replacing a bathroom sink is a classic “level-up” project: visible results, real functionality, and a surprisingly satisfying moment when
everything drains properly and nothing leaks. Plan carefully, match the sink and drain parts to your setup, seal it correctly, and test like
you’re auditioning for a role as “Person Who Doesn’t Want to Replace a Swollen Vanity.”
Real-World Experiences: What Actually Happens Under the Sink (And How to Win Anyway)
In a perfect world, you shut off two shiny valves, loosen a few friendly nuts by hand, lift the old sink out like it’s weightless,
and install the new one while birds sing. In the real world, bathrooms have characterand by “character,” this guide means “surprises.”
Here are the most common real-life moments people run into when replacing and installing a bathroom sink, plus practical ways to stay ahead of them.
First surprise: the shutoff valves that “sort of” shut off. Lots of homeowners discover that the hot valve closes fine,
while the cold valve keeps trickling like it’s emotionally attached to the pipe. When that happens, the safest move is to shut off the home’s
main water supply, then replace the faulty shutoff valve once the pressure is truly off. If you can’t confidently replace a valve, this is a
prime “call a plumber” momentnot because the project is impossible, but because water damage is expensive and impressively fast.
Second surprise: the P-trap that was installed by a time traveler. Under-sink plumbing is sometimes a museum of past repairs:
mismatched parts, too-long tailpieces, and slip nuts tightened with the enthusiasm of someone trying to seal a submarine hatch.
The fix is usually straightforward: disassemble, clean, and rebuild with properly sized parts so everything aligns without stress.
A trap assembly should fit together calmly. If you’re forcing it, it’s going to leak laterpossibly at 2:00 a.m. on a Tuesday.
Third surprise: “Do I use plumber’s putty or silicone?” The answer is: whatever your fixture instructions recommend.
In practice, many metal drain flanges are sealed with plumber’s putty, while some materials (certain plastics, composites, and porous stone surfaces)
do better with silicone. The real-world lesson is to keep both on hand. If you open the box and the manual politely implies that putty will ruin the finish,
you’ll be glad you didn’t commit too early.
Fourth surprise: the countertop cutout is not perfectly… anything. Older vanity tops can have slightly irregular openings.
Dry-fitting the sink before applying sealant prevents the classic mistake of discovering a fit issue while silicone is already everywhere.
If the sink rocks a little, check for leftover old sealant or debris. If it still rocks, you may need to adjust mounting clips or confirm the sink is the
correct model for your opening. The goal is “stable and sealed,” not “balanced like a gymnast.”
Fifth surprise: the “tiny leak” that isn’t tiny after a week. Some leaks don’t show up immediately because a joint only seeps
when the drain is flowing fast, or when hot water expands a connection slightly. That’s why the best real-world habit is a two-stage test:
test immediately after installation, then test again the next day after the sealant has cured and the sink has been used normally.
A quick tissue wipe around each joint takes seconds and can save your vanity from turning into a sponge.
Sixth surprise: cosmetic finishing takes longer than the plumbing. Many DIYers find the mechanical work easier than making the final result look clean.
Painter’s tape can help you lay a crisp caulk line at the backsplash or sink edge: tape both sides of the seam, apply caulk, tool it smooth, then pull the tape
while the caulk is still wet. It’s one of those small tricks that makes the project look professionallike you meant to do it, and not like you were racing
the clock before dinner.
The biggest “experience” takeaway is simple: sink replacement is rarely complicated, but it’s often fiddly.
If you plan for small surprisesextra towels, a bucket, new supply lines, and a little patienceyou’ll get the satisfying version of DIY:
a solid sink, smooth drainage, and a cabinet that stays dry. That last part is the true victory.


