Table of Contents >> Show >> Hide
- What Does “Show Margins” Mean in Microsoft Word?
- How to Show Margins in Word on Windows PC
- How to Show Margins in Word on Mac
- How to Show the Top and Bottom Margins If They Disappear
- How to Show Text Boundaries in Word
- How to Change Margin Measurement Units
- How to Adjust Margins After Showing Them
- Common Margin Problems and Easy Fixes
- Best Practices for Working With Margins in Word
- Example: Setting One-Inch Margins for a School Paper
- Example: Showing Margins for a Resume
- Experience Notes: What I Have Learned From Real Margin Problems
- Conclusion
Margins in Microsoft Word are a little like the invisible fence around a document. You may not think about them until your essay looks cramped, your resume spills onto a second page, your printer trims off the footer, or your teacher, editor, boss, or very detail-oriented client asks, “Why is this text so close to the edge?” Suddenly, margins are no longer boring. They are the tiny rulers of civilization.
The good news: learning how to show margins in Word on Mac and PC is simple once you know where Word hides the tools. The slightly annoying news: Word has several different margin-related views, and people often mix them up. You can show the ruler, reveal the vertical ruler, display the white space between pages, check margin measurements, use text boundaries in some versions, or open the Page Setup dialog to confirm the exact top, bottom, left, and right margins.
This guide walks you through each method in plain English. Whether you use Word for Microsoft 365, Word 2024, Word 2021, Word 2019, or a recent Mac version, you will learn how to make margins visible, adjust them, troubleshoot missing margins, and avoid layout surprises before printing or submitting your document.
What Does “Show Margins” Mean in Microsoft Word?
Before clicking every button on the ribbon like you are defusing a tiny office-themed bomb, it helps to know what you are trying to show. In Word, “show margins” can mean several things:
- Show the ruler: Displays a horizontal ruler at the top of the page and, in Print Layout view, a vertical ruler along the left side.
- Show white space: Reveals the top and bottom margins between pages in Print Layout view.
- Show text boundaries: Displays boundary lines around areas where text can appear in certain Word desktop versions.
- View margin settings: Opens the margins menu or Page Setup dialog so you can see the exact measurements.
- Use Print Preview: Shows how your document will look on the printed or exported page.
For most users, the easiest and most useful method is turning on the ruler. The ruler gives you a visual reference for margins, indents, tabs, and document width. It is the Word equivalent of turning on the kitchen light before chopping onions.
How to Show Margins in Word on Windows PC
If you are using Microsoft Word on a Windows PC, start with the ruler. It is quick, reliable, and built directly into the View tab.
Method 1: Turn On the Ruler
- Open your document in Microsoft Word.
- Select the View tab on the ribbon.
- In the Show group, check the box labeled Ruler.
- Make sure your document is in Print Layout view for the best margin display.
Once the ruler appears, look at the top of your document. The white area usually represents the writable space, while the shaded or darker areas show the margins outside the main text area. You can also use the ruler to see paragraph indents, tab stops, and page width.
Method 2: Show the Vertical Ruler on Windows
The horizontal ruler shows left and right margins, but the vertical ruler helps you see top and bottom spacing. If the vertical ruler does not appear, it may be turned off in Word Options.
- Go to File.
- Select Options.
- Choose Advanced.
- Scroll to the Display section.
- Check Show vertical ruler in Print Layout view.
- Select OK.
- Return to the View tab and make sure Ruler is checked.
If you still do not see the vertical ruler, check that you are using Print Layout. Draft view and web-style views may not show the same page boundaries.
Method 3: Check Exact Margin Measurements
Seeing the margin is helpful, but sometimes you need the exact number. For example, a school paper may require one-inch margins, while a business proposal may need a wider left margin for binding.
- Select the Layout tab.
- Click Margins.
- Review the preset margin options, such as Normal, Narrow, Moderate, Wide, or Mirrored.
- Select Custom Margins to view or edit the exact top, bottom, left, and right measurements.
The default Word margin is often one inch on all sides, but that can change depending on the template, document source, or previous formatting. Never assume. Word loves a mystery.
How to Show Margins in Word on Mac
Microsoft Word for Mac uses a similar layout, but some settings live in slightly different places. If you are switching from Windows to Mac, do not worry. The buttons did not vanish; they simply moved into a new neighborhood.
Method 1: Turn On the Ruler on Mac
- Open your document in Word for Mac.
- Click the View tab.
- Select Ruler.
- Use Print Layout view for the most accurate page margin display.
The ruler should now appear at the top of the document. This lets you see the left and right margin areas and gives you visual control over indents and tabs.
Method 2: Show the Vertical Ruler on Mac
If the vertical ruler is missing on the left side of the page, enable it in Word Preferences.
- Click Word in the Mac menu bar.
- Select Preferences.
- Under Authoring and Proofing Tools, choose View.
- Check the option for Vertical ruler.
- Close the Preferences window.
- Make sure you are in Print Layout view.
The vertical ruler is especially helpful when working with headers, footers, page breaks, and documents where top spacing matters. It is also useful when you are trying to figure out why page two looks like it started a dramatic new life halfway down the screen.
Method 3: View or Change Margin Measurements on Mac
- Select the Layout tab.
- Click Margins.
- Choose a preset margin option or click Custom Margins.
- Review or enter values for top, bottom, left, and right margins.
- Select OK when finished.
This is the best method when you need precision. If your assignment, manuscript, legal document, or company template requires specific formatting, use Custom Margins instead of eyeballing the ruler like a pirate reading a treasure map.
How to Show the Top and Bottom Margins If They Disappear
One of the most common Word margin problems happens when the top and bottom white space disappears in Print Layout view. Your document may look like one page is glued directly to the next. This does not always mean your margins are gone. It usually means Word is hiding the white space between pages.
Fix Missing White Space on Windows
- Go to File.
- Select Options.
- Choose Display.
- Under page display options, check Show white space between pages in Print Layout view.
- Select OK.
You can also try moving your pointer between two pages until it changes, then double-clicking the page boundary. In many Word versions, this toggles the white space on or off.
Fix Missing White Space on Mac
On Mac, first make sure you are in Print Layout. Then check the View or Preferences options related to page display. If the top margin still seems missing, try double-clicking the boundary between pages. The margin space may reappear instantly, as if Word finally remembered it was supposed to behave.
How to Show Text Boundaries in Word
Some Word users want visible lines around the text area, not just rulers. This is where text boundaries can help. In supported desktop versions, text boundaries show visual guides around the printable text area or around paragraph text zones.
Turn On Text Boundaries on Windows
- Select File.
- Choose Options.
- Select Advanced.
- Scroll to Show document content.
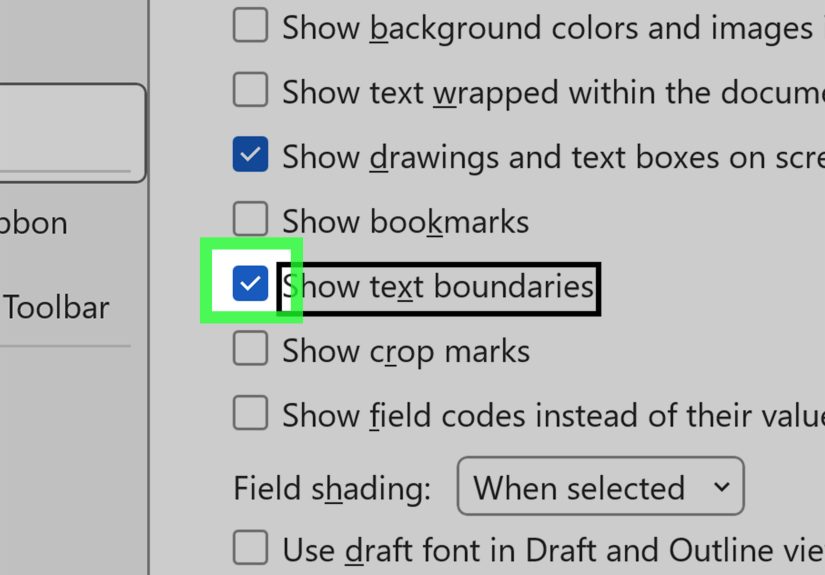
- Check Show text boundaries.
- Select OK.
A quick warning: in newer versions of Word, text boundaries may appear around individual paragraphs or content areas instead of forming one clean rectangle around the page. This can be useful for layout work, but it can also make your document look like it is wearing graph-paper pajamas. If it distracts you, turn it off after checking your layout.
How to Change Margin Measurement Units
If Word shows margins in centimeters but you need inches, or vice versa, change the measurement unit. This affects the ruler and other measurement fields.
Change Units on Windows
- Go to File.
- Select Options.
- Choose Advanced.
- Scroll to Display.
- Find Show measurements in units of.
- Select inches, centimeters, millimeters, points, or picas.
- Click OK.
Change Units on Mac
- Click Word in the Mac menu bar.
- Select Preferences.
- Choose General.
- Find the measurement unit setting.
- Select your preferred unit and close the settings window.
This is a small setting, but it saves a lot of mental math. Nobody wants to convert 2.54 centimeters to one inch while already fighting a deadline.
How to Adjust Margins After Showing Them
Once you can see your margins, you may realize they need changing. Word gives you two main ways to adjust them: presets and custom settings.
Use Preset Margins
- Go to Layout.
- Select Margins.
- Choose a preset such as Normal, Narrow, Moderate, Wide, or Mirrored.
Preset margins are great for everyday documents. Normal is usually safe for schoolwork, office documents, letters, and reports. Narrow can help fit more text on a page, but use it carefully. A page packed too tightly can feel like reading a cereal box through a keyhole.
Use Custom Margins
- Go to Layout.
- Select Margins.
- Click Custom Margins.
- Enter exact values for Top, Bottom, Left, and Right.
- Choose whether to apply the change to the whole document or a selected section.
- Select OK.
Custom margins are useful for resumes, booklets, academic papers, printable worksheets, newsletters, and documents that must follow strict formatting rules.
Common Margin Problems and Easy Fixes
The Ruler Is Turned On, But I Still Do Not See Margins
Switch to Print Layout. The ruler behaves differently in other views. Also check whether your zoom level is too high or too low. Sometimes the margin is there, but your screen is not showing enough of the page to make it obvious.
The Top Margin Looks Gone
Turn on white space between pages. This is a display setting, not necessarily a document formatting problem. Before changing your actual margins, check whether Word is simply hiding the visual gap.
My Printed Document Cuts Off Text
Open File > Print and review the preview carefully. Some printers have nonprintable areas near the edge of the paper. If your text, border, or footer is too close to the edge, increase the margin slightly.
My Margins Change Halfway Through the Document
Your document may contain section breaks. Section breaks can allow different margins in different parts of a document. Place your cursor in the strange-looking section, then open Layout > Margins > Custom Margins to check whether that section has different settings.
The Ruler Shows Indents, Not Just Margins
Correct. The ruler shows both margins and paragraph indent markers. The margin controls are at the edges of the ruler, while the small triangle and rectangle markers control paragraph indentation. If one paragraph looks oddly shifted, you may need to fix the indent, not the page margin.
Best Practices for Working With Margins in Word
Margins are not just technical settings. They affect readability, professionalism, printing, and how much trust your document earns at first glance. A clean margin says, “I know what I am doing.” A chaotic margin says, “This document was assembled during a thunderstorm.”
- Use one-inch margins for most standard documents. This is a common default and works well for readability.
- Use wider margins for documents with notes or comments. Teachers, editors, and reviewers appreciate breathing room.
- Use mirror margins for bound documents. Books, manuals, and booklets often need inside and outside margins.
- Check margins before exporting to PDF. A PDF preserves layout, including mistakes.
- Preview before printing. Print Preview catches problems that the editing screen may hide.
- Do not rely only on visual judgment. Use Custom Margins when exact measurements matter.
Example: Setting One-Inch Margins for a School Paper
Suppose you are writing a research paper and the instructions require one-inch margins on all sides. Here is the cleanest way to check it:
- Open the document.
- Go to Layout > Margins.
- Select Normal if it shows one-inch margins.
- If unsure, choose Custom Margins.
- Set Top, Bottom, Left, and Right to 1 inch.
- Click OK.
- Go to View and turn on Ruler to visually confirm the layout.
This simple process prevents formatting drama later. It is much better than finishing the paper at midnight and discovering your margins have the personality of a modern art exhibit.
Example: Showing Margins for a Resume
Resume margins are tricky because you want enough white space to look polished, but you also want your best experience to fit on one or two pages. Start with Normal margins. If the resume barely spills onto another page, try slightly smaller custom margins, such as 0.7 or 0.75 inches. Keep the ruler visible while adjusting spacing so the page does not become too crowded.
For resumes, margins should help the reader scan quickly. If everything touches the edge, the document feels tense. If the margins are huge, it may look like you are trying to make three bullet points fill a whole page. Balance is the goal.
Experience Notes: What I Have Learned From Real Margin Problems
After working with Word documents across school assignments, office reports, resumes, forms, ebooks, and printable PDFs, one lesson stands out: margin problems are rarely dramatic at first. They sneak in quietly. A copied paragraph brings strange formatting. A template has unusual section breaks. Someone hides the white space between pages and forgets about it. Then, three hours later, everyone is blaming the printer, the PDF converter, the moon, and possibly Microsoft itself.
The first habit that saves time is turning on the ruler before doing serious formatting. The ruler gives you immediate visual feedback. You can see whether the text area is too wide, whether a paragraph has a strange indent, or whether a table is pushing beyond the printable area. It is especially helpful when working with documents created by someone else. If a file has traveled through email, cloud storage, downloads, and multiple computers, assume it has picked up at least one formatting gremlin along the way.
The second habit is checking Custom Margins instead of guessing. Many users look at a document and say, “That seems like one inch.” That is fine for casual writing, but not for academic papers, contracts, submissions, or print-ready files. Exact margin settings remove doubt. If the requirement says one inch, set one inch. If a booklet needs mirror margins, use the mirror margin setting. Word is much better at measurement than the human eyeball, especially before coffee.
The third habit is watching for section breaks. Section breaks are powerful, but they are also sneaky. A document can have one margin setting on page one, another on page two, and a completely different layout after a section break. This often happens in reports with title pages, landscape tables, appendices, or pasted content. When margins suddenly change halfway through a document, place the cursor in that section and check the margin settings there. The issue is often local, not document-wide.
The fourth habit is using Print Preview before sending anything important. The editing screen is helpful, but Print Preview is the final rehearsal. It shows whether headers are too close to the top, footers are getting cut off, borders are outside printable range, or tables are wider than the page. This step is boring in the same way locking your door is boring: you only appreciate it when it prevents a problem.
Finally, do not overuse narrow margins just to force content onto fewer pages. Sometimes it works beautifully. Other times, it makes the document look crowded and harder to read. A better fix may be tightening paragraph spacing, editing repeated wording, resizing images, or using a cleaner font size. Margins are part of design, not just decoration. When they are visible and properly set, your document feels organized before the reader even gets to the first sentence.
Conclusion
Showing margins in Word on Mac and PC is mostly about knowing which view tools to enable. Start with View > Ruler, use Print Layout, turn on the vertical ruler if needed, and check Layout > Margins > Custom Margins when exact measurements matter. If the top or bottom margin seems missing, do not panic. Word may simply be hiding the white space between pages.
Once you understand the difference between rulers, white space, text boundaries, and actual margin settings, Word becomes much easier to control. Your documents print more predictably, look cleaner on screen, and avoid that unfortunate “why is my text trying to escape the page?” situation. Margins may be invisible by default, but now you know how to make them show up and behave.
Note: Menu names and settings can vary slightly depending on your Microsoft Word version, operating system, display mode, and update channel. For best results, use Print Layout view and confirm important documents with Print Preview before sharing, printing, or exporting to PDF.


