Table of Contents >> Show >> Hide
- Why the Singer Scholastic 717 Is Different From Some Modern Machines
- Before You Thread the Singer 717
- How to Thread the Upper Thread on a Singer Scholastic 717
- How to Wind the Bobbin on a Singer Scholastic 717
- How to Insert and Thread the Bobbin Case
- How to Raise the Bobbin Thread
- Quick Threading Checklist for the Singer 717
- Common Singer Scholastic 717 Threading Mistakes
- How to Know the Machine Is Threaded Correctly
- Troubleshooting Tips That Save Time
- Real-World Experiences With Threading a Singer Scholastic 717
- Final Thoughts
If you have a Singer Scholastic 717 sewing machine sitting on your table, congratulations: you own a sturdy little classroom workhorse. The bad news is that threading an older machine can feel like solving a mechanical riddle written by a very confident person in 1970s typography. The good news is that once you understand the thread path on the Singer Scholastic 717, it becomes wonderfully repeatable.
This guide walks you through exactly how to thread a Singer Scholastic 717 sewing machine, including the upper thread, bobbin, and final thread pickup. It also covers the most common threading mistakes, how to fix tension problems, and what experienced sewists quickly learn after using this vintage Singer for a while. So if your machine is making loops, nests, tangles, or a dramatic performance worthy of daytime television, let’s calm it down and thread it correctly.
Why the Singer Scholastic 717 Is Different From Some Modern Machines
The Singer Scholastic 717 is not trying to be cute, computerized, or emotionally supportive. It is a practical mechanical sewing machine built to sew. One reason people still like it is that it combines durability with straightforward controls. It also has a slant-needle design and a front drop-in bobbin setup, which means the threading routine is a little different from many newer beginner machines.
That matters because a machine can look threaded and still be threaded wrong. On the Singer 717, the thread must be seated properly in the tension discs, pass through the take-up lever, and then go through the final guides before entering the needle. Miss one point and the machine may sew for five seconds before turning your thread into spaghetti with ambition.
Before You Thread the Singer 717
1. Raise the presser foot
This is the golden rule. Raising the presser foot opens the tension discs so the upper thread can seat correctly. If you thread the machine with the presser foot down, the thread may sit outside the tension mechanism instead of inside it. That usually leads to loose stitches, looping underneath the fabric, or the famous “bird’s nest” under the needle plate.
2. Turn the hand wheel toward you
On the Singer Scholastic 717, always turn the hand wheel toward you. Rotate it until the needle is at its highest position and the take-up lever is up. This gives you the easiest, cleanest path for threading. It also prevents the machine from being threaded while the take-up lever is hiding like it owes someone money.
3. Check your needle
If the machine still misbehaves after threading, the needle may be the real culprit. Make sure the needle is inserted correctly with the flat side of the shank facing the back. A bent, dull, or incorrectly installed needle can cause skipped stitches and broken thread even when the threading is perfect.
4. Use the right bobbin and thread
Older machines can be picky about bobbins. Use the bobbin type recommended for the Singer 717, and make sure it is wound evenly. A badly wound bobbin may look innocent, but it can throw off stitch quality fast. For everyday sewing, all-purpose sewing thread works well, and a smooth, evenly wound bobbin will save you a lot of muttering.
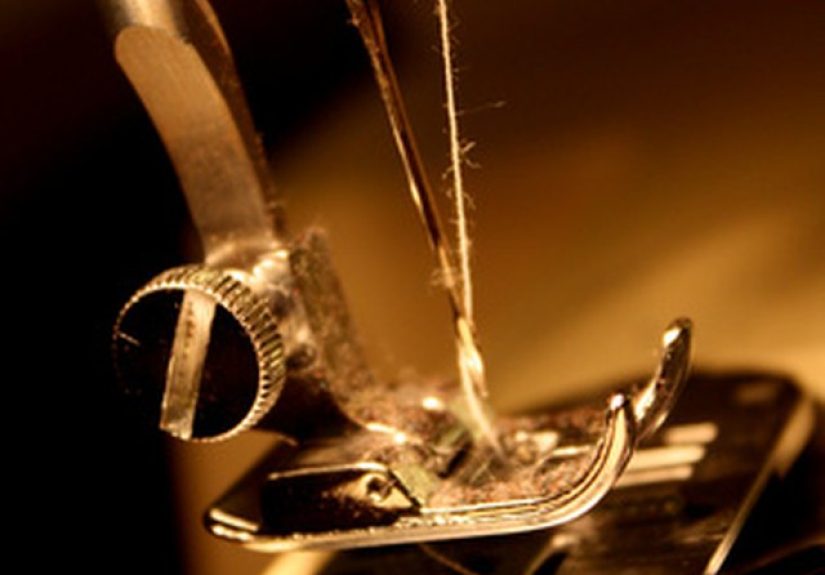
How to Thread the Upper Thread on a Singer Scholastic 717
Here is the step-by-step upper threading path for the Singer Scholastic 717 sewing machine.
- Place the spool of thread on the spool pin over the spool pin felt. Make sure the spool sits securely and the thread feeds smoothly.
- Raise the presser foot and confirm the needle is at its highest position.
- Guide the thread into the tension area. On this model, the thread is slipped horizontally between the tension discs from the top. This part matters a lot. If the thread is not properly seated here, the machine will not control upper tension correctly.
- Lead the thread under the guide on the right side.
- Carry the thread over the spring and under the guide on the left side. Let the spring return to its normal position.
- Thread the take-up lever from right to left. This is one of the most important steps on the Singer 717. If you miss the take-up lever, the machine can loop thread underneath the fabric almost instantly.
- Bring the thread down through the final thread guides above the needle. These last guides keep the thread aligned as the machine forms stitches.
- Thread the needle from front to back. Pull about 4 to 6 inches of thread through the eye of the needle.
That is the full upper thread path. If the machine sews poorly, rethread it from the beginning instead of guessing where the problem is. Vintage sewing machines reward patience and punish shortcuts with impressive creativity.
How to Wind the Bobbin on a Singer Scholastic 717
Before you sew, you need a properly wound bobbin. The Singer Scholastic 717 has a bobbin winding routine that is simple once you do it a couple of times.
- Disengage the sewing mechanism by loosening the hand wheel knob while holding the hand wheel.
- Place the thread spool on the spool pin.
- Lead the thread between the bobbin winding tension discs, then around the bobbin winding thread post.
- Feed the thread through the small hole in the bobbin from the inside or side indicated by your machine’s setup.
- Place the bobbin on the bobbin winder spindle and engage the latch by pressing it toward the bobbin.
- Hold the thread end lightly and start the machine. After several wraps, trim or allow the loose end to snap off.
- Continue winding until the bobbin is full. The bobbin winder should release automatically when full.
- Remove the bobbin and tighten the hand wheel knob again to re-engage sewing mode.
A good bobbin should be firm, evenly wound, and not bulging at the edges. If it looks lopsided, sloppy, or like it spent spring break unsupervised, wind a new one.
How to Insert and Thread the Bobbin Case
Once the bobbin is wound, it needs to be inserted correctly into the Singer 717’s bobbin area.
- Open the slide plate and access the bobbin area.
- Hold the bobbin so the thread unwinds in the correct direction for the machine’s bobbin case.
- Place the bobbin into the bobbin case.
- Pull the thread into the notch in the bobbin case.
- Draw the thread under the tension spring and into the slot.
- Pull out about 3 inches of thread.
- Close the slide plate, allowing the thread to pass through the slot correctly.
The main thing here is that the bobbin thread must be under the bobbin case tension spring. If it is just sitting loosely in the case, the stitch formation will be inconsistent and the machine may tangle immediately.
How to Raise the Bobbin Thread
Now that both the upper thread and bobbin are in place, you need to bring the bobbin thread up through the needle plate before sewing.
- Hold the needle thread lightly with your left hand.
- Turn the hand wheel slowly toward you so the needle goes down into the throat plate and comes back up.
- Watch for the bobbin thread loop to appear.
- Pull the upper thread gently to bring the bobbin loop fully up.
- Open the loop with your fingers and pull the bobbin thread free.
- Place both thread tails under the presser foot and toward the back, slightly to the right of the needle.
This final step helps prevent tangling when you start your first seam. On older machines especially, starting with both thread tails neatly under the foot is one of those tiny habits that makes you look much more experienced than you feel.
Quick Threading Checklist for the Singer 717
- Presser foot up before threading
- Needle and take-up lever in highest position
- Upper thread seated inside tension discs
- Take-up lever threaded from right to left
- Needle threaded front to back
- Bobbin thread pulled into notch, under spring, and into slot
- Both thread tails pulled under the presser foot to the back
If you follow that checklist, the Singer Scholastic 717 usually behaves beautifully.
Common Singer Scholastic 717 Threading Mistakes
Thread loops under the fabric
This usually means the upper thread is not threaded correctly, is not seated in the tension mechanism, or missed the take-up lever. Rethread the entire upper path with the presser foot up and the needle at its highest point.
Thread keeps breaking
Check the needle first. Then inspect the thread path for snagging, make sure the bobbin is inserted correctly, and confirm the thread is not wrapped around the spool pin or guides.
Skipped stitches
Often this points to the needle: wrong size, wrong type, installed backward, bent, or dull. On the Singer 717, remember that the needle’s flat side faces the back.
Machine jams at the start of sewing
Make sure both thread tails are held back when beginning the seam. Also confirm the bobbin thread has been raised fully before you start stitching.
Thread flaps wildly near the needle
You may have missed a thread guide. Even one missed guide can throw off the thread path enough to create messy stitches or erratic tension.
How to Know the Machine Is Threaded Correctly
Do a test seam on scrap fabric before you start your actual project. A correctly threaded Singer Scholastic 717 should produce balanced stitches with no giant loops on the bottom and no tight puckering on the top. The thread should feed smoothly, the stitch should look even, and the machine should sound calm rather than irritated.
Use two different thread colors for testing if you want to check the stitch balance more easily. One color in the needle and another in the bobbin will quickly show whether the top or bottom tension is dominating. That trick feels slightly nerdy, which is exactly why it works so well.
Troubleshooting Tips That Save Time
If your Singer 717 starts misbehaving, do these things in order:
- Remove the thread completely.
- Raise the presser foot.
- Raise the needle and take-up lever.
- Rethread the upper thread carefully.
- Check that the bobbin is correctly wound and seated.
- Replace the needle if there is any doubt.
- Test on scrap fabric before changing tension settings.
That order matters. Many stitch problems blamed on tension are actually threading mistakes. In other words, don’t start turning dials like a game-show contestant until you are sure the thread path is correct.
Real-World Experiences With Threading a Singer Scholastic 717
One of the most relatable experiences with the Singer Scholastic 717 is that the machine often looks simpler than it feels during the first threading attempt. You see a spool pin, a needle, a few guides, and a tension area, and your brain says, “How hard could this be?” Ten minutes later, you are staring at a loop under the fabric the size of a small pastry and wondering whether the machine is judging you. It probably is not, but it definitely wants to be threaded correctly.
Most beginners discover that the biggest breakthrough comes from understanding just two things: the presser foot must be up while threading, and the take-up lever cannot be skipped. Those two details solve a surprising number of problems. Many people spend time blaming the bobbin, the thread, the fabric, the age of the machine, and possibly the alignment of the planets, when the actual problem is simply that the upper thread never made it into the tension discs or missed the lever entirely.
Another common experience is learning to respect the hand wheel. On the Singer 717, turning the hand wheel toward you is not optional advice tossed in for decoration. It is part of how the machine wants to operate. Once users get in the habit of bringing the needle to its highest position before threading or raising the bobbin thread, the whole process becomes calmer and far more predictable.
People who sew on older school machines like the Scholastic 717 also tend to appreciate how honest the machine feels. There is no auto-threader hiding mistakes, no digital prompt flashing symbols, and no button pretending to do the thinking for you. When it is threaded right, it sews right. When it is threaded wrong, it tells you immediately, usually in the form of loops, noise, or dramatic thread bunching. Strangely enough, that honesty is part of the charm.
Experienced users often say that once they mastered threading the Singer Scholastic 717, they became better at threading every other sewing machine too. That makes sense. This model teaches the fundamentals very clearly: tension matters, thread direction matters, guide placement matters, and neat setup matters. It does not let you fake your way through the basics, which is frustrating at first and incredibly useful later.
There is also something satisfying about the moment the machine finally clicks into harmony. You thread the needle front to back, bring up the bobbin thread, pull both tails under the foot, test on scrap fabric, and suddenly the stitches look clean and balanced. No nesting, no snarls, no mystery knots. Just a smooth seam. That moment feels less like “I followed a manual” and more like “I have joined an ancient practical society of people who know how to make fabric behave.”
So yes, threading a Singer Scholastic 717 can be a little fiddly the first few times. But it is also learnable, logical, and worth practicing. Once the path becomes muscle memory, this machine stops feeling intimidating and starts feeling dependable. And that is exactly what a good vintage sewing machine should be: not flashy, not dramatic, just ready to sew when you are.
Final Thoughts
If you want to know how to thread a Singer Scholastic 717 sewing machine the right way, the answer is simple: start with the basics, slow down, and respect the thread path. Raise the presser foot, bring the needle and take-up lever to the highest position, seat the thread properly in the tension discs, thread the take-up lever from right to left, thread the needle from front to back, insert the bobbin correctly, and pull both thread tails to the back before sewing.
Once you do that, the Singer 717 becomes much less mysterious and much more enjoyable. It is a sturdy machine with a classic design, and when threaded correctly, it still does what it was built to do: make neat stitches without fuss. Well, without too much fuss. It is still a sewing machine, after all.


