Table of Contents >> Show >> Hide
- How This Project Started: One Cat, One Flashlight, Zero Chill
- What “Cat Light Drawings” Actually Are
- My Gear and Setup (Beginner-Friendly)
- The 7-Step Workflow I Used for Every Cat Light Drawing
- Common Problems I Hit (and How I Fixed Them)
- How I Turned Random Experiments Into a Real Series
- Editing Process: Keeping It Polished but Honest
- Why This Project Works for Art + SEO + Audience Engagement
- Conclusion
- Extended Creator Experience: 500-Word Field Notes from the Cat-Light Project
I did not wake up one morning and say, “Today I shall become a dramatic cat-light wizard.” But that is basically what happened.
One evening, I was testing long-exposure photography with a flashlight, and I accidentally drew a crooked glowing line that looked like a cat tail.
That happy mistake turned into a full creative project: a series of cat light drawings built from motion, darkness, and way too much coffee.
This article is a behind-the-scenes look at how I made the series, what actually worked, what failed spectacularly, and how I turned random experiments into a cohesive visual story.
If you are into creative photography, cat-themed art, night shooting, or simply making cool things with simple tools, this guide will help.
I’ll keep it practical, honest, and funbecause art should be both beautiful and a little ridiculous.
Along the way, I blended techniques from light painting photography, long exposure workflows, composition strategy, and cat behavior-aware staging.
Translation: yes, we are making art, but we are doing it with a plan.
By the end, you will know how to create your own cat light drawings, avoid common mistakes, edit your images into a polished series, and publish the work with strong SEO-friendly structure for web readers.
How This Project Started: One Cat, One Flashlight, Zero Chill
The original idea was simple: draw cat silhouettes in the air using a handheld light during long exposures.
The first tests were awful in the best possible way. The lines were shaky, the cat looked like a potato with whiskers, and half the frames were pure chaos.
But the energy was there. The lines felt alive.
What hooked me was the personality.
A drawn cat in light can look elegant, mysterious, playful, or totally unhinged depending on line speed, color, and shape.
One curve can say “majestic panther.” One wrong curve can say “angry toaster.” Both are artistically valid.
I decided to commit to a full series rather than a single lucky image.
That forced me to think beyond individual shots and design a visual language:
recurring line weight, a controlled color palette, consistent framing, and emotional variety across the set.
In other words, each piece had to stand alone and also belong to a bigger story.
What “Cat Light Drawings” Actually Are
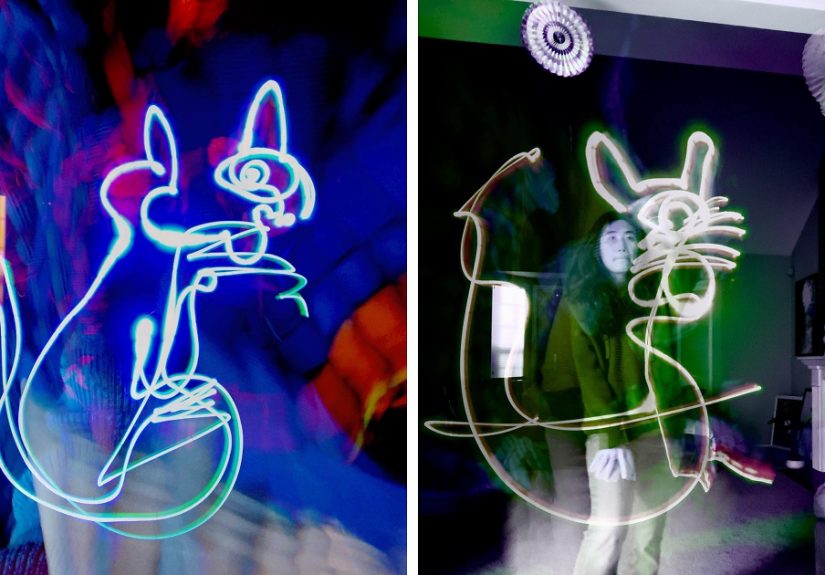
Cat light drawings are images created by moving a light source through space during a long exposure to form feline shapes, gestures, and symbols.
You can work in two main modes:
1) Light Drawing in Empty Space
You draw the cat outline directly in front of the camera in a dark scene.
The light itself becomes the subject.
This style creates graphic, sketch-like pieces with a strong minimalist feel.
2) Light Painting Around a Subject
You illuminate parts of a real cat sculpture, toy, or scene while the shutter stays open.
The result is more cinematic, with glow contours and atmospheric detail.
I used this method for several “portrait-like” pieces in the series.
The magic of this medium is that the drawing exists in time, not just space.
Your arm movement, speed changes, and pauses become visible brushstrokes.
Every image is literally performance + photography.
My Gear and Setup (Beginner-Friendly)
You do not need a studio full of expensive gear.
Most of my project was built with practical tools and a few smart choices.
Core Equipment
- Camera with manual mode (mirrorless, DSLR, or capable phone workflow)
- Tripod (non-negotiable for clean long exposures)
- Remote shutter or timer mode
- Small LED lights and a narrow flashlight
- Black clothing (so I disappear better during exposure)
- Dark room or outdoor low-light location
Camera Settings That Consistently Worked
- Shutter: 8–30 seconds depending on complexity
- ISO: 100–400 to control noise
- Aperture: f/5.6 to f/8 for balance and sharpness
- Focus: Manual focus locked before shooting
- Format: RAW for maximum editing latitude
- White Balance: Tuned per scene for mood consistency
I also learned to keep a tiny notebook for exposure notes.
That one habit saved hours of “why was this frame perfect and this one cursed?” detective work.
Safe Light Choices Matter
I avoided risky light sources and used controlled LEDs and flashlights.
If you’re creating art around pets or people, prioritize gentle, indirect light and comfort.
Good art is never worth unsafe shortcuts.
The 7-Step Workflow I Used for Every Cat Light Drawing
Step 1: Build a Cat Gesture Sheet
Before touching the camera, I sketched 20–30 tiny cat poses on paper:
curled sleep pose, alert ears, leap arc, side profile, stretched back, slow blink face.
These mini sketches acted like choreography.
When it was dark and time-sensitive, I had a plan instead of panic.
Step 2: Choose One Emotion Per Frame
Each image needed a clear emotional target: curious, regal, mischievous, cozy, nocturnal hunter.
This stopped the series from becoming repetitive line doodles.
Emotion drove line direction, shape tension, and color temperature.
Step 3: Set the Stage in Layers
I arranged scenes with foreground, subject zone, and negative space.
Even abstract work needs composition.
A clean background made the light lines feel intentional, while subtle environmental texture gave depth.
Think “minimal but not empty.”
Step 4: Run Technical Test Frames
I shot test exposures first using a stand-in object and simple strokes.
This calibrated brightness, focus, and line thickness.
Ten minutes of testing prevented one hour of regrettable improvisation.
It also helped me dial in how fast to move the light for smooth curves.
Step 5: Perform the Drawing Like a Dance
Once the shutter opened, I moved through the drawing in one continuous sequence:
start at ears, flow through spine, sweep tail, punctuate whiskers, then exit frame.
I kept the light moving to avoid blown hotspots.
If a line required emphasis, I slowed down instead of stopping.
Step 6: Bracket Variations
I captured 5–12 variations of the same concept with micro-changes:
faster tail curve, tighter face loop, wider negative space, slightly warmer light.
Often, version #8 beat version #1 by a mile.
The best images looked spontaneous but came from deliberate iteration.
Step 7: Curate for Series Cohesion
After each shoot, I reviewed frames as a group, not just as favorites.
I selected images that balanced shape diversity and tonal consistency.
A great series needs rhythm: quiet image, bold image, playful image, dramatic image.
Think playlist, not random shuffle.
Common Problems I Hit (and How I Fixed Them)
Problem: Messy, tangled lines
Fix: Simplify the drawing.
I reduced each cat to 5–7 essential strokes instead of trying to draw every fur detail in the air.
Minimal structure created cleaner, more elegant forms.
Problem: Too much sensor noise in dark scenes
Fix: Lower ISO, expose more thoughtfully, and enable appropriate long-exposure noise handling when needed.
I also spaced frames to let the camera process.
Less haste, less digital confetti.
Problem: Blown highlights on whiskers and eyes
Fix: Use dimmer output, greater distance from lens axis, and shorter light contact time.
I switched from “flashlight blast” to “controlled brush.”
Subtlety wins.
Problem: Flat compositions
Fix: Reintroduce composition rules.
I used leading lines, rule-of-thirds placement, and focal anchors.
Even abstract light art gets better when viewer attention has a path to follow.
Problem: Creative fatigue after many takes
Fix: Work in short sessions with a fixed shot list.
I separated shoots into “sketch days” and “finish days.”
Fresh eyes improved decisions more than one extra exhausted hour.
How I Turned Random Experiments Into a Real Series
A single strong image is nice.
A series is a statement.
To make the project coherent, I set rules:
- Use a limited palette (warm amber + cool blue accents)
- Keep line thickness visually consistent
- Alternate full-body and portrait-style cat forms
- Anchor each title to a behavior or mood
- Maintain similar contrast and black levels in post-processing
I titled pieces with personality cues:
Midnight Pounce, Window Watcher, Whisker Storm, Silent Zoomies, Queen of the Sofa Realm.
Titles matter.
They help readers emotionally enter abstract visuals.
Then I sequenced the final set like a mini narrative:
intro frame, tension frame, playful release, meditative close.
Viewers stayed engaged longer because the series felt intentional, not accidental.
Editing Process: Keeping It Polished but Honest
My edit style was clean and restrained.
Light drawing already has drama built in, so over-editing can quickly make images look artificial.
Editing Checklist
- Normalize exposure and recover highlights
- Refine white balance for mood consistency
- Lift key light lines using selective masks
- Reduce distracting noise without plastic smoothing
- Crop for stronger visual flow and mobile readability
- Apply subtle sharpening only where lines need bite
I exported two versions per image:
a high-quality master for print and a web-optimized version for fast loading.
For publishing, image performance matters as much as beauty.
Nobody waits around for a 20 MB cat masterpiece.
Why This Project Works for Art + SEO + Audience Engagement
The topic combines three high-interest areas:
cats, creative DIY photography, and visual storytelling.
That overlap creates strong reader intent across search.
People looking for “cat art ideas,” “light painting photography,” and “long exposure tutorials” can all find value in one piece.
To improve discoverability, I structured the article with clear H1/H2/H3 hierarchy, skimmable sections, practical takeaways, and natural keyword use.
The keywords are present, but the language stays human.
Search engines reward relevance; readers reward readability.
You need both.
Most importantly, the content is experience-driven.
Instead of generic tips, it includes real workflow decisions, mistakes, and fixes.
That makes it useful, memorable, and shareable.
In creative niches, authenticity is a ranking factor in everything except the algorithmand even there, it helps.
Conclusion
Creating a series of cat light drawings taught me that technical control and playful curiosity can absolutely coexist.
The project began as a messy experiment and grew into a coherent body of work through repeatable process, intentional composition, and consistent editing.
If you want to try this style, start simple:
one location, one light, one cat pose, one clear mood.
Build from there.
You do not need perfect gear or perfect lines.
You need patience, iteration, and the willingness to make weird frames before making great ones.
In the end, this series was not just about drawing cats with light.
It was about learning to treat time as a brush, darkness as a canvas, and mistakes as part of the art.
Also, yes, at least one frame still looks like a glowing croissant with earsand I’m keeping it.
Extended Creator Experience: 500-Word Field Notes from the Cat-Light Project
The most surprising part of this project was how physical it felt.
I expected a photography workflowtripod, settings, click.
What I got was somewhere between dance practice and handwriting class in the dark.
Every line reflected how steady my breathing was, how quickly I pivoted my wrist, and whether I hesitated for half a second at the cat’s shoulder.
If I rushed, the drawing looked anxious.
If I slowed down too much, it looked overcooked.
The final images were emotional recordings of movement, not just technical captures.
Early on, I made the classic beginner mistake: I tried to draw every detail.
Tiny claws, perfect whiskers, fluffy cheeks, dramatic fur texturethe works.
It failed every time.
The lines became tangled, and the subject got lost.
Once I reduced each cat to a handful of core gestures, everything improved instantly.
Ears. Back arc. Tail rhythm.
That was enough for the brain to read “cat” and for the eye to enjoy the image.
It reminded me that clarity is often subtraction, not addition.
The second big lesson was consistency.
A single cool frame is easy.
A series with internal logic is hard.
I had to stop judging images only by “wow factor” and start asking better questions:
Does this frame belong with the others?
Does it repeat too much?
Does it add contrast to the sequence?
On one review night, I removed three flashy images because they disrupted the visual rhythm.
Painful decision.
Correct decision.
I also learned to respect recovery time between shoots.
Long-exposure sessions can trick you into overworking because each frame takes effort and waiting.
After about 90 minutes, my line quality dropped and my decision-making got noisy.
So I switched to shorter sessions and clear goals: “Tonight, only side profiles,” or “Tonight, only tail-motion studies.”
That changed everything.
Progress became measurable.
Creativity felt lighter.
Results got better faster.
One of my favorite moments came from a so-called failed shot.
I missed the face shape, the tail was too short, and the whole thing leaned left.
But there was a spontaneous flick near the top that looked like a cat turning mid-jump.
It had motion, personality, attitude.
That frame eventually became a key image in the final set because it felt alive.
It reminded me that “mistake” and “style” are sometimes one decision apart.
If I were starting over, I would still make all the awkward early attempts.
They taught me pacing, restraint, and confidence faster than any perfect first try could.
This project made me a better photographer, yesbut also a better editor and storyteller.
I now trust process more than luck.
And whenever I see a flashlight, I still instinctively want to draw cat ears in the air.
Creative habits are hard to quit.
Thankfully, this one glows.


