Table of Contents >> Show >> Hide
- What “juice jelly” means (and what it doesn’t)
- The Make-It-Mine formula (so you can stop following recipes like a robot)
- Option A: Classic Make-It-Mine Juice Jelly (Gelatin)
- Option B: Vegan Make-It-Mine Juice Jelly (Agar-Agar)
- Make-It-Mine flavor combos (steal these shamelessly)
- Fun formats: cups, cubes, layers, and lunchbox wins
- Food safety & storage (quick but important)
- Want the toast version? Quick Make-It-Mine Freezer Juice Jelly (Pectin)
- of real-life Make-It-Mine Juice Jelly experiences (aka: how I learned to respect the jiggle)
- Conclusion
- SEO tags
If you’ve ever looked at a wobbly cup of fruit jelly and thought, “Cute… but I want it more me,” you’re in the right kitchen.
This Make-It-Mine Juice Jelly Recipe is a customizable, fridge-friendly dessert you can bend in a dozen directions:
bold flavors, layered colors, gummy-like bites, or soft-and-jiggly cups that basically do a happy dance when you tap the spoon.
And yes, we’re doing this with real techniques (not mystery powder vibes), so you’ll know why it sets, how to fix it when it doesn’t,
and what to change when you want a different texture. Consider this your “choose-your-own-adventure” jellyonly the monster is… dessert cravings.
What “juice jelly” means (and what it doesn’t)
“Jelly” can mean two very different things:
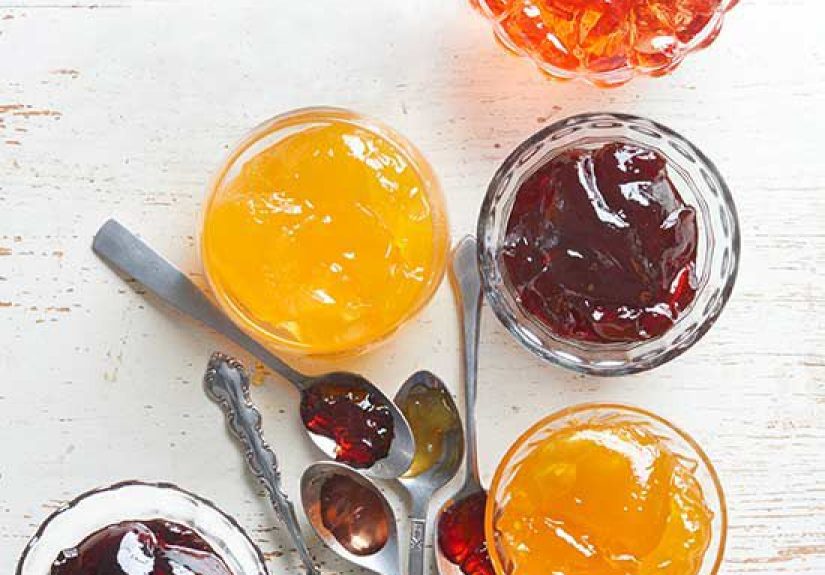
- Dessert jelly (what we’re making): a chilled, spoonable treat set with gelatin (classic bouncy) or agar-agar (plant-based, clean-cut).
- Spreadable fruit jelly (the toast kind): cooked juice + sugar + pectin, made using tested ratios and methods if you want shelf-stable canning.
Today’s main recipe is the dessert versionfast, flexible, and meant for the refrigerator. Near the end, I’ll also share an optional
“toast version” that uses pectin for a freezer-friendly spread (no canning required).
The Make-It-Mine formula (so you can stop following recipes like a robot)
Great juice jelly comes down to four choices: your juice, your setting agent, your sweetness level, and your add-ins.
Once you understand the “why,” you can remix it forever.
1) Pick your juice (aka: the flavor boss)
- 100% juice = clean flavor, usually sets well.
- Juice blends = fun complexity (apple-cherry, mango-orange, etc.).
- Very acidic juices (lemon-heavy) can taste sharpbalance with a touch of sweetener.
- Very thick juices/purees can set softerstill delicious, just less “bounce.”
2) Choose your “set”
| Setting option | Texture | Best for | Heads-up |
|---|---|---|---|
| Gelatin | Bouncy, classic jiggle | Cups, molds, “homemade Jell-O” | Doesn’t love fresh pineapple/kiwi/papaya unless heated first |
| Agar-agar | Clean bite, holds shape | Vegan jelly, layered cubes, room-temp stability | Must boil to activate; can turn brittle if overused |
3) Sweeten (or don’t)
Many juices are already sweet enough. Taste your juice first. If it needs a boost, start small:
1–2 teaspoons honey or sugar per cup of juice, then adjust. Jelly shouldn’t taste like a candy factory unless that’s your life goal.
4) Add-ins (the “make it mine” part)
- Fruit: berries, mandarin segments, diced peaches, grapes halved
- Texture: chia seeds, mini boba/tapioca pearls (cooked and cooled), shredded coconut
- Layers: two juices, or juice + yogurt layer (works best with gelatin)
- Top it: whipped topping, yogurt, granola, crushed cookies (right before serving)
Option A: Classic Make-It-Mine Juice Jelly (Gelatin)
This is the “tap it with a spoon and it giggles” version. It’s also the easiest way to control texture:
use less gelatin for soft cups, more for gummy-like bites.
Ingredients (makes 4–6 small cups)
- 2 cups fruit juice (your choice), divided
- 1 packet unflavored gelatin (about 2 1/2 teaspoons)
- 1–2 teaspoons lemon juice (optional, brightens flavor)
- Sweetener to taste (optional)
- Add-ins: fruit pieces, chia, etc. (optional)
Step-by-step
-
Bloom the gelatin. Pour 1/2 cup of the juice into a bowl. Sprinkle gelatin evenly over the surface.
Stir briefly, then let it sit 5 minutes. It will look thick and grainy. That’s goodgelatin likes a dramatic entrance. -
Warm the rest of the juice. Heat the remaining 1 1/2 cups juice in a small pot until hot but not boiling.
If you can see steam and think “cozy,” you’re there. -
Dissolve. Remove from heat. Whisk in the bloomed gelatin until fully dissolved.
Add lemon juice and sweetener (if using). Stir until smooth. -
Add-ins + pour. Add fruit pieces to cups (optional), then pour in the mixture.
Tap the cups gently to pop bubbles. - Chill. Refrigerate 2–4 hours until set. (Overnight is fine and sometimes even better.)
Texture dial (how to get the exact jiggle you want)
- Soft dessert cups: 1 packet gelatin for 3 cups juice (looser set).
- Firm, unmoldable jelly: 1 packet for 2 cups juice (the base recipe).
- Gummy-like bites: 1 packet for 1 1/2 cups juice, poured into a shallow pan and cut into squares.
Gelatin troubleshooting (because jelly has moods)
-
It didn’t set: Common causes are not enough gelatin, too much extra liquid from fruit, or using fresh enzyme-rich fruits
(like pineapple/kiwi/papaya) directly in the mixture. Use canned fruit or briefly heat the fresh fruit first, then cool before adding. - It’s grainy: The gelatin wasn’t fully dissolved. Next time, whisk longer off heat, and make sure your liquid is hot enough.
- It’s rubbery: Too much gelatin. Scale back slightly and remember: you can always add bounce next time, but you can’t un-bounce rubber.
- It weeps liquid (“sweating”): This can happen if it sits a long time or gets stirred after setting. Keep add-ins small and don’t overmix once set.
Option B: Vegan Make-It-Mine Juice Jelly (Agar-Agar)
Agar-agar is the plant-based setting agent that gives you a clean slice and a firmer bite. It’s fantastic for cubes, layers, and shapes that need to hold up.
It also sets as it cools, so you’ll feel like a jelly wizard. A slightly hurried jelly wizard, but still.
Ingredients (makes 4–6 small cups)
- 2 cups fruit juice
- 1 1/2 teaspoons agar-agar powder (firm but not rubbery)
- Sweetener to taste (optional)
- Add-ins (optional)
Step-by-step
-
Whisk agar into cold juice. Put juice in a small pot, sprinkle agar over the top, and whisk well.
Let it sit 2–3 minutes to hydrate while you keep whisking occasionally. -
Boil to activate. Bring the mixture to a boil, then simmer/boil gently for about 1 minute, whisking often.
(Agar needs heat to do its job.) -
Sweeten and pour quickly. Remove from heat, stir in sweetener if needed, then pour into cups immediately.
Agar starts setting as it cools, so don’t wander off to check your phone “for one second.” - Set + chill. Let it set at room temperature, then refrigerate for a cooler, bouncier bite.
Agar texture dial
- Softer wobble: 1 teaspoon agar powder for 2 cups juice.
- Firm cubes: 1 1/2 teaspoons for 2 cups juice (the base recipe).
- Very firm “jelly candy” cutouts: 2 teaspoons for 2 cups juice (test a small batch first).
Agar troubleshooting
- It’s brittle: Too much agar. Reduce slightly.
- It didn’t set: Agar likely wasn’t boiled long enough or whisked evenly before heating.
- It’s clumpy: Agar wasn’t dispersed well in cold liquid first. Whisk earlier and more thoroughly.
Make-It-Mine flavor combos (steal these shamelessly)
Bright & citrusy
- Orange + pineapple (heated or canned pineapple pieces) with a squeeze of lime
- Lemonade + strawberry (stir in diced strawberries after pouring)
Berry-forward
- Cherry juice + apple juice with blueberries
- Cranberry + grape with orange zest (tiny amount, big payoff)
Tropical-but-not-too-sweet
- Mango nectar + orange juice (cut sweetness with a squeeze of lemon)
- Guava + apple with shredded coconut
“Fancy” without being complicated
- White grape + peach with a pinch of grated ginger
- Pomegranate + blueberry with a tiny pinch of salt (yes, really)
Fun formats: cups, cubes, layers, and lunchbox wins
-
Layered jelly: Make one flavor, chill until barely set, then pour a second flavor on top.
Agar is excellent for crisp layers; gelatin gives you softer, meltier layers. - Jelly cubes: Pour into a square pan, chill, then cut into bite-size cubes. Great for snack plates.
-
“Jelly mosaic”: Make two or three colors as separate slabs, cube them, then suspend in a final pour of a lighter juice.
It looks like stained glass you can eat. (Much tastier than actual stained glass.) - Lunchbox cups: Pour into small containers with lids. Add crunchy toppings separately and sprinkle right before eating.
Food safety & storage (quick but important)
This dessert jelly is a refrigerated food. Keep it covered and cold, and use it within a few days for best texture and flavor.
If you’re aiming for shelf-stable jars, that’s a different project that requires tested canning recipes and correct processing.
In other words: don’t water-bath can this gelatin/agar dessert. It’s not designed for that.
Want the toast version? Quick Make-It-Mine Freezer Juice Jelly (Pectin)
If you want a spreadable juice jelly (toast, biscuits, peanut-butter sidekick), pectin is your friend.
This version is meant for the refrigerator/freezernot shelf-stable canningunless you follow a tested canning recipe exactly.
Simple freezer-style method (follow your pectin package directions)
- Choose a recipe designed for bottled juice (grape juice is the classic). Many pectin brands publish juice-based jelly and freezer jelly variations.
- Typically, you’ll mix juice + sugar, add pectin as directed, stir, then let it set in the refrigerator before storing in the fridge or freezer.
- Label your containers with the flavor and date. Future-you will be delighted and feel suspiciously organized.
of real-life Make-It-Mine Juice Jelly experiences (aka: how I learned to respect the jiggle)
The first time I made juice jelly “from scratch,” I assumed it would behave like a polite guest: show up, do what it’s told, and leave everyone impressed.
Jelly, however, has the energy of a cat. It will sit in the exact spot you wanted it to sit… until you look at it directly. Then it has opinions.
My earliest batch was a bold cherry juice gelatin set. I bloomed the gelatin, warmed the juice, whisked everything like I was auditioning for a cooking show,
poured it into little cups, and went to the fridge feeling unstoppable. Two hours later I opened the door, gently jiggled a cup, and it did… nothing.
It was still a cherry puddle with the confidence of a smoothie. Turns out I had used a little extra juice “because why not,” and the gelatin-to-liquid ratio
was suddenly a suggestion instead of a plan. I fixed it by reheating, adding a bit more bloomed gelatin, and trying againlesson learned: jelly math matters.
The next experiment was texture control. I wanted a soft, spoonable cup for snacking. I used less gelatin and poured it into wider containers so it would feel
lighter and more dessert-like. That one was a winuntil I tried to get fancy and add fresh pineapple chunks. The cups never fully set around the fruit.
The jelly was basically waving a tiny white flag of surrender. After some reading and a little kitchen humility, I switched to canned pineapple (or briefly cooked fresh pineapple),
and suddenly the jelly behaved like it had remembered its job description.
Agar-agar was a different adventure. The first time, I treated it like gelatin: warm it, stir it, and chill it. Agar laughed quietly and refused to set.
Once I learned that agar needs a real boil to activate, everything changed. My mango-orange agar jelly set so fast it felt like it had a meeting after lunch.
The texture was clean and sliceableperfect for cubesbut I overshot the agar once and got a brittle jelly that snapped like it was auditioning to be a cracker.
Now I do a tiny test cup whenever I’m using a new juice, because juices vary, and agar doesn’t believe in “close enough.”
The most fun “make-it-mine” moment was layered jelly. I did a bottom layer of cranberry-grape (tangy), then a top layer of apple-cherry (sweet).
The trick was patience: I waited until the first layer was just barely setlike a mattress that remembers you existbefore pouring the second layer gently over a spoon.
The result looked like a little sunset in a cup. It also made me feel like I should be paid for my work. (I was paid in jelly, which is an acceptable currency.)
These days, juice jelly is my go-to “I want dessert but I also want to feel like a responsible person” snack. I can make it bright and fruity, or dial it into gummy bites,
or toss in berries for texture. And every time the cup jiggles perfectly, it still feels a little magicallike your fridge is quietly cheering you on.
Conclusion
A great Make-It-Mine Juice Jelly Recipe is less about strict rules and more about smart ratios and your favorite flavors.
Start with the base formula, pick gelatin for classic bounce or agar for a clean, vegan set, then remix with juices, layers, fruit, and fun shapes.
Once you nail your ideal texture, you’ll never look at store-bought jelly cups the same way again (politely, from a distance).


