Table of Contents >> Show >> Hide
- Why Peanut Butter Blossoms Never Go Out of Style
- Ingredients
- Equipment
- Step-by-Step: How to Make Peanut Butter Blossoms
- 1) Do the “unwrap the kisses” chore first
- 2) Mix the dry ingredients
- 3) Cream the fats + sugars like you mean it
- 4) Add egg + vanilla (and optional milk)
- 5) Combine wet + dry (don’t overmix)
- 6) Chill the dough (yes, actually)
- 7) Scoop, roll, sparkle
- 8) Bake until puffed and crackly
- 9) The “blossom” moment: add the kiss
- 10) Cool properly (so the chocolate behaves)
- Cookie Science: What Makes a Great Peanut Butter Blossom?
- Pro Tips for Picture-Perfect Blossoms
- Fun Variations (Because Rules Are Optional)
- Make Ahead, Storage, and Freezing
- Troubleshooting: When Your Cookies Misbehave
- FAQ
- Experience Section: Real-Life Peanut Butter Blossom Adventures (Extra )
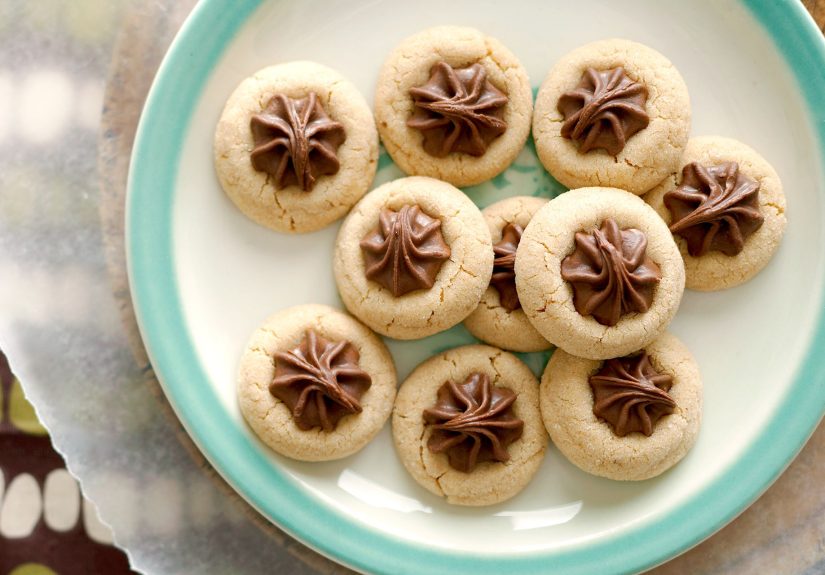
Peanut Butter Blossoms are the cookie equivalent of showing up to a party wearing a tiny chocolate top hat.
They’re nostalgic, charming, and somehow always the first thing to disappear from the holiday cookie tray
even when you made a “reasonable” amount (spoiler: it was not reasonable).
This peanut butter blossoms recipe delivers the classic: a soft, peanut-buttery cookie with
crackly sugar sparkle and a chocolate kiss pressed into the center at the perfect momentwhen the cookie is warm,
but the chocolate still knows how to keep its shape.
Why Peanut Butter Blossoms Never Go Out of Style
- Two-icon combo: peanut butter + chocolate = the power couple of desserts.
- Texture variety: crisp edges, chewy center, and a creamy chocolate finish.
- Make-ahead friendly: chill the dough, freeze the dough balls, or freeze baked cookies.
- Built-in portion control: each cookie has a “stop sign” on top… that you will ignore.
Ingredients
This recipe aims for that “classic American bake sale” flavor, with a dough that’s easy to handle and bakes up
thick enough to cradle a chocolate kiss without turning into a cookie puddle.
For the Cookies (makes about 30–36 cookies)
- 1/2 cup (113g) unsalted butter, softened (or use 1/4 cup butter + 1/4 cup shortening for a puffier, old-school texture)
- 1/2 cup (120–130g) creamy peanut butter (standard no-stir works best)
- 1/2 cup (100g) granulated sugar
- 1/2 cup (110g) packed light brown sugar
- 1 large egg, room temperature
- 1 teaspoon vanilla extract
- 1–2 tablespoons milk (optional, for slightly softer cookies)
- 1 1/2 cups (180–190g) all-purpose flour
- 1 teaspoon baking soda
- 1/2 teaspoon baking powder (optional, helps lift and reduces spreading)
- 1/4–1/2 teaspoon salt (use less if your peanut butter is salty)
For Rolling + Topping
- About 1/3 cup granulated sugar (for rolling)
- 30–36 milk chocolate Hershey’s Kisses (or dark chocolate/white chocolate if you’re feeling rebellious)
Equipment
- Baking sheets
- Parchment paper or silicone baking mat
- Stand mixer or hand mixer
- Cookie scoop (1 tablespoon) or spoon
- Cooling rack
Step-by-Step: How to Make Peanut Butter Blossoms
1) Do the “unwrap the kisses” chore first
Unwrap your chocolate kisses and pop them in the freezer while you make the dough. This tiny move helps the kisses
keep their shape when they meet a warm cookie. It’s the baking version of wearing sunscreen: boring, but it saves you.
2) Mix the dry ingredients
In a medium bowl, whisk together the flour, baking soda, baking powder (if using), and salt. Whisking now prevents
you from biting into a surprise pocket of baking soda later (and no one wants that).
3) Cream the fats + sugars like you mean it
In a large bowl, beat the softened butter (and shortening, if using) with peanut butter, granulated sugar, and brown sugar
until light and fluffyabout 2–3 minutes with a mixer. This step adds air, which helps the cookies bake up tender instead of dense.
4) Add egg + vanilla (and optional milk)
Beat in the egg and vanilla until fully combined. If you want a slightly softer bite, add 1–2 tablespoons of milk and mix again.
Think of milk as the cookie’s “cozy sweater.”
5) Combine wet + dry (don’t overmix)
Add the dry ingredients to the wet mixture and mix on low until just combined. Stop when you no longer see flour streaks.
Overmixing = tougher cookies, and your peanut butter blossoms deserve better.
6) Chill the dough (yes, actually)
Cover and refrigerate the dough for 30–60 minutes. Chilling helps the cookies hold their shape and prevents spreading.
If your kitchen is warm or your butter got too soft, chilling is non-negotiable.
7) Scoop, roll, sparkle
Heat the oven to 350°F (177°C). Line baking sheets with parchment.
Scoop dough into 1-tablespoon portions and roll into balls. Roll each ball in granulated sugar until coated, then place on the baking sheet
about 2 inches apart.
8) Bake until puffed and crackly
Bake for 9–11 minutes, until the edges look set and the tops are crackly, but the centers still look slightly soft.
If you prefer a slightly crisper edge, you can bake at 375°F for about 8–10 minutesjust keep a close eye.
9) The “blossom” moment: add the kiss
Remove cookies from the oven. Immediately press a chocolate kiss into the center of each cookie.
Press just until the cookie cracks around the edges and the kiss feels anchoreddon’t smash it like you’re angry at chocolate.
10) Cool properly (so the chocolate behaves)
Let the cookies cool on the baking sheet for 2–3 minutes, then transfer to a cooling rack.
If your kitchen is warm, you can slide the cooled cookies (on a tray) into the fridge or freezer for 10 minutes to help the kisses set neatly.
Cookie Science: What Makes a Great Peanut Butter Blossom?
Butter vs. shortening
Butter brings flavor and a slightly richer, more tender bite. Shortening (or a butter-shortening blend) tends to reduce spread and creates a puffier cookie.
If you grew up with the ultra-classic “church cookbook” version, there’s a decent chance shortening was involved.
Why roll in sugar?
Rolling dough balls in sugar creates a thin, sparkly crust that cracks as the cookie expandsgiving blossoms their signature look.
It’s both aesthetic and textural: sweet crunch outside, soft center inside.
Why chill the dough?
Chilling firms the fat so the cookies don’t spread too fast before the structure sets. Translation: thicker cookies, better texture, happier kisses.
Pro Tips for Picture-Perfect Blossoms
- Freeze the kisses: helps them keep their classic shape when pressed into warm cookies.
- Measure flour correctly: spoon and level instead of scooping, which can pack flour and dry out the dough.
- Don’t overbake: blossoms should look slightly underdone in the center when they come outcarryover heat finishes the job.
- Use a scoop: consistent dough portions = even baking = fewer “some are raw, some are crunchy” situations.
- Press the kiss deep enough: about halfway down so it stays put once cooled.
Fun Variations (Because Rules Are Optional)
Swap the candy
- Dark chocolate kisses: slightly less sweet, more “adult dessert vibe.”
- Hugs (striped): instant bakery display energy.
- Peppermint kisses: holiday-season crowd-pleaser.
- Mini peanut butter cups: double peanut butter, double chaos (in a good way).
Make them festive
Roll dough balls in colored sanding sugar (red/green/gold) for holiday cookie swaps. It’s the easiest glow-up a cookie can get.
Gluten-free option
Use a reliable 1:1 gluten-free flour blend and chill the dough thoroughly. Gluten-free dough benefits from extra rest so the flour hydrates and the texture improves.
A subtle flavor upgrade
If you like the sweet-salty thing, try adding a tiny pinch of flaky salt on top of the kiss after pressing it in.
It won’t scream “I’m fancy!”it’ll whisper it.
Make Ahead, Storage, and Freezing
Make ahead
Dough can be made a day ahead and refrigerated. If it gets too firm, let it sit at room temperature for 10–15 minutes before scooping.
Store baked cookies
Store in an airtight container at room temperature for up to a week. Place parchment between layers to keep the kisses from smearing or getting scuffed.
Freeze for later
You can freeze baked cookies, but an even better move is freezing the shaped dough balls (before rolling in sugar).
When ready, roll in sugar, bake, and press in fresh kisses so the chocolate looks pristine.
Troubleshooting: When Your Cookies Misbehave
“Why did my blossoms go flat?”
- Dough was too warm → chill longer.
- Butter was too soft/melty → start with properly softened butter, not glossy or sinking.
- Not enough flour (or scooped flour compressed) → spoon and level measurements.
- Natural peanut butter can cause texture/spread issues → no-stir works best for consistent results.
“Why are they dry?”
- Too much flour → measure carefully.
- Overbaked → pull when centers still look slightly soft.
- Overmixed dough → mix until just combined once flour goes in.
“My kisses are melting or sliding”
- Freeze the kisses first.
- Move cookies off the hot pan after a couple minutes to a rack.
- Don’t put the cookies back in the oven with kisses on top.
FAQ
Can I double this peanut butter blossoms recipe?
Absolutely. Just rotate your baking sheets, bake one sheet at a time for even heat, and keep the dough chilled between batches.
Crunchy or creamy peanut butter?
Creamy is the classic for neat shaping and a smooth bite. Crunchy works if you like texturejust expect a slightly more rugged-looking cookie.
Do I have to roll them in sugar?
You don’t have to, but you’ll miss that signature sparkle and crackle. If you skip it, the cookies are still deliciousjust less “blossom-y.”
Experience Section: Real-Life Peanut Butter Blossom Adventures (Extra )
The first time I made peanut butter blossoms, I learned an important truth: unwrapping a mountain of chocolate kisses is not “prep,” it’s a personality test.
You start optimisticlike, “This will be relaxing!”and by kiss number 17 you’re bargaining with the universe, wondering if the cookies would still count as blossoms
if you just glued one wrapper-covered kiss on top and called it rustic.
But here’s the thing: these cookies have a way of turning baking into an event. Peanut butter blossoms show up at cookie swaps, office parties,
and family gatherings like they own the place. I’ve watched people walk past elaborate frosted creations and laser-focus on the humble blossom,
as if their childhood memories are sitting right there under a little paper plume.
I’ve also made every classic mistakebecause tradition is one thing, but personal growth requires failure. I once pressed the kisses in too early,
while the cookies were still in the oven (rookie move). When I opened the door, the kisses looked like they’d spent a weekend in the desert.
The cookies still tasted great, but visually they were giving “modern art exhibit titled Heatwave.” Another time, I used dough that hadn’t been chilled
because I was in a hurry. The cookies spread like they were trying to become one giant mega-cookie. The kisses, confused by the new geography,
just kind of slid into the soft centers like tiny chocolate lifeboats.
Over time, I developed a “blossom routine” that feels almost ceremonial. I line up the unwrapped kisses like little chocolate chess pieces.
I chill the dough while the oven preheats and pretend that this makes me a patient person. I roll each ball in sugar and think, for a brief moment,
that I’m living a calm, orderly life. Then the timer beeps, and I’m sprinting to press kisses into warm cookies like it’s an Olympic sport.
My favorite part, honestly, is the small pause after pressing the kisses inwhen the cookies are still warm and the chocolate is just soft enough
to look glossy. If you’ve ever brought a tray of blossoms to a gathering, you know the feeling: someone will inevitably hover nearby,
“just checking,” and you’ll have to decide whether you’re the kind of person who shares warm cookies… or the kind of person who guards them
like a dragon sitting on a sugary treasure hoard.
And every year, without fail, peanut butter blossoms teach the same lesson: perfection isn’t the point. Sometimes the kisses lean a little.
Sometimes the cracks are dramatic. Sometimes you accidentally make a batch that’s slightly smaller because a “quality control cookie”
mysteriously vanished. But people still smile when they take a bitebecause peanut butter blossoms don’t just taste like peanut butter and chocolate.
They taste like holidays, kitchens that smell like baking, and the kind of simple joy you can hold in one hand (with a napkin in the other).