Table of Contents >> Show >> Hide
- Choose Your Hive Style (So You Don’t Build the Wrong Box)
- The Three Rules That Make a Beehive Actually Work
- Know the Parts Before You Start Building
- Standard Langstroth Sizes (The Compatibility Cheat Code)
- Materials That Last (Without Turning Your Hive into a Chemistry Experiment)
- A Smart DIY Build Strategy (Even If You’re Not a Precision Woodworker)
- Assembly Priorities (What Actually Determines Hive Quality)
- Finishing the Hive: Paint, Color, and “Don’t Paint That”
- Where to Put Your Finished Hive (Placement Is Part of the Build)
- Optional Upgrades That Feel Like “Cheat Codes”
- Common DIY Mistakes (So You Can Skip Them Like Ads)
- Maintenance: Your Hive Is a Tool, Not a Trophy
- Real-World Experiences: What DIY Hive Builders Learn the First Time (500+ Words)
- Lesson 1: The first hive is never the last hive
- Lesson 2: “Lightweight honey” is a myth
- Lesson 3: Paint is boring…until it saves your hive
- Lesson 4: Frames are the fussiest part of the whole system
- Lesson 5: Your hive location is a relationship decision
- Lesson 6: The bees will grade your craftsmanship
- Conclusion
Building a beehive is one of those projects that sounds like it requires a
wizard hat and a PhD in Buzzonomics. In reality, a good hive is mostly a
stack of well-fitting boxes that respect a few non-negotiable rules of
honey bee architecture. Get those rules right, and the bees will do the
fancy work. Get them wrong, and your “beehive” becomes a very expensive
wooden suggestion that the bees immediately redesign with gluey enthusiasm.
This guide walks you through the decisions, standards, and build approach
for a DIY Langstroth-style hive (the most common removable-frame hive in
North America). It’s written in a practical, Family-Handyman-ish spirit:
sturdy, compatible with standard gear, and built for real outdoor life.
Because this is woodworking plus livestock (tiny livestock with opinions),
keep safety front and center. If you’re not comfortable making accurate
cuts, there’s zero shame in using pre-cut hive parts or having boards cut
by an experienced adult, a local shop, or a lumberyard serviceyour bees
will not judge you for outsourcing.
Choose Your Hive Style (So You Don’t Build the Wrong Box)
When most people say “beehive,” they mean a Langstroth hive:
stacked boxes that hold removable frames. That removable-frame design is a
big deal because it makes inspections, honey harvesting, and colony health
management possible without destroying comb.
Langstroth (most common for beginners)
- Pros: Standardized sizes, tons of compatible parts, easier to buy/add boxes later, easiest to find local help.
- Cons: Honey boxes can get heavy; requires accuracy in spacing and fit.
Top-bar or Warre (alternative styles)
These can be great, but they’re less standardized and can change how you
manage the colony and harvest honey. If your goal is “build it once, then
easily expand with store-bought parts,” Langstroth wins the convenience
contest by a landslide.
The Three Rules That Make a Beehive Actually Work
1) Standardization matters more than creativity
A hive isn’t a decorative box; it’s a modular system. If you build to
standard Langstroth dimensions, you can mix DIY parts with commercial
parts (extra boxes, lids, feeders, frames) without drama. If you go
“close enough,” you’ll eventually discover that “close enough” is a
synonym for “won’t fit when you’re sweaty, in a hurry, and holding a box
full of bees.”
2) Bee space is the difference between “removable frames” and “bee cement”
Honey bees naturally maintain a corridor called bee space
(roughly 1/4 to 3/8 inch). If a gap is too small, they’ll seal it with
propolis. If it’s too big, they’ll fill it with burr comb. Either way,
your neat, removable parts become one sticky sculpture. Good hive design
preserves bee space around frames and between hive components so you can
separate parts later without turning the inspection into a wrestling match.
3) Weatherproof the outside; let the inside be “bee-finished”
The outside of your hive faces rain, sun, and temperature swings. The
inside should stay as natural as possible so bees can coat surfaces with
propolis and regulate humidity and airflow. In plain terms: protect the
wood from weather, but don’t paint the bees’ living room.
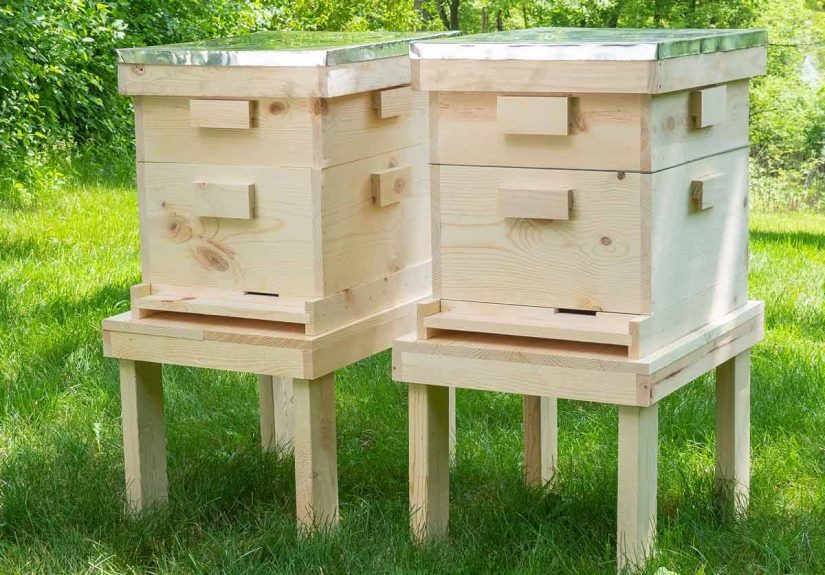
Know the Parts Before You Start Building
A standard Langstroth setup is a stack that goes from “front porch” to
“attic,” with each piece serving a job. Here’s the basic lineup:
Bottom board (the base)
This is the floor and entrance area. Some are solid; some are screened.
A screened option can help with ventilation and monitoring pests, but
either style can work well depending on climate and management style.
Brood boxes (deep hive bodies)
These are the larger boxes where the queen lays eggs and the colony raises
brood. Many setups use one or two deep boxes, but some beekeepers use all
medium boxes to keep lifting weight manageable.
Honey supers (medium or shallow boxes)
These are the boxes added above the brood area for surplus honey storage.
Medium supers are popular because they’re easier on your back than full
deeps when filled.
Frames + foundation
Frames hang inside the boxes and guide bees to build comb in removable,
inspectable sections. Foundation can be wax or plastic, and you can also
run foundationless frames if you know what you’re doing and your local
conditions support it.
Inner cover + outer cover
The inner cover creates a buffer space and keeps bees from gluing the main
lid down with propolis. The outer cover (often telescoping) protects the
hive from weather. Think of it as the roof that actually keeps rain out.
Optional, but common
- Entrance reducer: Helps colonies defend the entrance and manage airflow.
- Queen excluder: A grid that discourages the queen from moving into honey supers (use thoughtfully; not everyone loves them).
- Hive stand: Lifts the hive off damp ground and improves access.
Standard Langstroth Sizes (The Compatibility Cheat Code)
For a 10-frame Langstroth hive, the outside footprint is commonly around
16 1/4 inches by 19 7/8 inches. Box depth varies by type:
deep (about 9 5/8 inches tall), medium
(about 6 5/8 inches), and shallow (around 5 7/8 inches).
Sticking to these standards means you can add purchased boxes later and
everything still lines up like a good LEGO set.
One more standard you can’t eyeball: frame rests (the
ledges/rabbets where frames hang) and the spacing around them must preserve
bee space. If you’re building boxes from scratch, this is where precision
matters most.
Materials That Last (Without Turning Your Hive into a Chemistry Experiment)
Wood choice
Most commercial woodenware is made from pine, but rot-resistant woods like
cypress and cedar can last longer in wet climates. Whatever you choose,
prioritize straight boards and consistent thickness so joints close tightly.
Avoid pre-treated wood where bees live
Many preservatives are not bee-friendly. If you’re building woodenware,
use untreated lumber for any component that forms the interior living space.
If you’re exploring preservation options, follow extension-style guidance:
protect exterior surfaces and joints, but keep treatments away from areas
the bees contact.
Fasteners and glue
Outdoor-rated wood glue plus screws can create strong joints that resist
swelling and shrinking cycles. This helps hive boxes stay square, which
helps frames hang correctly, which helps you not invent new curse words
during inspections.
A Smart DIY Build Strategy (Even If You’re Not a Precision Woodworker)
You have three practical routes to a DIY hive, and the “best” choice is
the one that matches your tools, skill, and patience level:
Option A: Assemble pre-cut hive bodies
This is the easiest path to standardization. You get flat-packed boxes with
finger joints already milled. Your job is to square them up, fasten them
securely, and finish the exterior. It still feels DIY (because it is), but
it dramatically reduces the risk of building non-standard equipment.
Option B: Have the lumber cut, then you assemble
If accurate cutting isn’t your comfort zone, consider having boards cut by
a qualified adult, a shop class instructor, a local maker space supervisor,
or a lumberyard service. Then you focus on layout, assembly, and finishing.
This keeps the project approachable while still giving you a truly
custom-built hive.
Option C: Full scratch build
Fully scratch-building a Langstroth hive is absolutely doable, but it’s the
most demanding on accuracyespecially for frame rests, box squareness, and
maintaining bee space. If you go this route, work from a reputable plan and
double-check measurements against commercially available parts.
Assembly Priorities (What Actually Determines Hive Quality)
Whether you’re assembling pre-cut parts or building boxes, focus on these
fundamentals:
Keep boxes square and flat
A hive body that’s out of square causes frames to bind, gaps to open, and
lids to rock. In a perfect world, every box stacks neatly and seals evenly.
In the real world, “close enough” becomes “why is my lid doing the wobble?”
Protect the joints
Joints are where water sneaks in, freezes, expands, and turns your
woodworking pride into compost. Seal exterior joints (for example, with
a non-toxic exterior caulk where appropriate) and keep paint coverage
consistent on weather-exposed surfaces.
Make handling easy
Bees don’t care about your grip strength, but your lower back does.
Consider practical handholds or cleats so boxes can be lifted and moved
safely. Remember: a honey super can get surprisingly heavy, especially in
peak nectar flow.
Finishing the Hive: Paint, Color, and “Don’t Paint That”
Paint the exterior, not the interior
Exterior paint protects wood from weather. The interior should remain
unpainted so moisture isn’t trapped and bees can naturally coat surfaces
with propolis. As a simple rule: if bees will walk on it, think twice
before coating it.
Choose exterior-grade paint and avoid very dark colors
Use an outdoor-rated paint appropriate for wood exposure. Light colors are
often preferred because they absorb less heat in summer. Apply multiple
coats for durability, and let painted parts cure fully before putting them
into service.
Timing tip
Paint and finish before bees arrive. Trying to paint during a
busy season is like trying to mop the floor during a toddler birthday party:
technically possible, emotionally questionable.
Where to Put Your Finished Hive (Placement Is Part of the Build)
A well-built hive still needs a good location. Placement affects colony
health, neighbor relations, and how much you enjoy the hobby.
Face the entrance in a practical direction
Many beekeeping guides recommend an entrance facing generally
south to east to catch morning sun and encourage earlier
foraging flights (while also avoiding harsh prevailing winds where possible).
Give them sun, give them shelter, keep them dry
Aim for a site with decent sun exposure and a windbreak. Avoid low spots
where water pools. Wet ground shortens the life of woodenware and can
increase pest pressure.
Provide water (so they don’t “borrow” it from your neighbors)
Bees need water. If you don’t provide it, they’ll find itsometimes in a
neighbor’s pool, birdbath, or pet bowl. A reliable water source near the
apiary can prevent a lot of drama and help keep the peace.
Consider forage radius and local rules
Bees typically forage within a couple miles, but can travel farther when
necessary. Also check local ordinances, HOA rules, and any state guidance
on apiary registration or inspections. A little research now can save a
lot of stress later.
Use a stand and keep the hive off the ground
Elevating the hive helps reduce ground moisture issues and makes it harder
for some pests to bother the colony. Many guides suggest raising the hive
roughly 12 to 18 inches off the ground. Whatever you use,
make sure it’s stable, level, and built to hold serious weight.
Optional Upgrades That Feel Like “Cheat Codes”
Screened bottom board
Useful for ventilation in warm climates and for certain monitoring methods.
Not mandatory, but popular.
Moisture/ventilation shim (seasonal)
In damp or cold seasons, moisture control can matter as much as temperature.
Local beekeepers are your best guide here because climate is everything.
All-medium configuration
Some beekeepers run all medium boxes to standardize frames and reduce the
“surprise, this box is a gym workout” problem. It can simplify equipment
management, especially for beginners.
Common DIY Mistakes (So You Can Skip Them Like Ads)
- Building non-standard sizes: It’s cheaper until you need a replacement lid or box and nothing fits.
- Ignoring bee space: Leads to glued frames, burr comb, and messy inspections.
- Painting inside surfaces: Can trap moisture and fights the bees’ natural propolis “varnish.”
- Using questionable preservatives: If you wouldn’t want it near food, don’t put it inside a hive.
- Skipping exterior protection: Unprotected joints soak water and shorten hive life fast.
- Placing hives in a wet, shaded low spot: Great for mushrooms, not great for woodenware.
Maintenance: Your Hive Is a Tool, Not a Trophy
A DIY hive will last longer with simple upkeep: keep it level, repaint
when the exterior starts to wear, and replace damaged parts before they
turn into bigger problems. Store spare boxes and frames dry and protected
so they don’t warp. And if you’re new to beekeeping, connect with a local
beekeeping association or extension programhands-on mentoring can save a
season.
Real-World Experiences: What DIY Hive Builders Learn the First Time (500+ Words)
I can’t claim personal, lived “weekend workshop” experiencebut beekeepers
are generous storytellers, and the same lessons show up again and again
when people build their first hive. Consider this section the “field notes”
compilation: the stuff that doesn’t always make it onto the cut list, but
absolutely shows up in your day-to-day beekeeping.
Lesson 1: The first hive is never the last hive
Many beginners build one hive, set it out proudly, and then discover a
classic beekeeping truth: colonies grow, swarm, split, and surprise you.
Suddenly you need a second box, a spare super, or a whole extra hive body
right when everyone else in town also needs one. The builders who look
happiest are the ones who planned ahead: they built (or bought) at least
one extra box and a few spare frames. It’s not overkillit’s future-you
being kind to present-you.
Lesson 2: “Lightweight honey” is a myth
The day you lift a full honey box is the day you stop joking about gym
memberships. This is why you’ll hear experienced folks talk up medium
supers. In several extension-style training materials, medium equipment is
often recommended as a more manageable choice because a full deep can be
extremely heavy. Builders who switch to mediums rarely do it because they
love buying more boxes; they do it because they love their spine.
Lesson 3: Paint is boring…until it saves your hive
The most common DIY regret isn’t “I chose the wrong wood species.”
It’s: “I rushed the finishing step.” Outdoor exposure is relentless.
Beekeepers who take finishing seriouslymultiple coats on the exterior,
careful attention to joints, and enough cure time before bees move intend
to report fewer warped boxes, fewer swollen joints, and fewer “why does the
lid not fit anymore?” moments. In other words, paint is not a fashion
decision; it’s structural maintenance.
Lesson 4: Frames are the fussiest part of the whole system
Building boxes feels straightforward. Frames, on the other hand, are small,
repetitive, and oddly capable of consuming an entire afternoon. Many DIYers
discover that making hive bodies can be economical, but frames are where
patience goes to be tested. A common compromise is to DIY the big wooden
parts (boxes, stands, covers) and buy frames pre-assembled or at least
pre-cut. That approach keeps the “I built this!” satisfaction while
reducing the “why do I have 200 tiny parts on my table?” chaos.
Lesson 5: Your hive location is a relationship decision
People who keep bees in suburbs often say the same thing: the bees are
usually fine, but neighbors are unpredictable. Builders who place hives
thoughtfullyentrance not aimed directly at a walkway, water provided so
bees don’t visit the neighbor’s pool, and a windbreak to reduce winter
stresstend to have smoother seasons. Some even plant shrubs or add a
simple barrier so bees fly up and over head height when leaving the hive,
which can reduce accidental “face-level bee traffic” near patios.
Lesson 6: The bees will grade your craftsmanship
Honey bees are brutally honest inspectors. If you leave a big gap, they’ll
fill it. If you give them a weird cavity, they’ll build comb in it. If you
ignore bee space, they’ll glue everything together like they’re paid by the
ounce of propolis. That’s not them being difficultthat’s them being bees.
The builders who enjoy inspections the most are the ones whose equipment
makes bee behavior predictable: standard dimensions, correct spacing, and
clean stacking surfaces.
Put all those lessons together and you get a surprisingly simple “pro”
mindset: build standard, build strong, protect the exterior, keep the
interior bee-safe, and plan for expansion. Do that, and your DIY hive won’t
just look good on day oneit’ll still be working (and stacking neatly) when
you’re ready to add supers, split colonies, or help a friend start their
first hive. That’s the kind of project that keeps paying you backsometimes
in honey, sometimes in pollination, and sometimes just in the quiet pride
of having built something that truly works.
Conclusion
A great DIY beehive isn’t about fancy joinery or rustic charmit’s about
respecting standards, bee space, and the realities of outdoor weather.
Build (or assemble) a Langstroth hive to standard dimensions, keep boxes
square, protect exterior joints, avoid coating interior bee surfaces, and
place the hive in a dry, stable location with water nearby. Do that, and
you’ll end up with equipment that’s compatible, durable, and genuinely
enjoyable to usebecause the only thing that should be complicated in
beekeeping is explaining to friends why you suddenly care deeply about
tiny winged insects’ real estate preferences.


