Table of Contents >> Show >> Hide
- Step 1: Know What You Bought (Because “Asparagus Fern” Is a Group Project)
- Step 2: Put It in Bright, Indirect Light (Think “Sunglasses,” Not “Spotlight”)
- Step 3: Choose a Pot With Drainage (Non-Negotiable, Like Wearing Shoes Outside)
- Step 4: Use Rich, Well-Drained Soil (Fluffy, Not Muddy)
- Step 5: Water Like a ProfessionalEvenly Moist, Not Soaked
- Step 6: Bump Up Humidity (Your Fern Likes a Little Spa Energy)
- Step 7: Keep Temperatures Comfortable (No Drafty Drama)
- Step 8: Feed Lightly (Or You’ll Grow a Monster… a Cute Monster)
- Step 9: Prune for Shape and Density (Yes, You Can Give It a Haircut)
- Step 10: Repot Before It Breaks the Pot (Tuber Roots Don’t Mess Around)
- Step 11: Propagate by Division (Make Two Plants, Feel Like a Wizard)
- Step 12: Troubleshoot Pests, Yellowing, and Pet Safety
- Extra: Real-Life Experiences With Asparagus Fern Care (About )
- Conclusion
The asparagus fern is the plant equivalent of a fluffy green cardigan: cozy, dramatic (in a charming way),
and mysteriously everywhere once you invite it into your home. Despite the name, it’s not a true fern
it’s an Asparagus with fern-like fronds (technically “cladophylls,” which sounds like a dinosaur
but is actually plant anatomy). The good news: asparagus fern care is forgiving, beginner-friendly, and wildly rewarding
when you nail a few basics like light, watering, and humidity.
You’ll see these sold under several “stage names,” including Asparagus densiflorus (often ‘Sprengeri’),
Asparagus setaceus (lace/plumosa asparagus), and the foxtail type (like ‘Myersii’). Care is similar across the group:
give them bright, indirect light, steady moisture (not swampy soil), and a little seasonal common sense.
Follow the 12 steps below and your plant will look like it belongs in a magazineminus the mysterious stylist who
apparently lives inside magazine pages.
Step 1: Know What You Bought (Because “Asparagus Fern” Is a Group Project)
What to check
- Growth habit: Some types trail (great for hanging baskets), others mound or stand upright (foxtail).
- Hidden “superpower” roots: Most have tuberous roots that store waterhelpful, but they can crack pots if crowded.
- Bonus features: Mature plants may flower and form berries. Pretty? Yes. Pet-safe? Nope.
Why this matters: you’ll choose the right pot size, pruning approach, and placement (hanging vs. tabletop).
Also, those tiny spines on older stems are realthis plant can be polite and prickly at the same time.
Step 2: Put It in Bright, Indirect Light (Think “Sunglasses,” Not “Spotlight”)
The sweet spot
Aim for bright, indirect light near an east or north window, or a few feet back from a sunny window with a sheer curtain.
Hot, direct afternoon sun can scorch or yellow the foliage, while too little light can lead to thinning and leaf drop.
Quick example
If your plant sits in a south-facing window and starts looking washed out, scoot it back 2–4 feet or add a sheer curtain.
If it’s in a dim corner and dropping fronds like it’s auditioning for a drama series, move it closer to a window.
Step 3: Choose a Pot With Drainage (Non-Negotiable, Like Wearing Shoes Outside)
Why drainage matters
Asparagus ferns like moisture, but standing water invites root rot. Use a pot with drainage holes and a saucer,
and never let the pot sit in a puddle long-term.
Pot material tip
Plastic holds moisture longer (great if you forget to water). Terracotta breathes and dries faster (great if you tend to overwater).
Either worksyour habits decide the winner.
Step 4: Use Rich, Well-Drained Soil (Fluffy, Not Muddy)
What the soil should feel like
Go for an organically rich, well-draining potting mix. A light, airy blend helps keep roots healthy.
If you want to get nerdy (optional but fun), slightly acidic to near-neutral soil is often recommended for strong growth.
Easy DIY mix
- 2 parts quality indoor potting mix
- 1 part perlite or pumice (for drainage)
- Optional: a small handful of orchid bark for extra airflow
Step 5: Water Like a ProfessionalEvenly Moist, Not Soaked
The rule of thumb
In the growing season (spring through early fall), keep the soil evenly moist. Water thoroughly, then let excess drain away.
As a practical guide, let the top inch of soil dry slightly between waterings, especially in winter.
Signs you’re off track
- Too dry: fronds yellow, crisp, or drop; soil pulls away from pot edges.
- Too wet: sour smell, mushy stems near soil line, constant dampness, fungus gnats.
The tuberous roots store water, so the plant can survive a missed watering. But don’t test its patience like it’s a phone battery at 1%.
Step 6: Bump Up Humidity (Your Fern Likes a Little Spa Energy)
Simple humidity upgrades
- Pebble tray: set the pot on pebbles above water (pot bottom stays out of water).
- Humidifier: the easiest “set it and forget it” option.
- Plant cluster: group plants so they share moisture.
Low humidity can cause browning tips and extra shedding. If your home is winter-dry, humidity support helps your plant
keep its feathery look instead of going full tumbleweed.
Step 7: Keep Temperatures Comfortable (No Drafty Drama)
Ideal range
Asparagus ferns generally prefer moderate warmth and don’t love prolonged cold. Avoid cold drafts, sudden temperature swings,
and placing the plant right next to heating vents or radiators.
Seasonal move
If you keep it outdoors in summer, bring it inside before temperatures dip too low. This one is not built for frosty heroics.
Step 8: Feed Lightly (Or You’ll Grow a Monster… a Cute Monster)
Fertilizer basics
During active growth, use a balanced liquid fertilizer at half strength. Many growers fertilize monthly; if your plant is
pushing lots of new growth, you can feed more frequently in smaller doses. In winter, back offplants typically slow down.
Specific example
If the label says 1 teaspoon per quart, use 1/2 teaspoon per quart. Apply after watering (never to bone-dry soil).
If you see pale new growth, feeding may helpunless the real issue is low light.
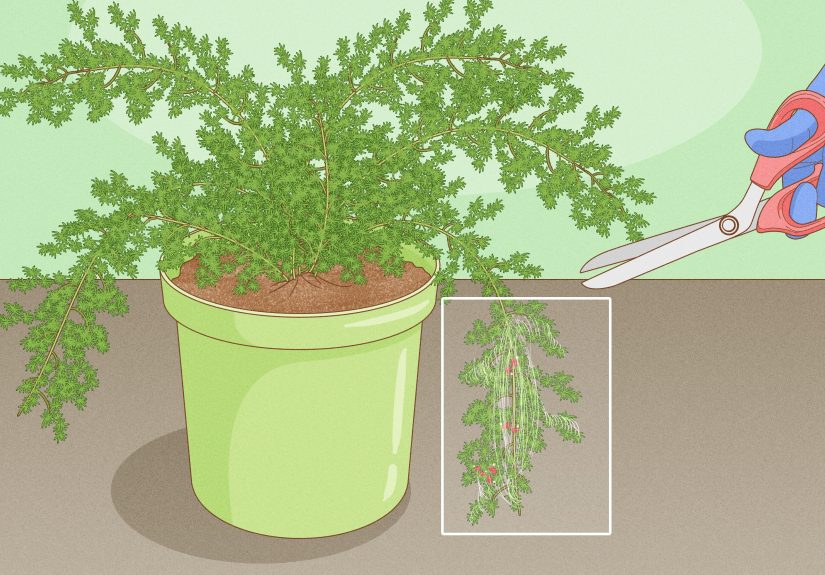
Step 9: Prune for Shape and Density (Yes, You Can Give It a Haircut)
How to prune without panic
- Remove yellow or old stems at the base.
- To encourage a fuller look, pinch or trim stems back by about a third every few months.
- For leggy plants, cut a few of the oldest stems close to the soil to push fresh growth.
Wear gloves if your plant is matureolder stems can get woody with tiny spines. It’s not aggressive; it’s just… enthusiastic about boundaries.
Step 10: Repot Before It Breaks the Pot (Tuber Roots Don’t Mess Around)
When to repot
If roots circle the pot, the plant dries out unusually fast, or the container bulges, it’s time. Asparagus ferns can be vigorous,
and crowded tubers can stress the plant (and occasionally the pot).
How to repot
Move up only 1–2 inches in diameter. Fresh soil refreshes nutrients and improves drainage. After repotting, water well and keep the plant out of harsh sun
for a week while it adjusts.
Step 11: Propagate by Division (Make Two Plants, Feel Like a Wizard)
The easiest method
Division is the go-to: remove the plant from the pot, gently tease apart the root mass, and split into sections with roots and stems attached.
Replant into fresh soil and water thoroughly.
What to expect
Divisions may sulk briefly (a few weeks of “I’m fine” energy). Keep conditions steadybright indirect light, moderate moistureand new growth should follow.
Seeds from berries are possible, but slower and messier (and those berries are a pet hazard).
Step 12: Troubleshoot Pests, Yellowing, and Pet Safety
Common problems (and the fast fix)
- Spider mites, mealybugs, aphids, whiteflies: isolate the plant, rinse foliage, and treat with insecticidal soap as needed.
- Root rot: reduce watering, improve drainage, and trim rotted roots if severe.
- Yellowing fronds: often caused by low light, inconsistent watering, or poor drainagework through the basics first.
- Brown tips: low humidity, underwatering, or salt buildupraise humidity and flush soil occasionally.
Pets and kids
Asparagus fern is considered toxic to cats and dogs. Repeated contact can cause skin irritation,
and ingestion (especially berries) can cause stomach upset. If you have curious nibblers, hang the plant high
or choose a pet-safe alternative.
Outdoor caution
In warm climates, some asparagus fern types can spread aggressively outdoors via seeds and tubers. Keep outdoor plants in containers,
remove berries, and avoid letting pieces of root escape into garden beds.
Extra: Real-Life Experiences With Asparagus Fern Care (About )
The first time most people “fail” with an asparagus fern, it’s usually not because they did something dramatic. It’s because they did something
quietly wrong for a long timelike letting the soil swing between desert-dry and soup-wet, or parking it in a spot that’s technically “bright”
only if you’re a moth. The plant responds with the subtlety of a toddler who missed a nap: shedding, yellowing, and making you question your entire identity
as a plant parent.
One of the most useful patterns to notice is how the fern behaves after a watering change. If you switch from “tiny sips every day” to “deep watering,
then drain,” the plant often looks better within a couple of weeks. Those tuberous roots like a rhythm: drink, breathe, repeat. Daily sips can keep the
top soil wet while the bottom stays stagnantgreat for fungus gnats, not great for roots. On the flip side, if you forget watering for too long,
the fronds can crisp at the tips and drop like confetti. A practical trick: lift the pot. You’ll learn “light pot = water soon” faster than any app can teach you.
Another very real experience: asparagus ferns are magnetic to dry indoor air. In winter, you can do everything “right” and still get brown tips
if your heating system turns your living room into a croissant. A pebble tray helps, but the biggest difference often comes from placing the plant where humidity
naturally runs highernear a kitchen sink (with good light), in a bright bathroom, or alongside other plants. A small humidifier is the cheat code, especially if
you want that lush, soft look instead of the “slightly crispy holiday décor” vibe.
Repotting is where asparagus ferns reveal their personality. The top growth looks delicate, but the roots are determined and surprisingly strong. Many people
wait until the plant is clearly uncomfortabledrying out constantly, pushing roots out, or warping a plastic potthen repot and wonder why it throws a tantrum.
The smoother path is repotting before the struggle becomes visible. Upsize modestly, refresh the mix, and the plant usually rebounds quickly.
And if you divide it during repotting? Congratulationsnow you have two plants and a new hobby explaining “cladophylls” to guests who didn’t ask.
Finally, the pet factor is not theoretical. If your cat treats houseplants like salad bars or your dog is a “taste-tester,” asparagus fern is best kept out of reach.
Hanging baskets work brilliantly, and they also show off the plant’s airy texture. In other words: you protect your pets and get a nicer-looking plant.
That’s what we call a win-win, and your asparagus ferndramatic as it may bewill absolutely accept the applause.
Conclusion
Asparagus fern care boils down to a simple recipe: bright indirect light, consistent moisture with excellent drainage,
moderate warmth, and a little help with humidity. Add occasional feeding, thoughtful pruning, and timely repotting,
and you’ll have a feathery, lively plant that looks fancy without acting high-maintenance. Keep it away from pets, watch for pests early, and if you grow it outdoors,
keep it contained so it doesn’t go rogue.


