Table of Contents >> Show >> Hide
- Why Bother? The Case for Screen Upcycling
- The Big Reality Check: A Laptop Screen Isn’t a Monitor Yet
- What You Need (Without Turning This Into a Shopping Cart Novel)
- High-Level Build Plan (Safe, Practical, and Not a “Wire This Pin to That Pin” Adventure)
- Step 1: Identify your panel like it’s applying for a passport
- Step 2: Figure out the interface family (eDP vs. LVDS)
- Step 3: Choose a controller kit that’s matchedor properly configured
- Step 4: Bench-test before you build the fancy folding enclosure
- Step 5: Design the “portable folding” form factor
- Step 6: Cable management and strain relief (the unglamorous hero)
- Step 7: Configure your computer like it’s meant to have two displays
- Designing the Folding Monitor: Three Practical Concepts
- Make It Work Like a Normal Monitor (Because That’s the Whole Point)
- Common Problems (and the Calm Ways People Solve Them)
- Safety and Responsibility (Short, Serious, and Worth Reading)
- Should You DIY or Just Buy a Portable Monitor?
- Conclusion: A Screen’s Second Life Can Be Better Than Its First
- Experiences: What It’s Like Living With a DIY Folding Monitor (The 500-Word Reality Check)
Somewhere in a drawer (or a “totally organized storage system” that looks suspiciously like a junk pile),
there’s a laptop that retired early. Maybe it won’t boot. Maybe it lost the keyboard in a coffee incident.
Maybe it simply got replaced by a shinier rectangle. But if the display panel is still good, you’re sitting on
the most expensive part of many laptopsbasically a high-quality window that’s begging for a second career.
[1]
This guide breaks down how people actually turn a salvaged laptop screen into a portable folding monitor:
what’s realistically involved, what parts matter, what “gotchas” show up on day two (when the novelty fades),
and how to build something that folds shut without turning your screen into modern art.
It’s practical, in-depth, and friendlylike a helpful neighbor who owns a screwdriver set and a sense of humor.
Why Bother? The Case for Screen Upcycling
1) E-waste is a real thing (and screens are too useful to landfill)
Electronics recycling isn’t just a feel-good hobby; it’s a response to a growing waste stream. The U.S. EPA
encourages donating and recycling electronics because devices contain valuable materials and can also include
hazardous substances if mishandled. Even a single laptop kept in use a little longer helps. [1]
2) Extra screen space makes work less annoying
Portable monitors are popular for a reason: they reduce tab-juggling and let you keep “supporting” windows
(chat, notes, timelines, research, music, meeting agendas) off your main screen. People often find that a small
side monitor changes their workflow more than upgrading a laptop CPU ever did. [6]
3) The budget math can be surprisingly friendly
If your panel is free (because it came from a broken laptop), your main cost is a controller kit and an enclosure.
Compared with buying a brand-new portable monitor, the DIY route can be cheaperespecially if you enjoy the build
as much as the result. (If you don’t enjoy building, skip ahead to the “Should you just buy one?” section. No judgment.)
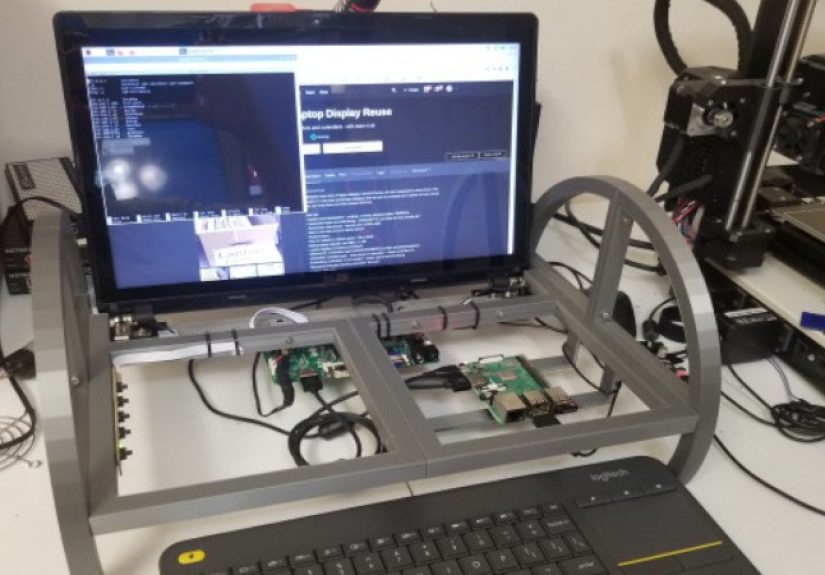
The Big Reality Check: A Laptop Screen Isn’t a Monitor Yet
A laptop display panel is not designed to accept HDMI or USB-C video directly. It’s more like a “raw” component that
expects a specific internal signaling standard (commonly eDP or LVDS) and a particular power/backlight setup.
To turn it into a normal monitor, you need a controller board that speaks “computer video” on one side and “panel language”
on the other. [2]
Think of the controller board as a translator. Your laptop/desktop speaks HDMI/DisplayPort. Your salvaged panel speaks
LVDS/eDP. The controller board is the interpreter who makes sure nobody accidentally orders soup in a hardware store.
[2]
What You Need (Without Turning This Into a Shopping Cart Novel)
-
A working laptop LCD panel (no cracks, no “mystery ink blot” damage, no shattered corners).
The model number label on the back is crucial. [3] -
A matching controller board kit for your exact panel model (or a properly configured universal kit).
This is the make-or-break component. [2] -
Power and video cables appropriate for the controller board (often HDMI/DP/USB-C input varies by board).
Follow the board vendor’s documentation. -
A folding enclosure plan: a clamshell cover, kickstand, or hinge-based frame that protects the panel
when closed and holds it at a usable angle when open. [5] -
Optional but nice: a slim protective front cover, a cable strain relief solution, and a “home”
for the controller board so it doesn’t dangle like a tiny electronic parachutist.
High-Level Build Plan (Safe, Practical, and Not a “Wire This Pin to That Pin” Adventure)
You’ll see many step-by-step tutorials online. They can be helpful, but for safety and reliability, the best approach
is to keep the build modular and follow the controller kit’s official instructions. Your goal is a tidy, repeatable setup:
plug in, power on, display works, and the folding mechanism doesn’t punish you for traveling.
Step 1: Identify your panel like it’s applying for a passport
Flip the panel (carefully) and find the sticker with the panel model number. This isn’t triviacontroller kits are typically
matched to specific panels, and the model number is what sellers and firmware tools use to ensure compatibility.
[3]
Step 2: Figure out the interface family (eDP vs. LVDS)
Many modern laptops use eDP (Embedded DisplayPort), while older systems commonly used LVDS.
These aren’t interchangeable “because they both have a cable.” The signaling is different, and mixing the wrong parts can
lead to a non-working display (or worse, a damaged one). [2]
LVDS is a standardized signaling approach (commonly referenced via TIA/EIA-644), valued for reliable, low-noise transmission.
In practice, what matters to you is that your controller board must match the panel’s interface type and configuration.
[4]
Step 3: Choose a controller kit that’s matchedor properly configured
There are two broad paths makers use:
-
Screen-specific kits that are pre-configured for your exact model. These tend to be the smoothest “plug-and-play”
experience when you provide the correct panel model. [2] -
Universal controller approaches that may require more research and correct configuration/firmware selection.
This can work well, but it’s less forgiving if you’re new. [3]
Step 4: Bench-test before you build the fancy folding enclosure
Before you mount anything, do a simple test setup: connect the panel to the controller kit, connect a video input,
power it per the manufacturer’s instructions, and confirm you get a stable image. If you can’t get a stable picture
on the bench, building a gorgeous folding case just gives you a beautiful box for sadness.
Step 5: Design the “portable folding” form factor
Portable monitors often succeed because they treat protection and support as part of the product:
a travel cover that doubles as a stand, a rigid backplate, and a hinge or kickstand that doesn’t wobble like a baby giraffe.
DIY builds can copy that winning idea. [5]
Step 6: Cable management and strain relief (the unglamorous hero)
A folding monitor repeatedly opens and closes, which means cables get flexed. The smart move is to route cables so they don’t
bend sharply at the connector and to secure them so the connector isn’t taking all the stress. This is where DIY builds either
feel “surprisingly pro” or “like a science fair volcano, but for HDMI.”
Step 7: Configure your computer like it’s meant to have two displays
Once the monitor is stable, set up your OS for how you actually work: extend vs duplicate, preferred scaling, and remembering
window positions. Windows includes specific multiple-display options and troubleshooting steps for external monitors.
[7]
Designing the Folding Monitor: Three Practical Concepts
Option A: Clamshell “book cover” (simple, protective, travel-friendly)
This is the easiest folding concept: a rigid backplate holds the panel, and a front cover folds closed to protect the screen.
When open, that cover can fold into a stand (similar to how many portable monitors ship with a cover-stand).
[5]
Why it works: you protect the screen in a bag, you get a stand without extra parts, and it looks intentional.
Why it fails: flimsy hinges, weak magnets, or a cover that doesn’t hold angle well.
Option B: Kickstand back (fewer moving parts, less hinge drama)
Instead of a folding front cover, use a fixed front frame plus a rear kickstand that flips out. It’s less elegant when traveling,
but it can be sturdier and easier to build. This works especially well if you keep the monitor in a backpack sleeve or hard case.
Option C: “Dual folding” book style (only if you have two panels)
If you happen to have two matching laptop panels, a book-style dual monitor is possible: two panels joined by a central hinge.
It’s heavier, but it creates a portable workstation vibe. This is the “I’m basically running mission control in a coffee shop”
option. Just know you’re doubling complexity and cable management.
Make It Work Like a Normal Monitor (Because That’s the Whole Point)
Windows: extend, remember positions, and troubleshoot fast
Windows offers built-in controls for multiple displays (extend, duplicate, remember window locations, and more).
If your external monitor is detected but not behaving, Windows troubleshooting commonly starts with the Win+P projection
options and display settings. [7]
Docking and “one-cable dreams”
Many commercial portable monitors are designed for quick setups (often USB-C for video + power, depending on the device).
DIY laptop-panel monitors can be close, but the controller board determines what’s possible. If your goal is truly “one cable,”
choose your controller hardware accordinglyor accept a second cable as the price of upcycling glory.
Common Problems (and the Calm Ways People Solve Them)
Problem: “It powers on, but the screen is black”
In DIY builds, a black screen often comes down to mismatched controller/panel compatibility, incorrect configuration, or backlight
control issues. This is why panel model identification and a matched kit matter so much. [2]
Problem: “Wrong resolution or weird scaling”
Operating systems may default to scaling that makes text too big or too tiny. Adjust display scaling and resolution in your OS settings.
Microsoft’s display guidance includes typical steps for multi-monitor setup and behavior. [7]
Problem: “It works… until I move it”
Portable builds fail under motion when cables are stressed, connectors wiggle, or the controller board isn’t secured. Strain relief and
a stable mount for the controller board aren’t “nice to have”they’re what makes “portable” possible.
Safety and Responsibility (Short, Serious, and Worth Reading)
If you’re salvaging a panel from a laptop, treat it like a repair job: power down, disconnect power sources, and follow reputable repair
guidance. Some repair guides explicitly remind you to disable/disconnect internal batteries before display work, which is there for a reason.
[8]
Also: older display systems may involve different backlight approaches, and not all components are equally beginner-friendly.
If something feels out of your comfort zone, it’s okay to stop and ask a knowledgeable adult or technician for help.
Finally, if your panel isn’t usable (cracked, damaged, or unreliable), recycle responsibly. Investigations and reporting have highlighted
that some e-waste can be exported and handled unsafely overseas, which is exactly what responsible recycling is supposed to prevent.
Use reputable programs and certified recyclers when possible. [9]
Should You DIY or Just Buy a Portable Monitor?
Buying a portable monitor is the “it just works” path. Review sites regularly test portable monitors and rank options by use case (office,
travel, gaming, USB-C convenience). If you need something immediately reliable for school or work, buying can make sense.
[10]
DIY is for you if:
- You enjoy building and tinkering (or want to learn with supervision and safe practices).
- You have a known-good panel and like the idea of saving it from the scrap pile.
- You want a custom form factor (folding cover, specific size, vertical orientation, etc.).
Buying is for you if:
- You need guaranteed compatibility and warranty support.
- You care about ultra-thin design, speakers, and polished “one-cable” convenience.
- You don’t want to spend time hunting for the right controller kit and building a case.
Conclusion: A Screen’s Second Life Can Be Better Than Its First
Recycling a laptop screen into a portable folding monitor is one of those projects that feels like wizardry the first time it works.
The trick isn’t magicit’s matching the panel to the right controller board, testing early, and treating the enclosure like a product
(protect the panel, manage the cables, build a stand that doesn’t wobble).
Done well, you get a genuinely useful travel monitor, you reduce waste, and you gain the power to look at a “broken” laptop and think,
“Not broken. Just… modular.” [1]
Experiences: What It’s Like Living With a DIY Folding Monitor (The 500-Word Reality Check)
Makers often describe the first successful power-on as a mini celebration: the panel lights up, your computer recognizes a second display,
and suddenly that “dead” laptop becomes a productivity sidekick. The second emotion, surprisingly, is usually reliefbecause the hardest
part of the project isn’t the hinge or the case. It’s compatibility. Once people learn that a laptop panel can’t accept HDMI on its own,
the controller board becomes the star of the show, and “panel model number” becomes sacred vocabulary. [2]
After the honeymoon phase, the day-to-day experience comes down to ergonomics. A DIY folding monitor that doesn’t hold its angle will
annoy you every single time you use it. That’s why many people end up copying the logic of commercial portable displays: a cover that
doubles as a stand, or a kickstand with a stable footprint. People who nail this part report using the screen far more oftenbecause setup
feels effortless instead of fussy. A good stand is the difference between “cool project” and “daily driver.” [5]
Another common learning is that portability isn’t just weightit’s durability. DIY screens are frequently thinner and more fragile than
store-bought portable monitors because you’re working with a bare panel. Builders who travel with their DIY monitor typically add a rigid
front cover or store it in a sleeve that prevents pressure on the panel surface. The “folding” mechanism becomes a protective habit:
close it before you toss it in a bag, don’t let cables dangle, and avoid tight bends at the connector. When those habits stick, people
report the DIY monitor surviving travel surprisingly well. When they don’t, the first casualty is often the connector area or a cable that
starts behaving like it’s on its last nerve.
On the software side, the experience tends to get better over time. At first, users fumble with extend vs duplicate, scaling, and window
placement. Then they discover the settings that fit their workflowlike keeping chat windows on the side display, using the extra panel
for research, or treating it as “digital scratch paper.” Many users report that the small side screen is perfect for things that don’t
deserve the full glory of the main display but still need to be visible (messages, checklists, calendars, references). That’s consistent
with why portable monitors have become a popular upgrade in general. [6]
The most honest long-term takeaway from DIY builders is this: the value isn’t only saving money. It’s also the confidence you gain.
Once you’ve successfully repurposed a laptop panel, you start seeing electronics differently. “Broken” becomes “parts.” Upgrading becomes
“reuse.” And the next time you see a discarded laptop, you don’t just see a dead deviceyou see a potential monitor, a project, or at the
very least, a chance to recycle responsibly instead of contributing to the e-waste problem. [9]